


Exterior

As enthusiasts, when we build our cars, we tend to stuff as much tire under those cars as possible. This is especially important for rear tires that hook the car to the ground while improving its stance. For those interested in drag-racing their cars, you will need to accommodate larger rear tires or slicks. The current hot trend is the 10.5-inch slick, which seems to work well on many applications, but depending on the make and model of your car, it may require modifications to enlarge the rear wheel openings to accommodate the larger rubber.

This is an easy-to-apply product that was designed to prevent dulling and oxidation of aluminum, retaining the polished brightness and luster.

Spraying flake isn’t a black art; it’s simply a slightly different medium. It’s no tougher to spray than anything else, although you do have to be meticulous, pay attention to the details and resist the urge to rush. Plus, unless you have a spray booth, it doesn’t matter how well you seal off your chosen spraying area: This stuff will escape and get everywhere.

We recently had the opportunity to work on a Levi’s Edition AMC Jeep Renegade—a unique piece of off-road history that has undoubtedly seen its fair share of adventures. The exterior still boasts its original paint, complete with bumps, scrapes, and surface rust that showcase the character that comes with many years of use and enjoyment. Rather than opting for a fresh new repaint, our mission was to preserve its tough, battle-worn patina while adding protection and a nice polished matte finish to show it some love. We wanted to enhance its character, highlighting its scars instead of hiding them, and, with the assistance of Sweet Patina’s products, we accomplished this beautifully. This Jeep didn’t spend its life tucked away in a garage; its paint tells a story, with each scratch, chip, and faded patch serving as a badge of honor. We felt that applying a shiny new paint job would be a disservice to this classic Renegade.

“Rust can put fear into the hearts of many hot rodders, but with enough work, nearly anything can be repaired.“

The Time-Worn Look Is More Popular Than Ever Author Defining Patina in Street Rods Patina is defined as “a pleasing surface sheen on something that develops with age or frequent handling.” When that definition is applied to street rods, a patina rod can take on any number of variations. The exterior can be close to original, with age showing through the painted surface in the form of primer. Sometimes the faint appearance of rust can also classify a rod as having patina, provided the rust has not taken over the entire car. Many times these patina rods are built from those treasured “barn finds” that seem to be discovered by undaunted rodders scouring the country searching for the Holy Grail of hot rods. The Art and Trend of Patina One of the modern trends of the street rodding hobby has been to create that cherished patina look. The art of patina can be tricky. We have seen patina rods crafted in such a fashion that the naked eye cannot tell the difference between real and invented, the real old and the fabricated old. The Appeal of Patina Rods As with all aspects of rodding, each of us has a different definition of what makes a patina rod. There does seem to be one theme that runs through each variation, though: the owners have a lot of fun with their cars. For some, it is a chance to get back to the basics. For others, it is a chance to reverse the high-end trophy-hound trend.

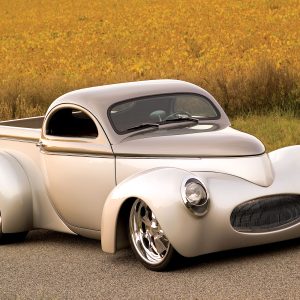
Traditional hot rods are all the rage, and while it’s a great experience to run across a true barn-find hot rod, some folks would rather make their own with the perfect blend of colors, textures and just the right amount of sanding. It’s definitely a way to grab attention, as these so-called beaters steal the show from some of the finest rods around, but there’s no doubt lots of time and money is spent to obtain this look.

There are many ways to finish the bottom of any car. Whether you are building new, from the ground up or even detailing a rebuild that is not the off-the-frame type, you have options. And regardless of the extent of the refurbishing, you could even leave the underside in some shade of primer as it is easy to touch up, and the fenderwells and underside often become marked with use.

For many of us, the culmination of money and time spent on our street rods comes through experiences with our friends, whether it’s at the corner drive-in on the weekend or at a national event with thousands of people. It’s there we can share stories, laughs and the fruits of our labors, namely, the cars that bring us together in celebration of history, creativity and realized possibilities.

When news of the Show Car Buildoff began circulating, the team at DuPont Hot Hues saw it as an excellent opportunity to not only become involved, but also to provide a sound platform to help all of us better understand what is involved in painting a car. The color selection is a process in and of itself, but having a better understanding of the characteristics of the materials used, how to use them and what is involved in using them is helpful as well.
