The Easy Way To Paint Your Engine Compartment
Photos by Chris Rigs
We learned that Underground Motorsports in Little Rock, Arkansas, was going to build one fast daily driver, so we thought we’d take a peek and drop some knowledge for you. We were looking for any tech procedures that may illustrate for readers how a car of this sort is built from scratch.
 Underground chose the very popular ’98 240SX (aka Silvia in Japan). For starters, modification plans called for an RB26DETT Skyline GTR “Godzilla” motor swap, an extra dose of NX and complete interior and exterior makeovers. That’s a lot to get our arms around, so we’ll tune into the guys at Underground from time to time to check on the progress of their nifty plans. But first…
When the 240SX was originally introduced domestically, it was marketed more toward women. This marketing scheme didn’t really give enthusiasts a legitimate idea about the performance aspects that the car had to offer. In Japan, the 240SX/Silvia was a major hit with consumers. Powered by a 205hp S13 SR20DET motor and featuring a near fifty-fifty weight ratio, it was a perfect candidate for an all-out track/drift car.
American customers weren’t quite as fortunate, as we got stuck with a torque-happy 155hp truck motor. The car eventually was pulled from the U.S. market in 1998 after declining sales. It wasn’t long after this that the U.S. import scene began to recognize the potential of the 240SX and began doing SR20DET motor swaps. Today this package is all the rage.
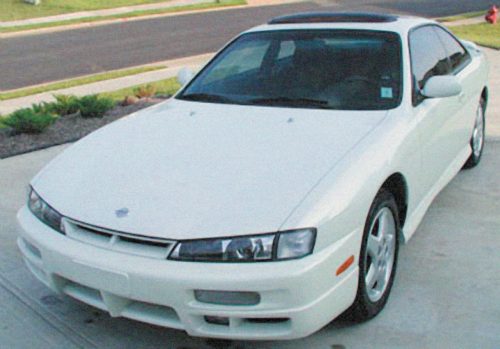 Underground wanted to take the 240SX a step further, so it chose to install the very-popular Skyline motor. The company is the East Coast distributor of the McKinney Motorsports RB25DET/ RB26DETT install kits, which make the Skyline swaps as simple as that for the SR20DETs. (Look for a complete RB26DETT Swap Guide in an upcoming issue of HCI.) The RB26DETT motor was the main choice because of its all-out gut-wrenching power potential and its ease of modification.
However, before any engine swap can take place, routine housekeeping must be done, as well as painting the engine compartment. Here we are going to take you through this initial step.
How many times have you seen a car that has over $20,000 invested in the engine and a $1,000 paint job? For many of us, a killer paint job is the number one thing we stress about when building a new project car. What’s the point of having a nice ride if the car has big dents in the body and mismatched color fenders? This article is for car enthusiasts who wonder what it takes to paint the engine bay of a show or race car.
Painting a car is something anyone can do with some basic knowledge about the procedure. While the process is not mechanically challenging, understanding the science of temperature, humidity and other climate conditions is what separates decent painters from the great ones.
“To be honest, I really thought that painting a car was somewhat of a joke,” admitted Underground’s Chris Rigs. “I mean, I’m a car guy and I can fix anything, right? Gimme 10 cans of spray paint and I can paint the world!”
Well get ready, Rigs, because you have no idea what you are getting yourself into.
First of all, we highly recommend removing your engine and body panels before attempting to paint the engine bay. Not only does it make the process much simpler, but it will also enable you to have the show car look by attending to details that you might not be able to get to with the engine installed.
While there are many methods of engine/transmission removal, we’ll show you our favorite for the 240SX chassis. First, it’s critical to roll down the windows and unlock the doors. Then remove the battery and windshield fluid dispenser from underneath the hood. (The FMIC will go through the windshield fluid dispenser when installed.) The next step is to disconnect all of the hoses and fluid lines. The radiator hoses can take some extra time, but make sure that those are also removed completely.
From this point, you will need to disconnect all the pieces of the wiring harness, which is attached to the motor and various parts of the engine compartment. Once all hoses and pieces that are attached to the motor have been disconnected and removed, it is time to drain all fluids and then disconnect the transmission. (You will also need to remove the driveshaft for the RB26DETT installation.)

The driveshaft plays the role of a seal for the transmission output, so before transmission removal begins, don’t forget to drain the transmission fluid. Failing to do this simple procedure will result in a nightmarish fluid spill. Once the transmission has been disconnected, you can proceed to loosen the engine from the motor mounts. Now you have a decision to make: you can either remove the engine from the top or the bottom. We chose to go through the top and use our trusty cherry picker to remove the motor.
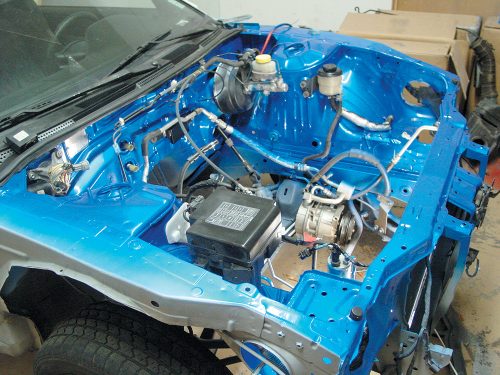
Once the motor was removed, we prepared the engine bay for the painting process. You will need to begin by removing all of the pieces in the engine bay, including hoses, wires, wiring harness and so on. If you prefer, you can leave the brake lines, brake hardware and air conditioning lines intact, but everything else should be removed or repositioned to the bottom of the engine compartment.


(If you are doing an RB swap and are having Underground Motorsports perform the wiring service, you will need to remove the wiring harness. With the 240SX, this is a two-person job. Disconnect the wiring harness from the ECU and then have one person positioned inside the car and one person outside by the engine bay, tugging back and forth. You will actually have to break a little piece inside of the dash that holds the wiring harness in place for it to feed through. This will require some time to complete, as the hole is very tight.)
The next step requires some heavy-duty cleaning and detailing of the engine bay. We used a pressure washer to remove the first layer of grime, but a steam cleaner could also be used. House of Kolor suggests using Simple Green degreaser or any other powerful engine degreaser to remove the layers of oil and contaminants. After spraying the bay with the Simple Green degreaser, most of the surface grime was gone. At this point, you will need some soap to remove the excess oil from the engine bay. This step is crucial—the paint won’t stick if there is any oil left in the engine bay!
After it’s clear of residue, begin scuffing the engine bay with a scuff pad to prepare it for primer. We suggest using a 3M Auto-Pak Automotive Paint and Body Scuff Pad. Don’t go light on this step. Spend an ample amount of time making sure the engine is completely scuffed up or the primer will not stick.
Now is also a good time to cover the windshield and wrap all remaining hoses, fuel and brake lines with aluminum foil and masking tape to prevent paint from being sprayed on them. Make sure to thoroughly cover up anywhere that you don’t want paint!
After scuffing the engine bay, Underground went over the entire compartment with a 3M Auto-Pak Tack Cloth. This sticky cloth removes the residue left behind from the scuffing process and it must be done to prepare the engine bay for primer.
Now, follow these next few steps carefully or you will probably find yourself having to go back to step one. A paint gun and air compressor will be needed to complete the painting of our engine compartment. If you don’t have one, check with a rental company. We suggest getting at least a 25-gallon compressor with 125psi capability or you will have to wait every five or 10 minutes for the compressor to fill back up with air. This could lead to runny paint or mismatched color if only half of the engine bay is done while you are waiting for the compressor to fill up.

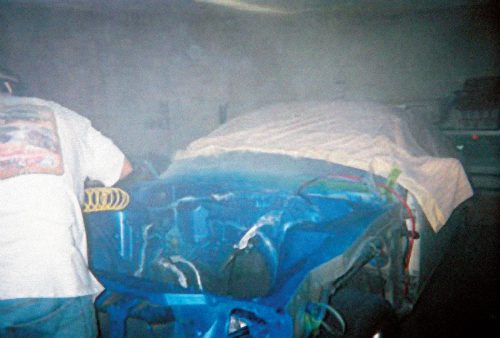


The engine compartment is now ready to have the House of Kolor Adhere-to AP-01 applied. This Adhereto will help the primer stick to the engine bay. Double-check one last time to make sure all hoses and engine pieces are properly covered. House of Kolor recommends applying one medium coat of Adhereto with a dry film thickness over the entire engine bay. Let the Adhereto dry for four to five minutes and then prepare for the primer process.
The next three phases are the most gratifying since you will see the project come together, but they require close attention to detail so that everything comes out flawlessly. In order to spray primer onto the engine bay, it must first be mixed with House of Kolor KU-150 Catalyst and RU-311 Medium Dry Reducer. The ratio is 4:1 for both the Catalyst and Reducer. Mix the ingredients in a painter’s prep mixing cup, as it will help you measure the ratios more easily. We suggest three to four coats of primer to ensure that the engine bay is sealed and ready for the basecoat. Let the primer dry for no more than 24 hours before applying the basecoat.
Once the primer is dry, you can apply the basecoat. While the Kandys and Kameleons are fun to look at, they are not so fun to repaint. Since we are planning on doing more than just entering the car in a show, we needed a paint that was durable and easy to match if we had to repaint a body piece or touch up the engine compartment. House of Kolor recommended we go with its PBC (Designer Pearl basecoat) line.
If you want that candy look without the hassle and worries, you don’t need to look any further. We wanted a color that wasn’t too dark to be photographed for publication, yet would also get us plenty of attention. We decided to go with the House of Kolor PBC-36 TruBlue Pearl, one of the hottest colors in the import scene. This deep, medium blue looks just like a Kandy when clearcoated and it has a deep finish.
The Pearl basecoat must be mixed with RU-311 Medium Reducer in a 2:1 ratio before it is applied. We applied four coats, but the choice is up to you. There is no right or wrong here. You can spray as much base color as you would like until you get the color looking exactly how you want. Once the last layer of basecoat has been applied, let the engine bay dry for 15 to 20 minutes and then prepare for clearcoat.
(Note: While working on the engine compartment, always remember to protect yourself by wearing a mask. There will be a lot of fumes in the air and you want to make sure that you are covered up at all times.)
The final process is applying the clearcoat. Not only does clearcoat seal the deal, it is the step that gives you the rewarding, shiny finish that we all covet. Many painters have the idea that the more clearcoat, the better. We tend to agree with this philosophy and spared no expense on this final step. We went with House of Kolor’s UC-35 Kosmic Klear.
Before the clear could be sprayed, it had to be mixed with RU-311 Reducer and KU-150 Catalyst in a 1:2 ratio. Once again, the option is up to you on the amount of clearcoat you choose to apply. We went with five coats of clear, but it is not uncommon for show cars to apply more.


When the last layer of clearcoat has been applied, let the car sit for 24 hours. Be careful not to let anything come in contact with the engine compartment or you will have permanent spots. At this point, you can sit back and look in awe at your work of art. Isn’t she a beauty?

Article Sources
House of Kolor
1-800-844-3691
4440 Warrensville Center Rd. Warrensville Hts., OH 44128 Email: info@houseofkolor.com