


ALL FOR FUN
George Poteet is not the kind of guy who does things halfway. He likes to jump into a project with both feet and with his eyes wide open. Such has been the case over the many years he has been building street rods and customs. His street rods have been trendsetters. Most of you are familiar with the Sniper, an unbelievable Viper-powered ’50s Plymouth built by Rad Rods by Troy. More recently, his ultra-traditional black Deuce five-window built by David Lane renewed interest in building more traditional rods. It is no surprise that when Poteet decided he would like to run a car at the Bonneville Salt Flats, he would do it in a big way.

TALE OF TWO DEUCES
Hardcore rodders have a history of searching for vintage tin, even though the number of old cars (and trucks) sitting behind barn doors, in fields, under tarps and alongside garages has dwindled as interest has increased. This steady decline of available vintage steel is the very reason why so many businesses presently produce fiberglass and steel reproduction bodies and body parts.

HIDDEN HORSEPOWER WITH E85 FUEL
Advanced Fuel Dynamics has developed kits for many makes and models, and our focus today is installing a PROFLEX DX Adaptive Flex Fuel System on a 2022 Ford Mustang GT Premium.


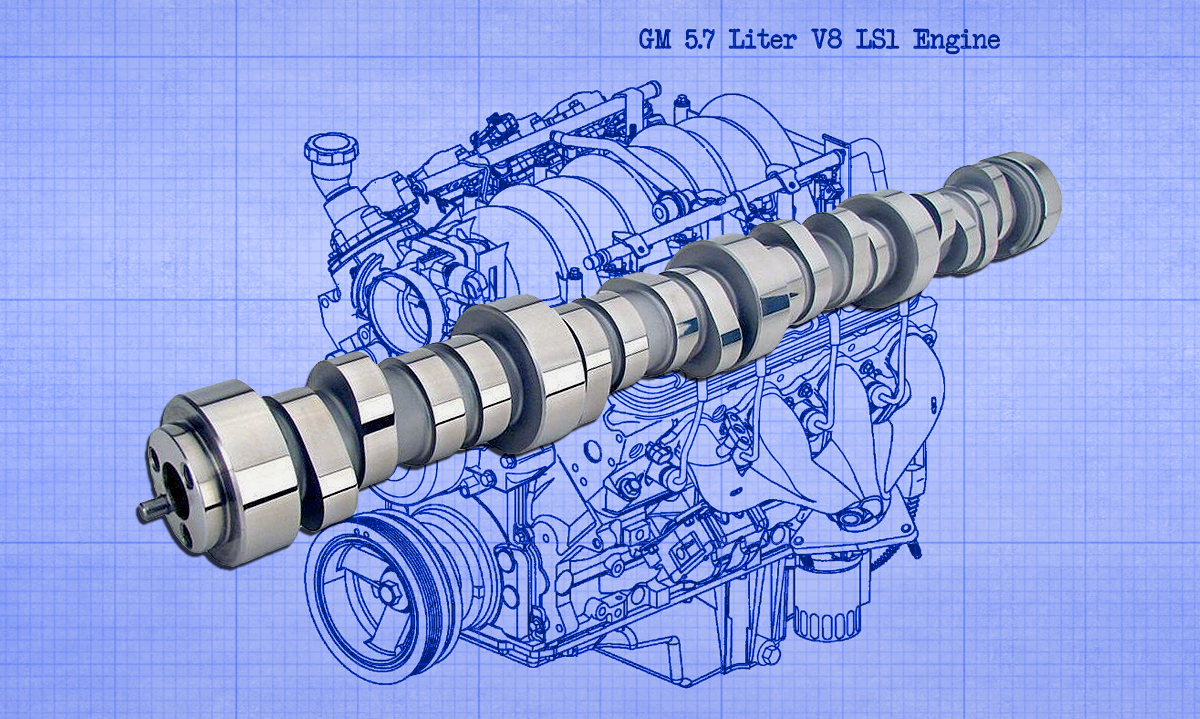
The Modern LS1 Dyno Performance
Run on the dyno, the modern LS1 would easily out-power even the 370hp LT1 offered in the ’70 Corvette, to say nothing of the more powerful LS6 version. Both LS1-based engines would not only out-power the earlier engines but would do so with improved fuel mileage and reduced emissions. While the last 30 to 40 years have improved the small block, it is nice to know that they still respond to the right cam profile to the tune of 35 to 50 hp.
Testing the New Cam at Westech Dyno Facility
To find out just how well the new LS1 engines respond to a cam change, we ventured over to the Westech dyno facility, where the wrenches started to fly. The idea was to dyno-run an LS1 equipped with a stock cam and then, with the engine still on the dyno, swap in a new Comp performance-grind camshaft. The LS1 test mule came straight out of the GM Performance Parts catalog. Designated PN 25534322, the GMPP engine assembly included a complete F-body LS1 engine rated at 320 hp and 330 lb-ft of torque.
Preparing the LS1 for Dyno Testing
The LS1 assembly also included a complete street rod wiring harness and pre-programmed ECU designed to allow installation of the engine into any pre-’76 vehicle equipped with a 4L60E automatic overdrive transmission. For our needs, the harness allowed us to run the engine on the engine dyno by hooking up a few 12-volt and ground wires to the dyno along with the various sensors and harness plugs. Everything was well labeled, making the hookup pretty straightforward.
The Benefits of an Engine Dyno Setup
Running the LS1 on the engine dyno rather than in the car on a chassis dyno made swapping the cams much easier and less time-consuming. Another big part of our time reduction was the fact that our test engine was not equipped with any accessories (A/C, power steering, alternator, etc.). We installed a Meziere electric water pump that allowed removal of the entire serpentine system, along with all the unnecessary accessories.
Initial Testing with Stock Setup
The increase in baseline power over the rated power output of 320 hp, achieved during initial testing, can be attributed to the fact that we ran the engine sans accessories, with long-tube Hooker headers, and a free-flowing air-intake system, rather than all of the factory LS1 hardware. The crate motor rating came from the factory LS1 combination equipped with all accessories and a complete intake and exhaust system, including the catalytic converters.
Setting Up the Engine for Cam Installation
After a few back-up runs to verify the power curve, we tore into the LS1 for its very first cam change. The test engine was fresh from the crate, so we were sure to break it in properly before subjecting it to the rigors of the dyno.
Cam Removal and Installation Process
With the stock cam removed, we installed the Comp Cams Xtreme RPM XR265HR (PN 54-412-11). Comp also offers Xtreme RPM High Lift and Xtreme XE-R profiles. The dual-pattern XR265HR cam offers 0.522 intake lift and 0.529 exhaust lift.
 Checking and Adjusting for Valve Clearance
Using air pressure in the cylinder (from a leak-down tester) kept the valves in place while compressing each spring. Compressing the springs allowed removal of the keepers, retainers, and finally the stock springs themselves. Before installing the new Comp beehive springs (PN 26918-16), we installed a set of soft checker springs to check piston-to-valve clearance with the new cam.
Dyno Results with Comp Cams XR265HR
After finishing up the valve covers, coil packs, and hooking up the various sensor plugs and vacuum lines, we allowed the engine time to acquaint itself with the new cam. The idle quality was still very good with the new cam, something we expected given the relatively short 212/218 duration and minor lift increase.
Power Gains and Performance Improvements
While only slightly larger than the stock LS1 cam, the new Comp profile really made itself known in the power department, upping the peak power from 405 hp at 5,500 rpm to 438 hp at 5,900 rpm. The result here is that the new Comp LS1 cam not only upped the peak torque from 408 lb-ft to 426 lb-ft, but it also increased the torque curve across the rev range.
Summary of the Comp Cams LS1 Performance Gains
Couple this with a net gain of 33 hp, and all for a very simple cam swap, and you could say life is good above 400 hp.


