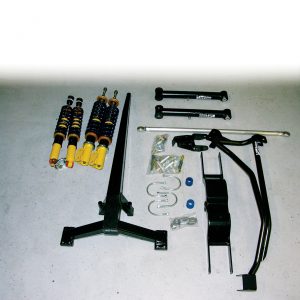
THE AUTO BUILDER
Featured

Lost & Found
There are many reasons why the icon cars have achieved the lofty status they now enjoy, but one of the more obvious reasons is the simple fact that they were finished. Their existence and subsequent high-level exposure have inspired many a young lad to undertake similar projects, and for every famous car built in the early years, probably two others were started in an attempt to either copy or outdo it, but they never saw the light of day.

Whipple Supercharger Install
Ok, so you have your quarter-million dollar boat with twin 500 EFI Mercruiser engines for a total horsepower of just under 1000, but that just isn’t enough. What do you do? Well… there is one relatively easy way to dramatically increase horsepower, that’s right—a supercharger. On top of the power increase you get that cool unmistakable whine that will cause any wrench head to notice. This particular install is a stage 3 Whipple supercharger which will add approximately 240 hp per engine; in essence, we are adding a third engine.

FALKEN TIRE DRIFT SHOWOFF
THE FALKEN Tire Drift Showoff was a hit, to say the least. The event was held at Irwindale Motor Speedway on a beautiful, sunny afternoon. Thousands of people attended, which goes to show the outstanding marketing job that Falken Tire is doing to help make a difference in the tuner car movement. The company took it upon itself to give us a taste of what the Japanese market has been enjoying for so many years. Among the thousands of spectators, a healthy number of show cars showed up as well—and why wouldn’t they? This was an Import Showoff event, but this car show was a bit different from the norm. It was a JDM versus DTM show. In other words, Japanese against Euro. The cars that came out were very hot, with enough JDM and DTM on hand to kill you. All the heavy hitters and the big crews such as Team Hybrid, Flux, Tuningwerks Competition and Art-N-Motion came out to show their stuff. While this was a huge attraction, it was far from the main one.
Spotlighter
POPULAR READS
-
Product Spotlight: Bill Mitchell Products Aluminum LS Engine Block
-
PRODUCT SPOTLIGHT: 60-66 Chevy C10 Fresh Air Vent Block Off Plate
-
Product Spotlight: Pyramid Optimized Design Sequential Aurora Taillight for 1964½–1966 Mustang
-
PRODUCT SPOTLIGHT: Cam Covers for GEN/3 Coyote from Pyramid Optimized Design
Electrified
Installing Electric-Life's Power Window Kit
Author
Robert Benner
Photography by Chris Fesler
If you are like many of us who have at one time or another opted for a less expensive vehicle to build, then this how-to will be of interest to you. At the cost of certain features or creature comfort conveniences mundane items like power windows and locks we often begin with what may be considered a strippo model or a basic transportation car that is … well, available. These cars can, after all, make for a great foundation that can easily be personalized, just like we are doing here.
If you are unfortunate enough to own such a vehicle like the Civic DX, which never offered power windows then the thought of adding them has no doubt crossed your mind. The notion that power windows would make your vehicle just a little bit nicer is a sound one and that is where an Electric-Life power window kit comes into play.
Electric-Life offers several different types of electric window kits, along with a full range of accessories for just these types of cars. And how about this little-known fact: Electric-Life power window systems are standard equipment on all Ferraris. So, with a set, you could say that you have the same!
In addition to the typical universal-style power window kits, Electric-Life manufactures a large number of vehicle-specific kits that completely replace the manual window regulator and can also be used to replace a faulty OEM power window regulator. In our case, for the Õ00 Honda Civic, Electric-Life builds a complete, custom-fit, bolt-in window kit. Along with the window kit, a complete switch kit and wiring harness were also obtained from Electric-Life.
To do the job right and to get the lowdown for this how-to, we took the car and the kit down to Unique Car Audio in Gilbert, Arizona, to document the installation. Check out the following photos and see if you feel this is something you can do in your backyard to add a bit of convenience to your ride.
Another thing: when customizing the interior of your car, it is often easier to replace the existing window mechanisms and include a power set for that custom touch. Either way, this is an inexpensive way to add a bit of class to that tuner car of yours.
1. Here is the door before we started with the power conversion. Soon the manual crank will be gone and the pure convenience of power will take its place.
2. Before the door panel could be removed, the door pull was unscrewed and removed from the door.
3. The panel behind the door handle needed to be removed as well.
4. The clip that secures the window crank was removed and discarded.
5. Finally, the speaker grille was removed, as well as the screws that secure the door panel behind it.
6. The door panel was removed by pulling it away at the bottom and lifting up to clear the inner door panel structure.
7. Here you can see the factory manual window regulator and the four bolts that secure it to the door.
8. The four bolts around the crank were removed, along with two bolts that secured the bottom of the regulator to the door.
9. A pair of bolts secures the window glass to the regulator. Both of these were removed and the glass lifted up.
10. A few strips of masking tape hold the window in its up position so it will not interfere with the removal and installation of the window regulators.
11. With everything disconnected, the manual window regulator was removed through the large hole in the door and set aside.
12. Here you can see the Electric-Life electric regulator (bottom) and manual regulator (top).
13. Before installing the new electric window regulator, the wiring was plugged into the motor, as it is difficult to access once the regulator is in the door. (Trust us!)
14. The new regulator is simply fit into the door through the same hole that the manual regulator was removed from.
15. The new unit was test-fit before bolting on the screws.
16A,B. Using factory holes and the included hardware, the power regulator was secured to the door.
17. Next, the window was dropped back into position and secured to the regulator using the factory hardware.
18. Since our switches were going to be mounted in the center console, only two wires were run into each door. These wires were connected to the leads coming from the window motors.
19. To supply power to the system, the wiring harness was tapped into the ignition wiring beneath the dashboard.
20. The ground wire was secured to the metal chassis of the Honda, also beneath the dash.
21. With the wiring connections completed, the lower dash panel was reinstalled and all wiring was run through the center console.
22. The loose ends of the wiring were run up through the factory opening in the center console and through the Electric-Life switch plate.
23. Quick disconnects were added to the switch wiring to allow them to be removed in the future, if needed.
24. The switches were plugged into the wiring, making sure to test the polarity of the motors to see if it was correct.
25. With the wiring connected, the switches were snapped into place.
26. The finished switches fit perfectly into the blank spots in the Honda center console.
27. With the window crank removed, the opening in the door panel was filled with fiberglass and the panel was re-covered with matching suede.
ARTICLE SOURCES
Electric-Life Inc.
5990 Northwest Hwy.
Chicago, IL 60631
800/548-2168
Unique Car Audio
1720 W. Elliot Rd., Ste. C
Gilbert, AZ 85233
480/926-1448


