
Edit Template
THE AUTO BUILDER
Menu
Featured


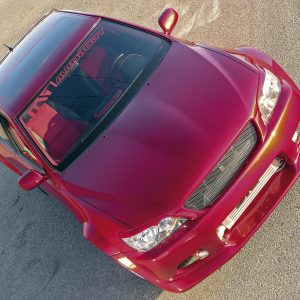
CANDY LEXUS
The Lexus IS300 is not only stylish in its outside appearance, but because of its acceptance as a true sports sedan by most tuner enthusiasts, it’s a desirable starting base for creating a potent street performer. This RWD Lexus is factory-fitted with the rugged 2JZ-GE 3.0L DOHC inline V-6 engine, as used in Toyota Supra models in past years and updated with VVT-i Variable Valve Timing. It also features double wishbone front and rear suspension systems, as equipped from the Toyota factory. A limited-slip differential option helps put the power to the ground, and the edgy Lexus body produces an impressive 0.29 coefficient of drag. This is definitely a slippery package with both good looks and ample performance.
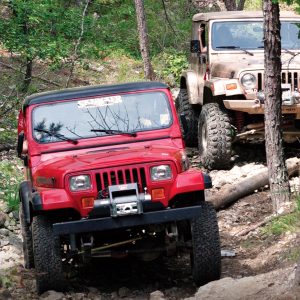
Jeepin’…
From its necessary beginnings in World War II to today, Jeep has developed into an American Icon. Jeep has become a symbol of independence and liberty for the whole world to see. It’s been abused, pampered and even celebrated, but to those who love them it’s still just a Jeep… for better or for worst.

MANDY: Honda Integra Type-R build
Things have been changing, especially with the types of cars being built and showcased. Instead of industry-backed projects, these are cars put together by everyday enthusiasts. Erick Dickerson is one of those people. You might call him a collector—he owns nearly every model of Honda or Acura from the recent generation. With a garage full of Civics, an S2000, several Integras, and even an NSX, Dickerson may not exactly be your average guy—but his biggest decision each morning isn’t what to wear, it’s what to drive.


Spotlighter
POPULAR READS
-
Product Spotlight: Bill Mitchell Products Aluminum LS Engine Block
-
PRODUCT SPOTLIGHT: 60-66 Chevy C10 Fresh Air Vent Block Off Plate
-
Product Spotlight: Pyramid Optimized Design Sequential Aurora Taillight for 1964½–1966 Mustang
-
PRODUCT SPOTLIGHT: Cam Covers for GEN/3 Coyote from Pyramid Optimized Design
CIMTEX RODS SUPER CAMEO: PART 8
Twin Powerdyne BD-11A Supercharger System Mockup and Installation
In part seven of our Cimtex Rods Super Cameo Buildup series, we covered the installation of our Stainless Works four-tube ZR1 headers and Cimtex Rods-fabricated 3-inch custom exhaust system, as well as the fabrication and installation of our Cimtex Rods-constructed 22-gallon fuel tank and the accompanying MagnaFuel fuel system.
Now we’re going to cover the mockup of our Powerdyne BD-11A SilentDrive twin supercharger system. But first let’s digress and take a look at the big picture.
One of the key criterion in our Cimtex Rods Super Cameo buildup was to elicit that all-important “wow” factor throughout the entire series. When it came to the engine, we didn’t want to install just any old run-of-the-mill, multi-carbureted GM small or big block, much less a late-model GM crate engine straight out of the catalog. Going in we figured that the Cimtex Super Cameo powerplant should be something special.
The engines considered ran the gamut from a blown 426 Hemi to a Pro Stock-type Arias Hemi Chevrolet. However, the phenomenal cost of building either engine (at $25,000 plus) eventually ruled them out, and we also wanted this ride to be practical as a driver. At that point, Tim and Darrell Cimbanin came across an excellent deal on a 1996 Corvette ZR1 dyno engine originally used on the Mercury Marine “Wet Vette” project. In fact, the deal was so sweet that the seller prohibited us from publishing the actual sales price.
So now, with something affordable, albeit exotic, installed between our Super Cameo’s highly modified 1956 Chevrolet half-ton framerails, Tim and Darrell had to make the decision whether to leave the ZR1 stock and simply polish the heck out of it, or go a little more exotic by installing a turbocharger or supercharger.
Of course, the first thing Team Cimtex did was check on the availability of an aftermarket supercharger and turbocharger kit for the Corvette ZR1 engine, and they came up with a big, fat zero! Suffice it to say that whatever aftermarket power adder they might enlist would require scratch building to their own specifications.
“Early on, we decided that since this is a show truck, we didn’t want to run anything that would produce excessive heat buildup in the engine compartment, so that pretty much ruled out a turbocharger,” commented Darrell Cimbanin. “Space availability was likewise a prime consideration. We’ve already set the engine back within the chassis a total of 6 inches in order to provide adequate room for our custom-built Be Cool four-core aluminum radiator and twin electric fan setup. Clearing the Flat Out Engineering front crossmember and Corvette C4 rack-and-pinion steering assembly was yet another design challenge.”
Initially the Cimbanins considered using either a Kenne-Bell twin-screw or Eaton-Magnuson Roots-type street supercharger. However, in order to do the job right both required a custom-fabricated intake manifold, a costly proposition at best, not to mention that the job also required an entirely new fuel system, which meant messing with the ZR1’s tricky engine electronics—something neither Darrell nor Tim really wanted to do.
The next candidate was a centrifugal supercharger such as a Paxton, Vortech, ATI Pro Charger or Powerdyne, as all of these units are lightweight, compact and make plenty of horsepower. Furthermore, all of these blowers are available in either standard or reverse rotation, allowing them to be placed virtually anywhere at the front of the engine.
Ultimately, the Cimbanins settled on Powerdyne Automotive Products’ self-contained, self-lubricating, BD-11A SilentDrive supercharger equipped with a space-age ceramic ball-bearing drive.
“We didn’t want to tap into the ZR1’s crankcase for lubrication, so the self-lubricating Powerdyne BD-11A proved the most logical choice. With the stock 3-1/4-inch pulley, these blowers are capable of safely producing six psi. With such a conservative boost rating, we also didn’t have to worry about changing the compression ratio of the engine.”
Due to space limitations, it was quickly determined that a reverse-rotation Powerdyne BD-11A centrifugal-drive supercharger was required. However, no matter where the Cimbanins attempted to place the BD-11A, the engine looked lopsided. So Tim and Darrell reasoned that if one Powerdyne BD-11A was good, then two would look even better. The Cimbanins contacted Powerdyne and arranged to have yet a second BD-11A RR core shipped down to their Jarrell, Texas, shop for prototyping.
“Initially we had intended on placing these blowers to the front of each rocker cover, off to the right and left side of the power steering pump and the alternator. But that took up a considerable amount of space and looked ungainly. There was also the question of how to successfully route the supercharger ducting around our custom-designed Be Cool radiator.”
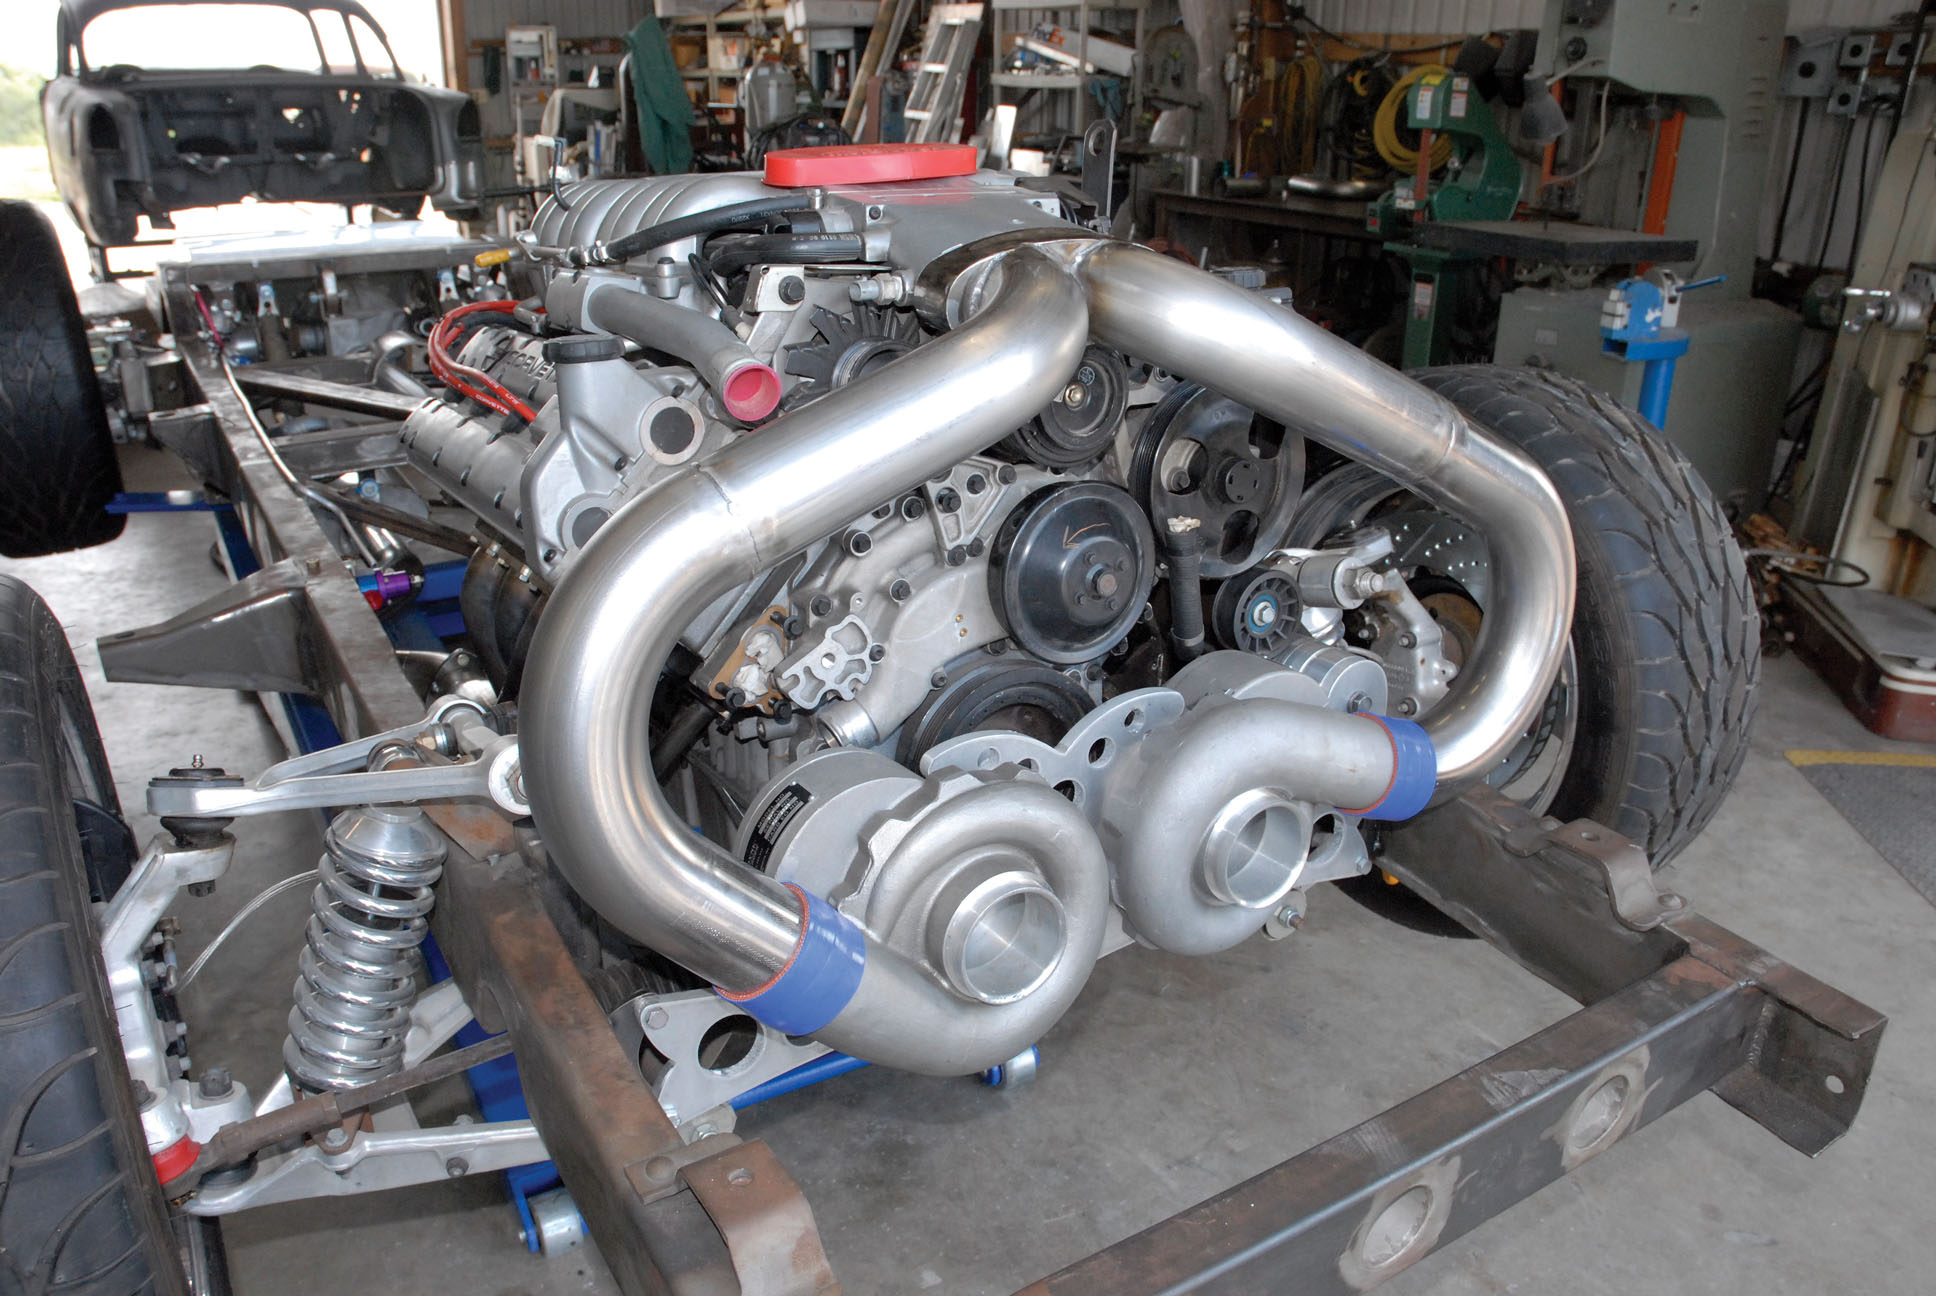
Another design criteria was that the brothers Cimbanin wanted to retain the Corvette ZR1 single serpentine drive belt, not only to keep things simple but also to save space. As luck would have it, the ZR1 crank pulley was located directly over the Corvette C4 steering rack, leaving enough room to mount the BD-11A reverse-rotation superchargers on either side of the engine, low enough in the Cameo chassis to clear the new radiator and the dual electric fans. In order to accomplish this, the Cimtex crew designed a 1/4x30x10-inch steel template (or cradle) spanning the inner width of the Cameo chassis. With twin Powerdyne BD-11As mounted in the cradle, clocked at approximately 45 degrees left and right, allowing the discharge tubes to face outward, the supercharger ducting could be routed outward, or it could be routed perpendicular to a common junction converging at the ZR1 throttle body. The ducting would remain clear of the radiator and the electric cooling fans.
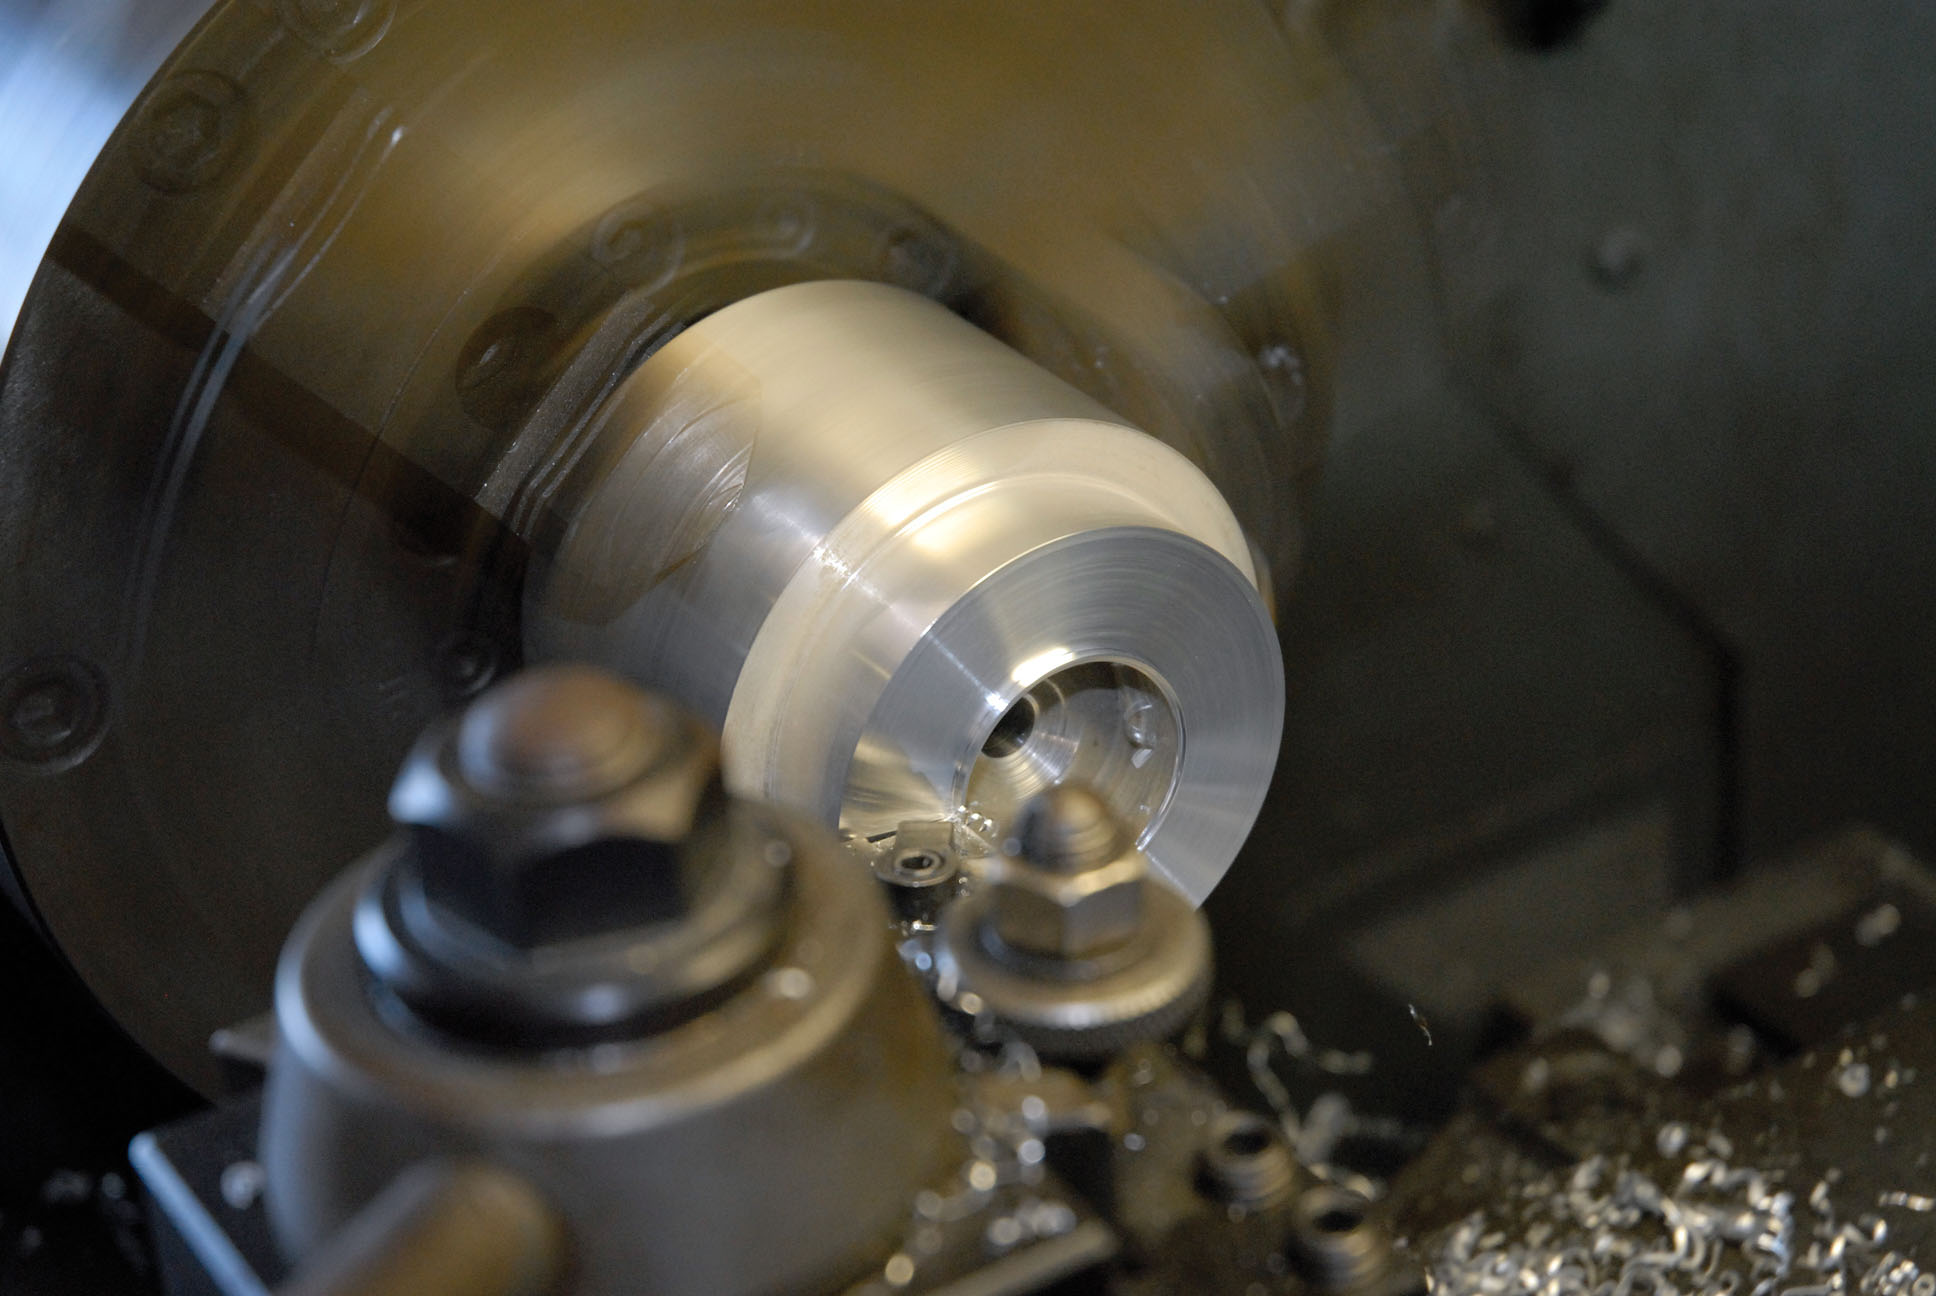
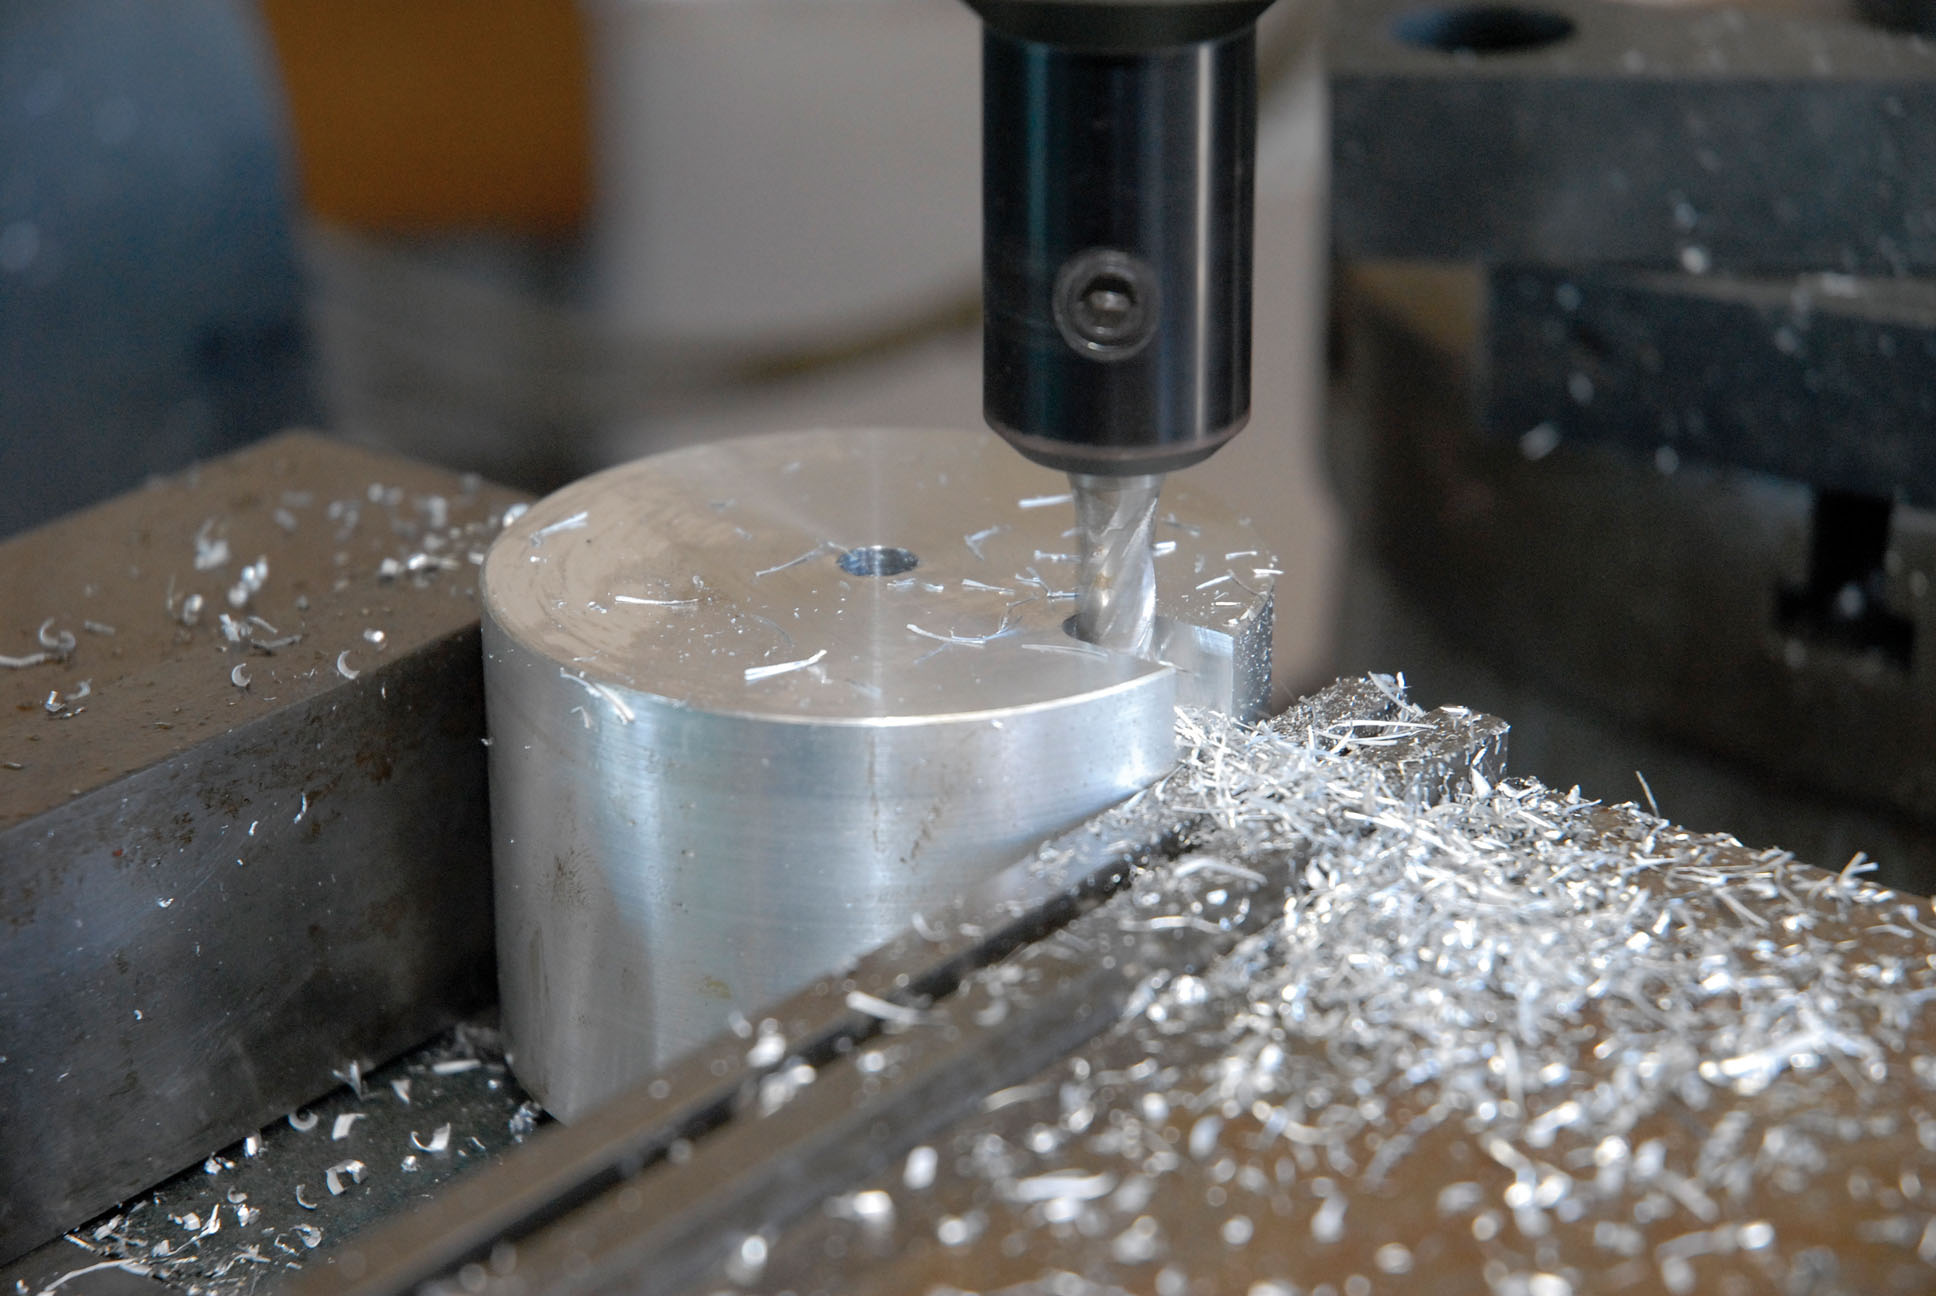
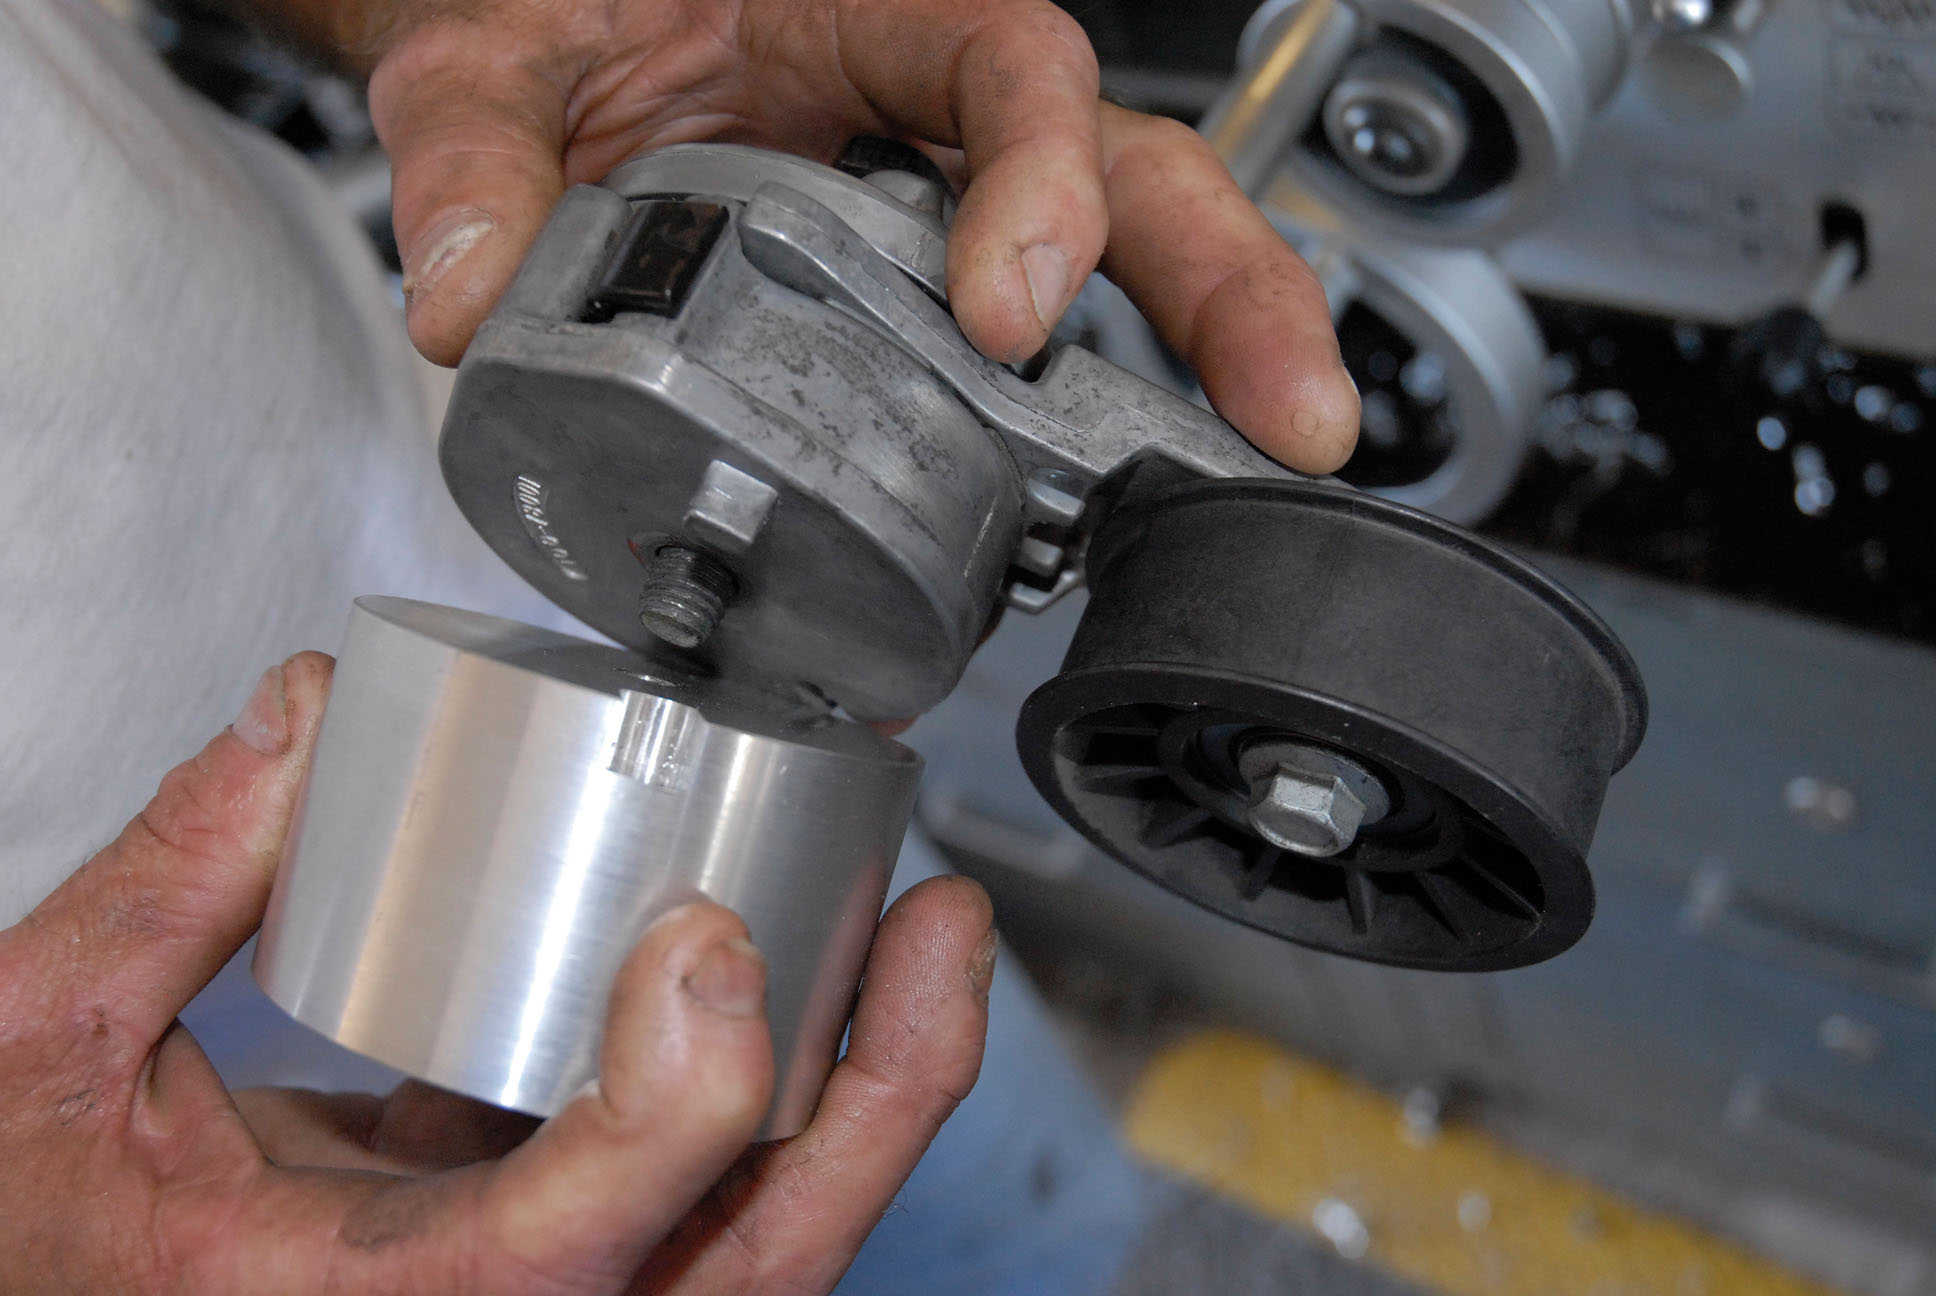
Part of this setup also included the relocation of the ZR1 serpentine belt idler pulley from the driver’s side of the ZR1 engine to the driver’s side of the new bracket, although now operating in reverse rotation. However, in order to maintain proper belt alignment, the pulley had to be spaced out from the bracket via a specially machined 3x3x2-inch aluminum spacer.
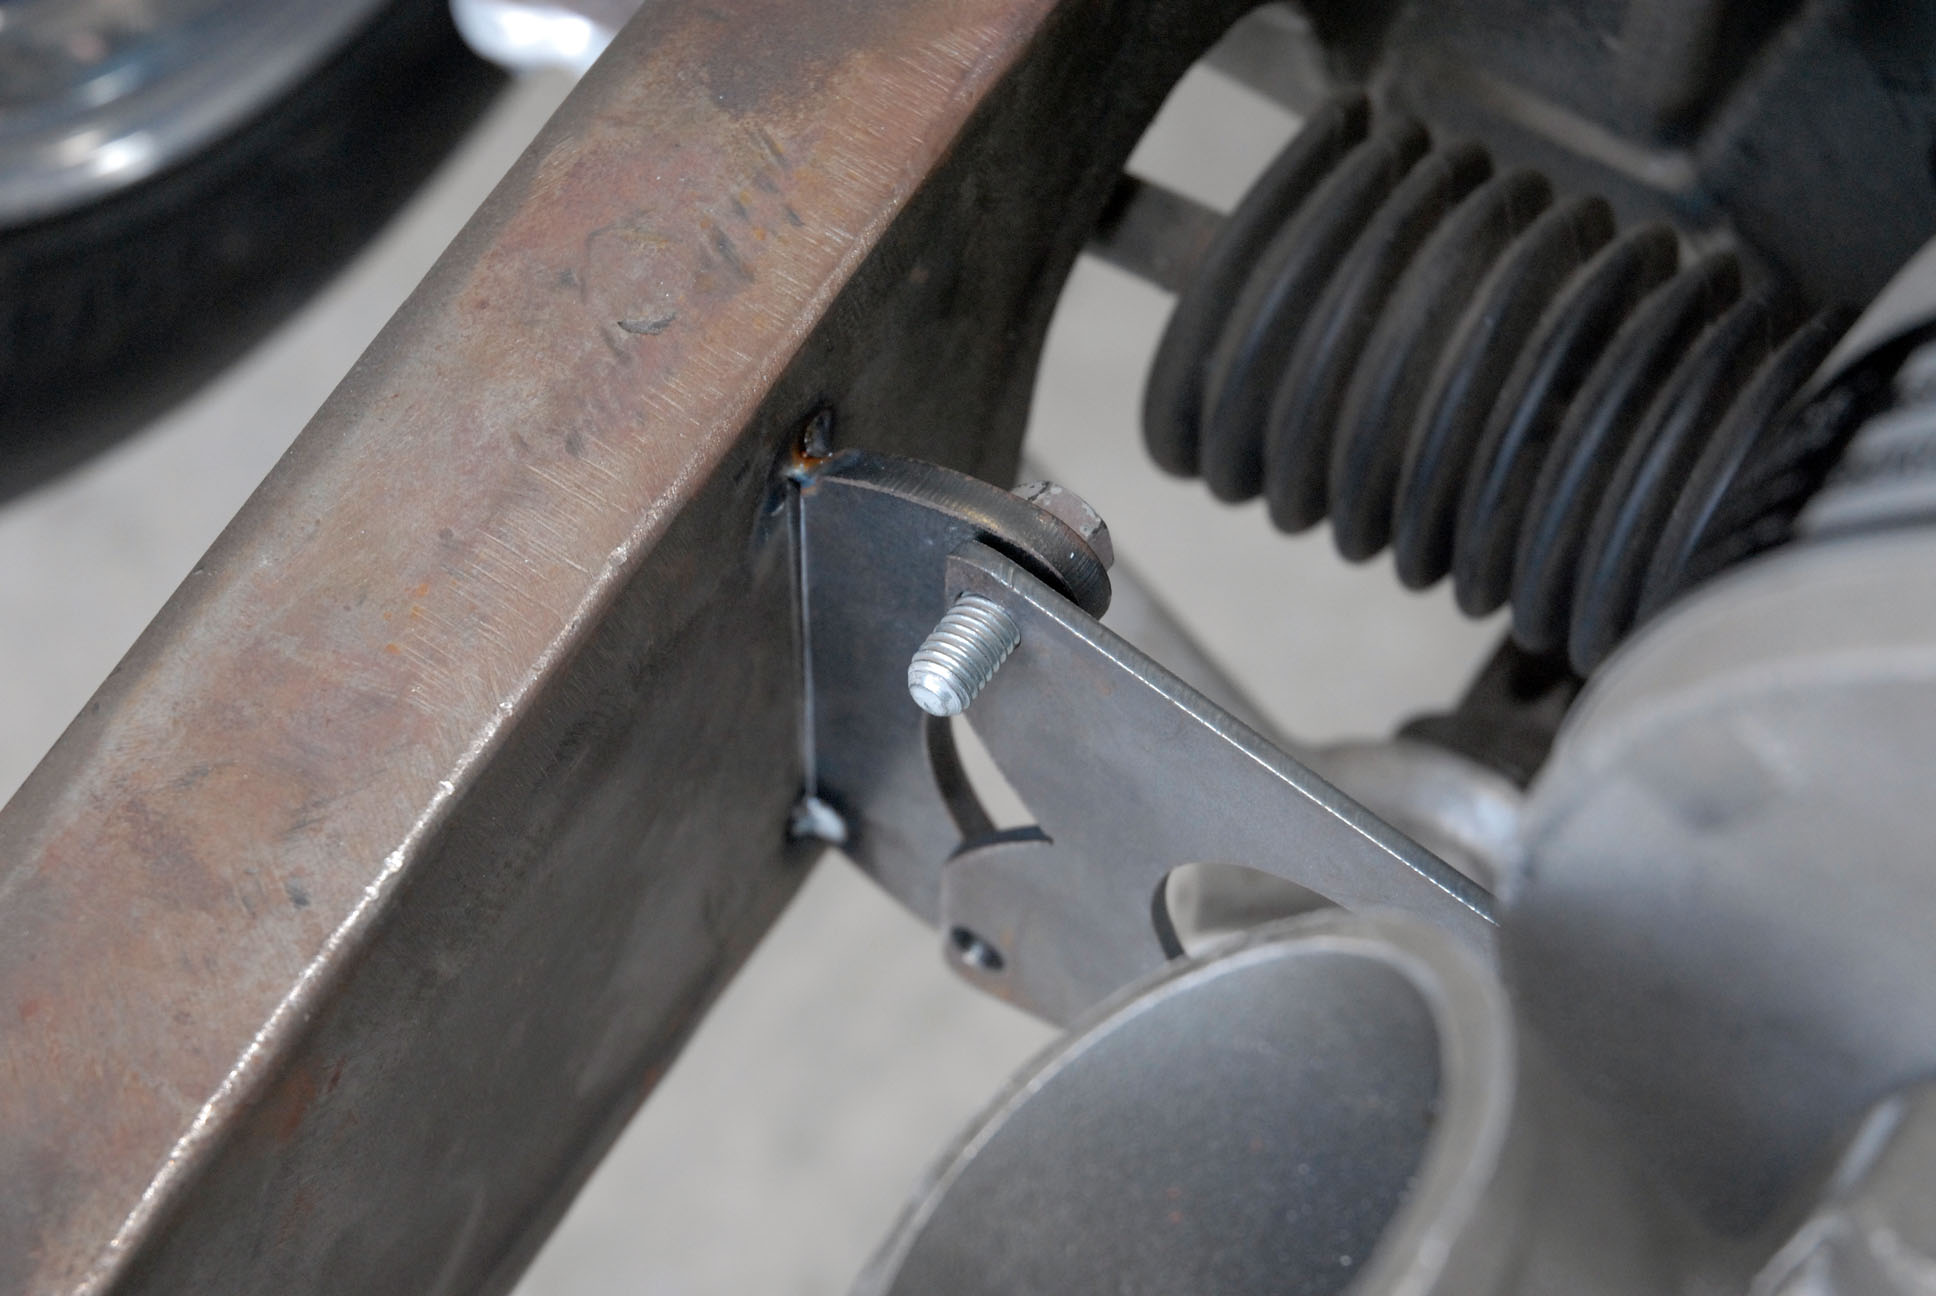
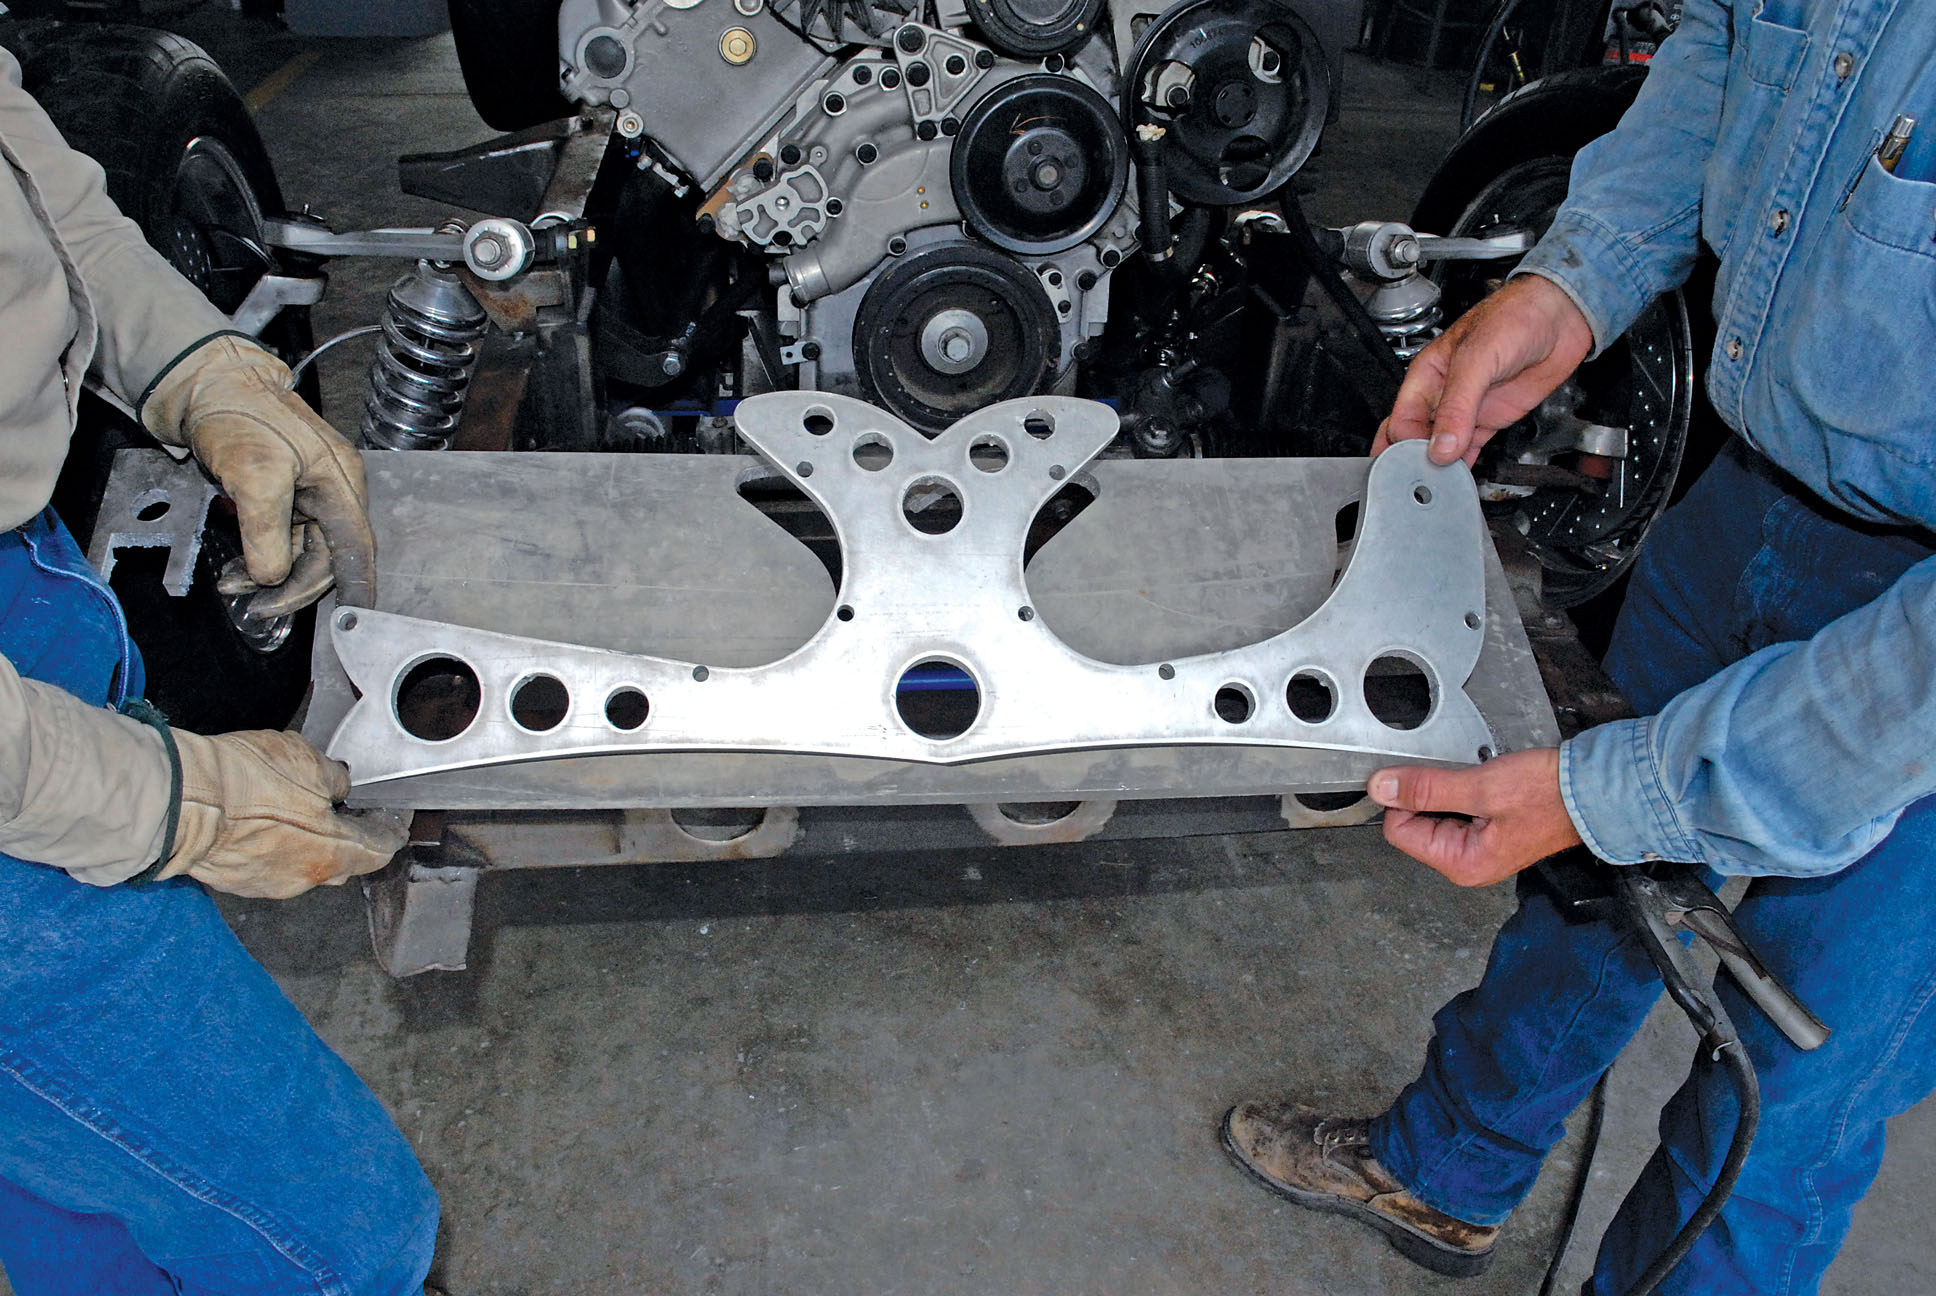
Once proper belt alignment had been achieved, Team Cimtex constructed the actual (production) supercharger mounting bracket out of laser-cut 5/8-inch aluminum flat stock. Then a series of 2-, 1-1/2-inch and 3/4-inch holes were laser cut into the bracket to not only reduce weight, but also to dress up the bracket itself. You will note that the center hole in the bracket intersects with the crank bolt for ease in servicing. Actual mounting of the bracket to the Cameo’s front framerails was accomplished via a set of 3x2x3/8-inch mounting tabs made out of flat stock and welded to the inner framerails.
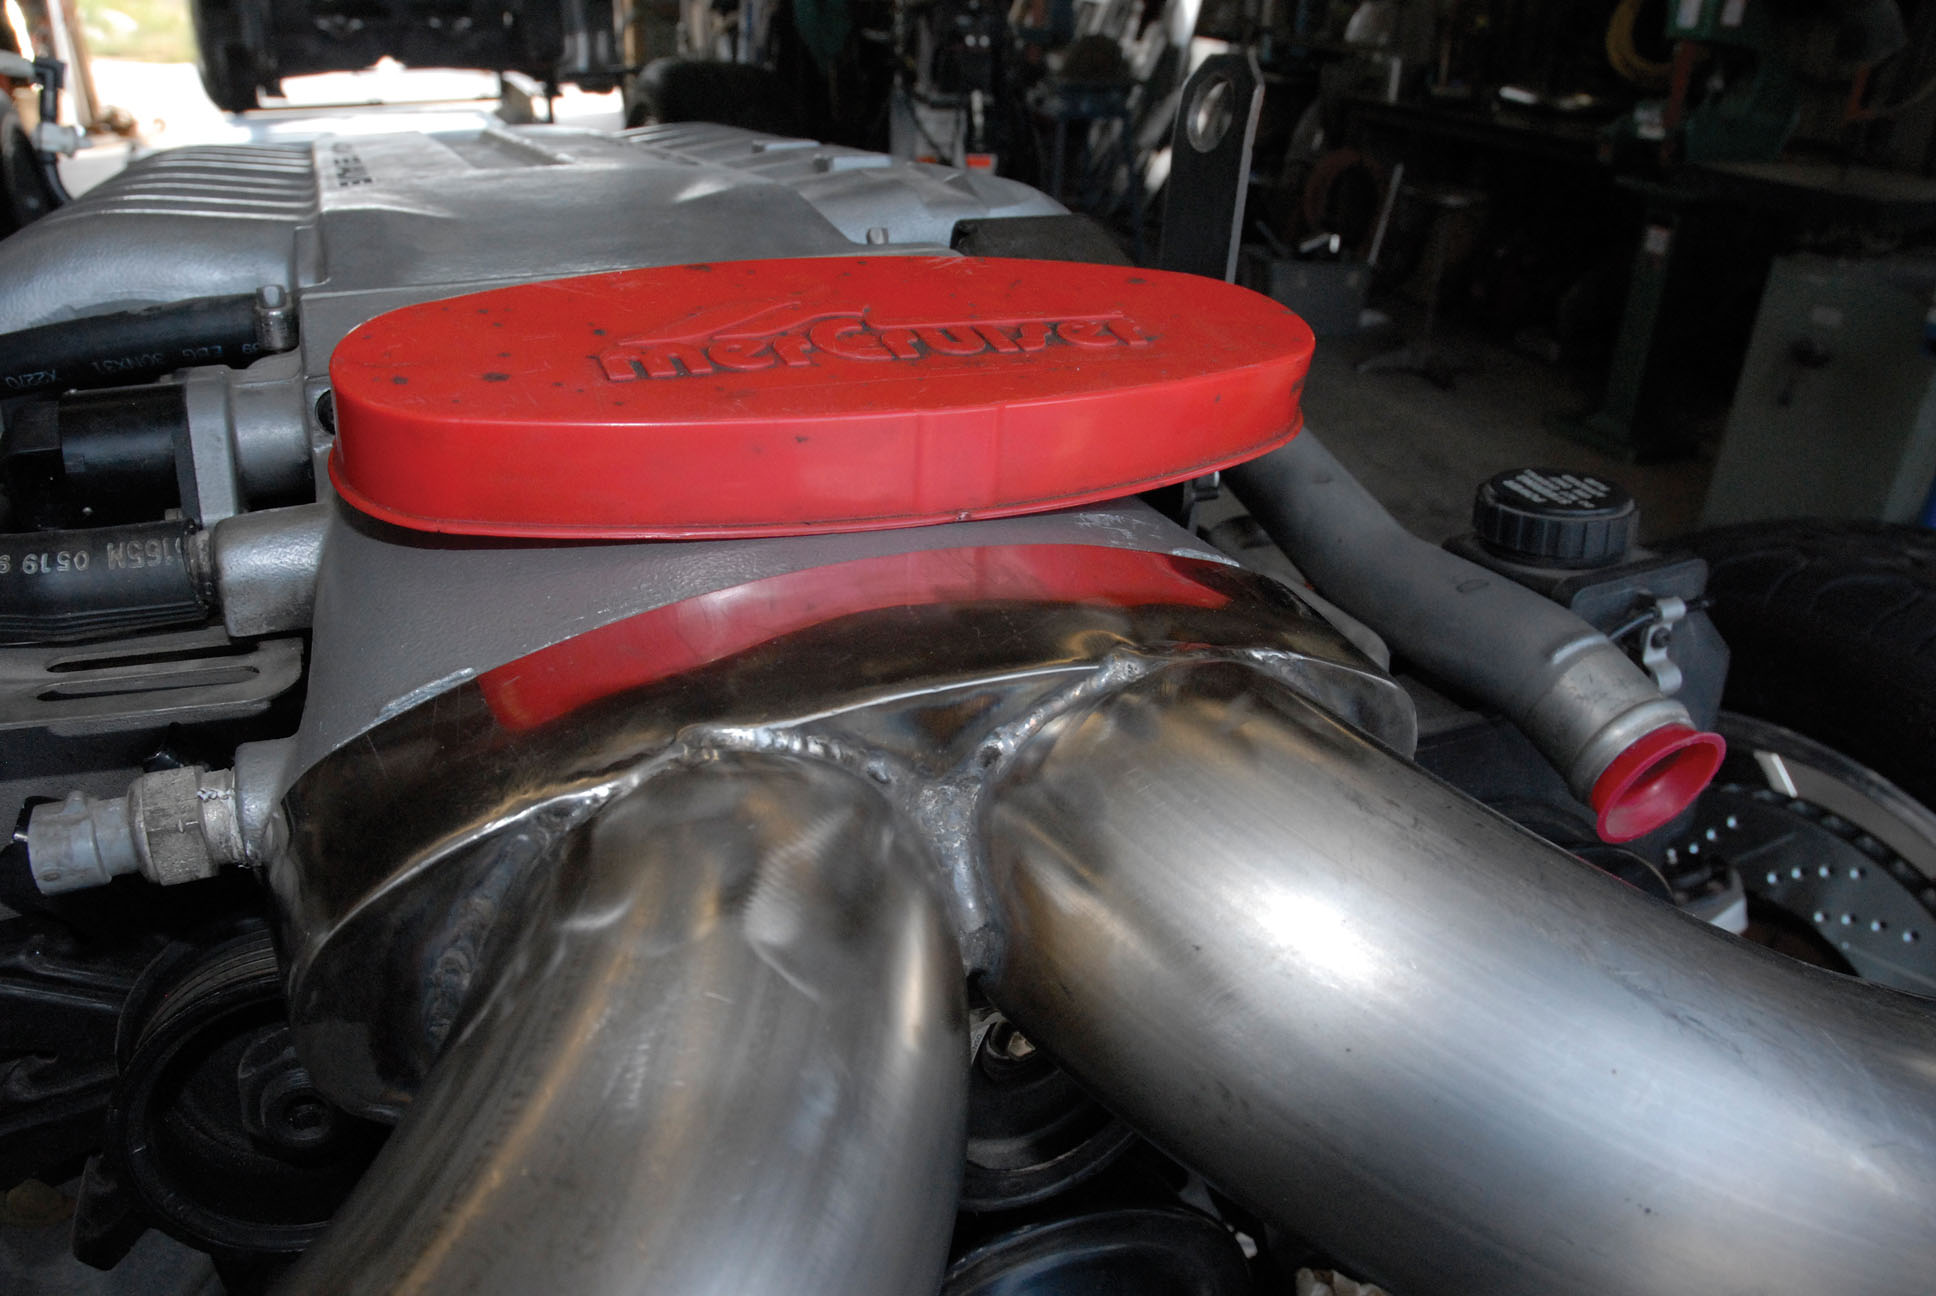
When it came to the supercharger ducting, the Cimbanins used a MagnaFlow 3-inch-diameter stainless steel 45-, 60- and 90-degree elbow kit, which provided the guys with enough varying bends to be shaped into a fully functional dual snorkel assembly or air discharge tract. With these pieces of tubing welded together as a unit, they converge on an oval-shape junction fashioned from a piece of formed and welded 15-gauge stainless steel strap. The entire snorkel assembly is then secured to the ZR1 throttle body via a neoprene rubber coupler and a pair of stainless steel hose clamps.
Of course, no supercharger system would be complete without a supercharger bypass valve or, in this case, two of them. A pair of Vortech Engineering polished aluminum bypass valves (p/n 8D204-008) was placed on the bottom side of the air discharge tube(s), located directly below the ZR1 throttle body and set at 45-degree angles. These bypass valves are set to operate at 10 to 11 inches of vacuum.
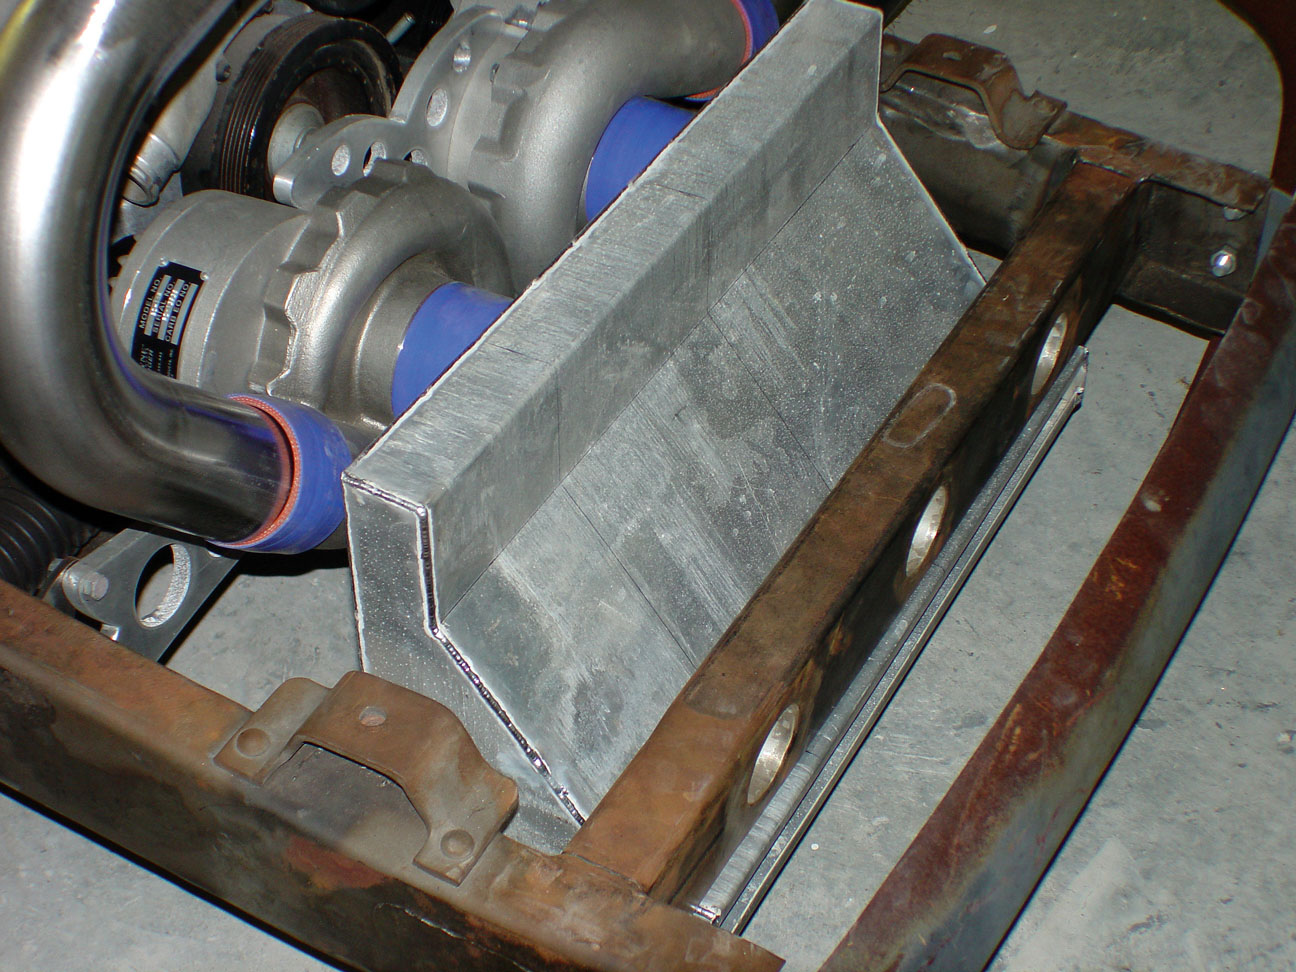
Next came the actual fabrication of the air intake tract itself. Since the ZR1 Corvette engine operates on speed density, use of the normally bulky mass airflow sensors was not necessary. However, our fabricators still had to worry about radiator clearance. Cimtex fabricator Darren Barker came up with a rather trick-looking “vacuum cleaner” cold air intake box, which is mounted directly to the 3-inch supercharger inlets, mounted down low in the chassis beneath the radiator. This aluminum box measures 23 inches in width, 11-1/2 inches at the back, 8-1/2 inches in depth and 2 inches at the intake opening (or air inlet). Inside you find a paid of K&N lifetime conical filters attached to the supercharger inlets.
“This box is 100-percent restriction free, and it can pass more air than the superchargers can actually handle. Furthermore, we’ve still got more than enough room to mount our radiator. It’s a real efficient system!”
That pretty much concludes Project Cimtex Super Cameo’s chassis and fitup. In our next installment, we actually begin hanging sheetmetal and performing the tricky bodywork. Follow along with the guys at Cimtex as they show you how the Powerdyne BD-11A twin supercharger system was tailor made for our installation.
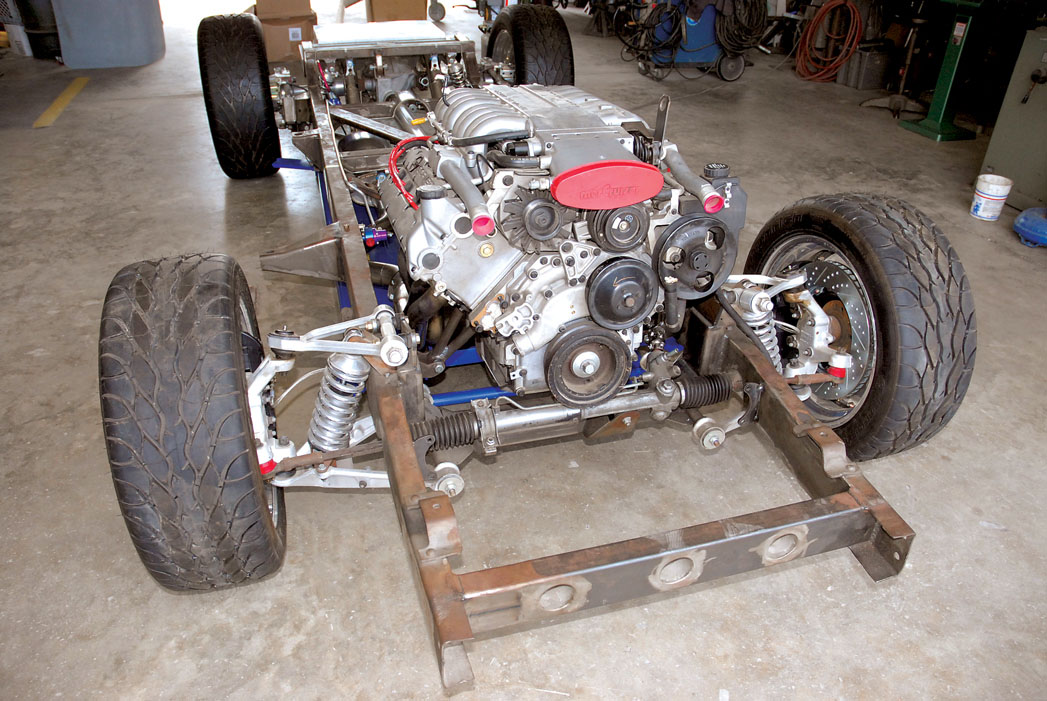
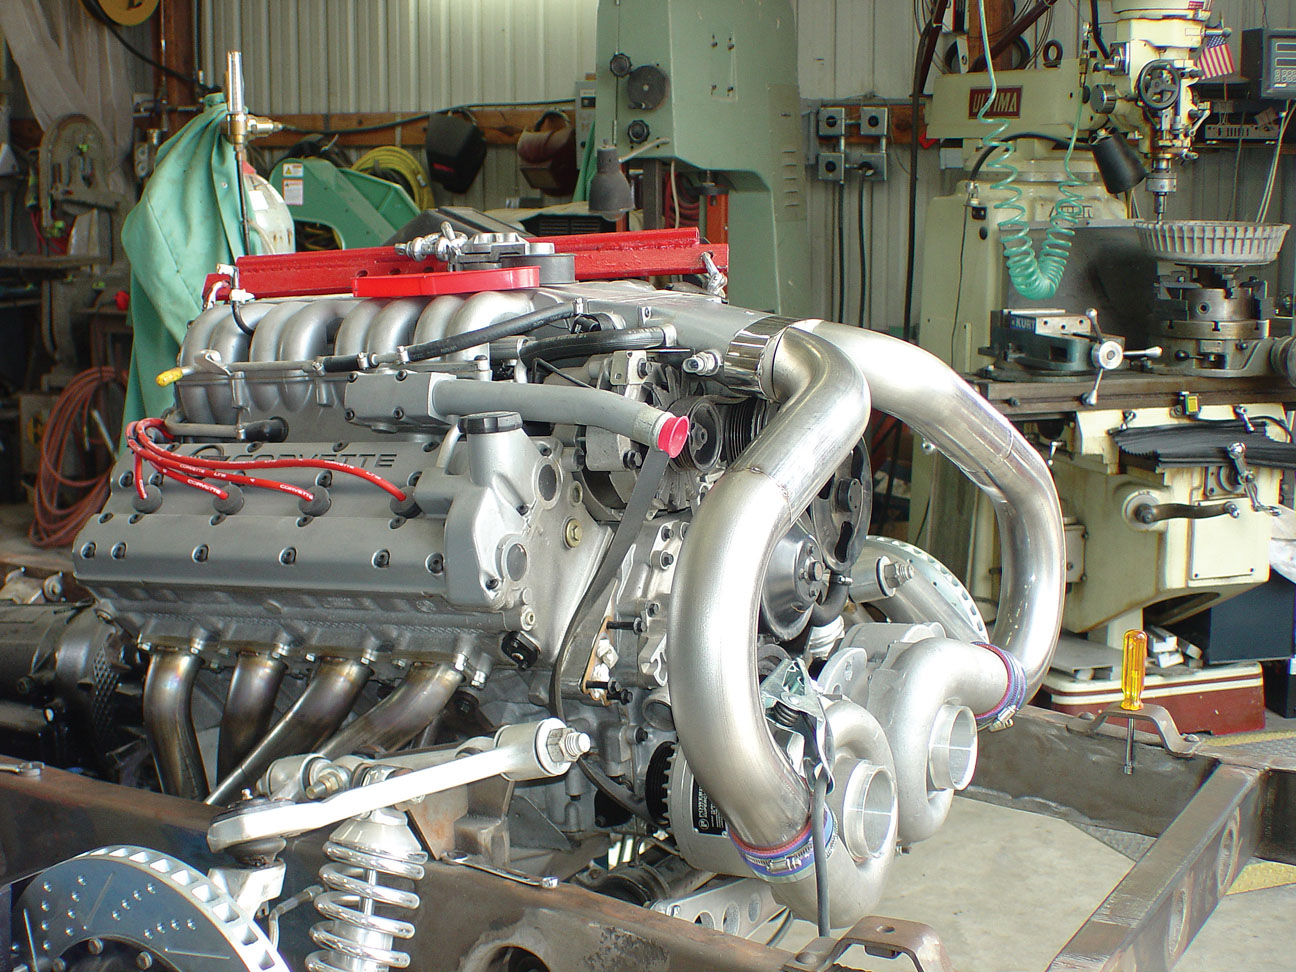
1. Here’s our Cimtex Super Cameo chassis complete with Corvette ZR1/GM 4L80E drivetrain ready and waiting.
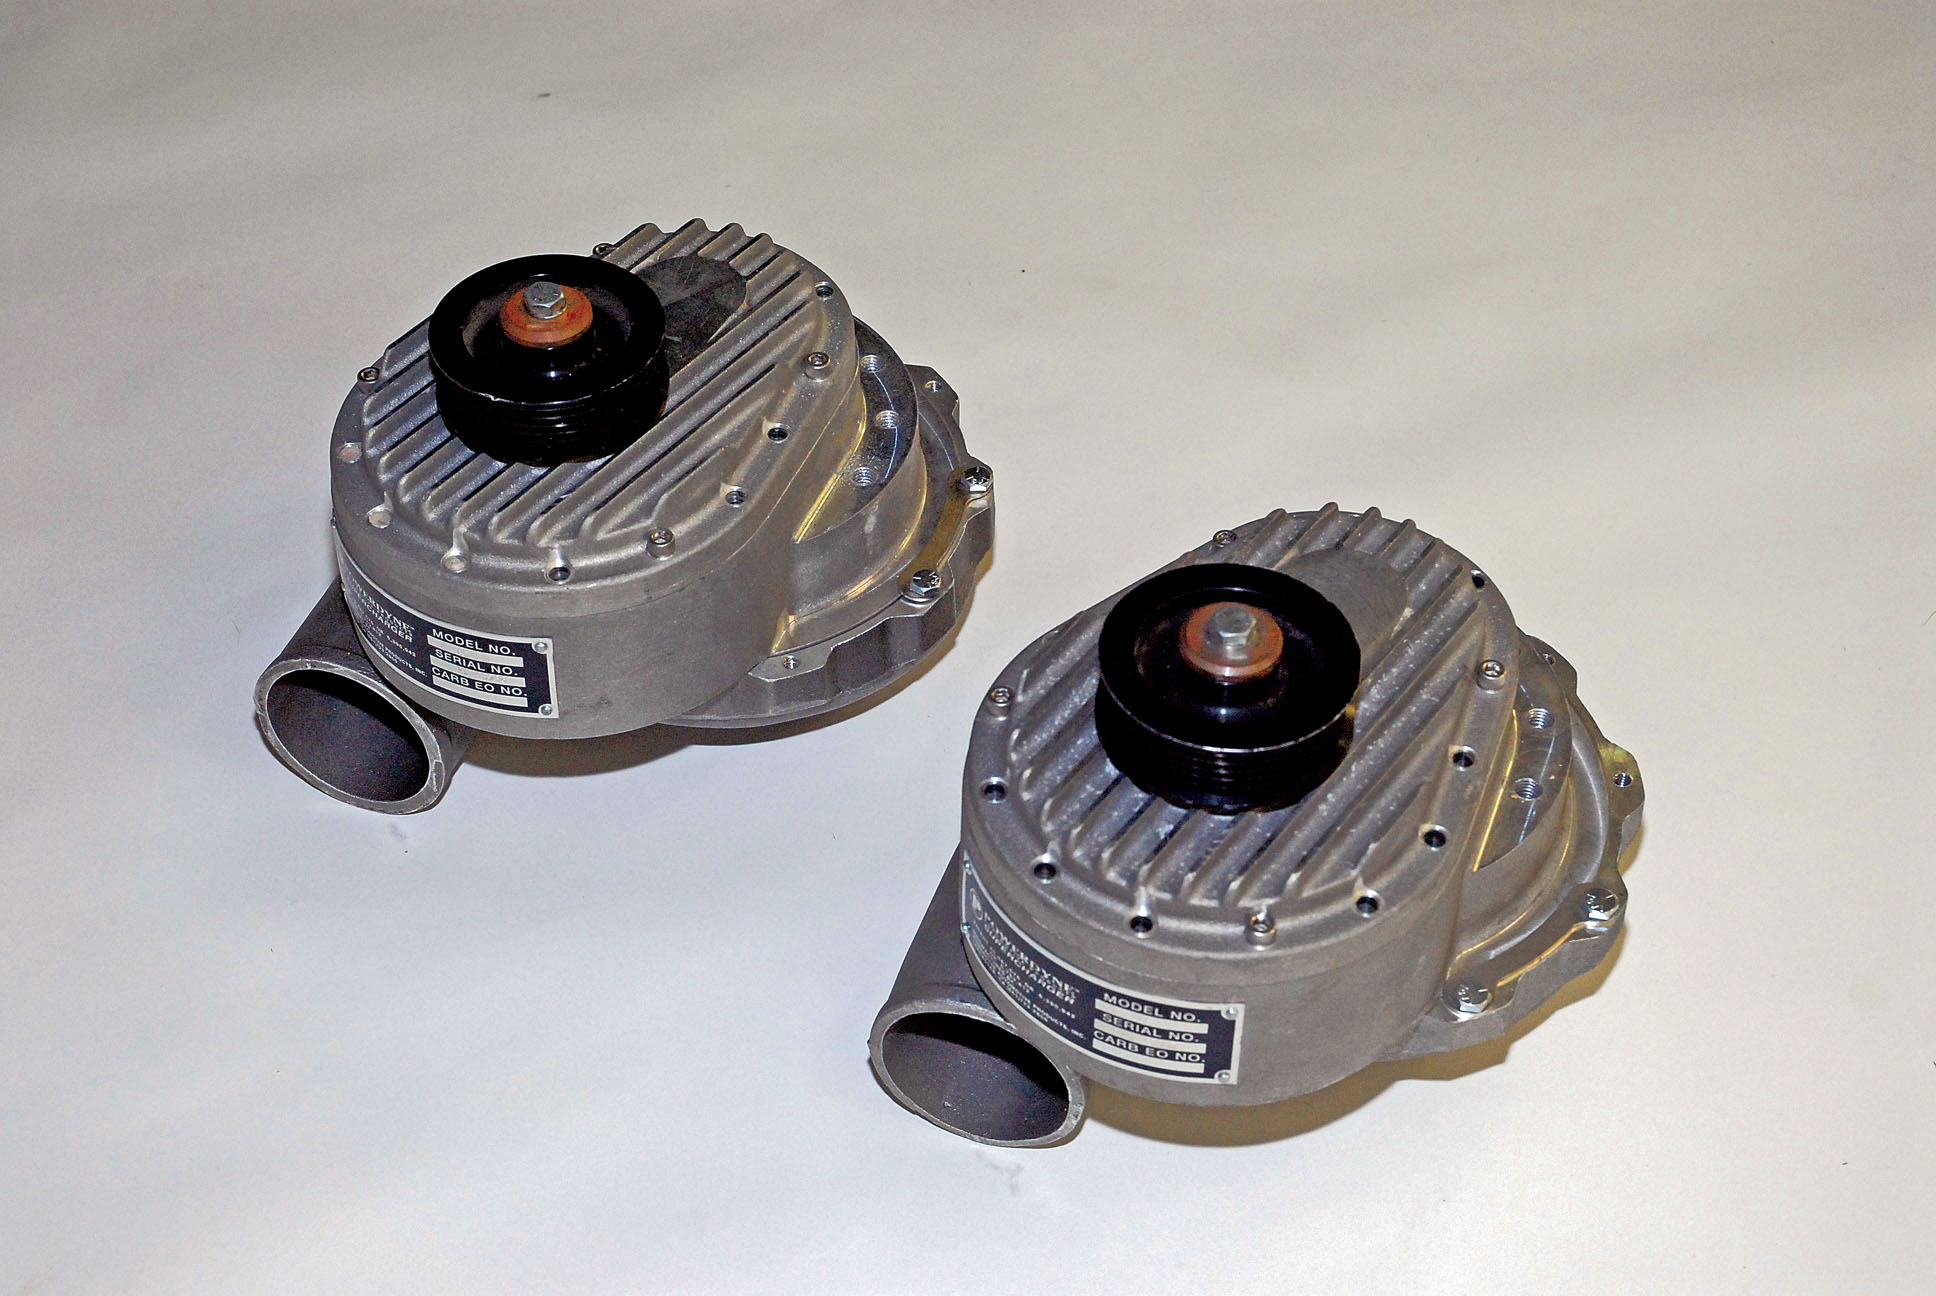
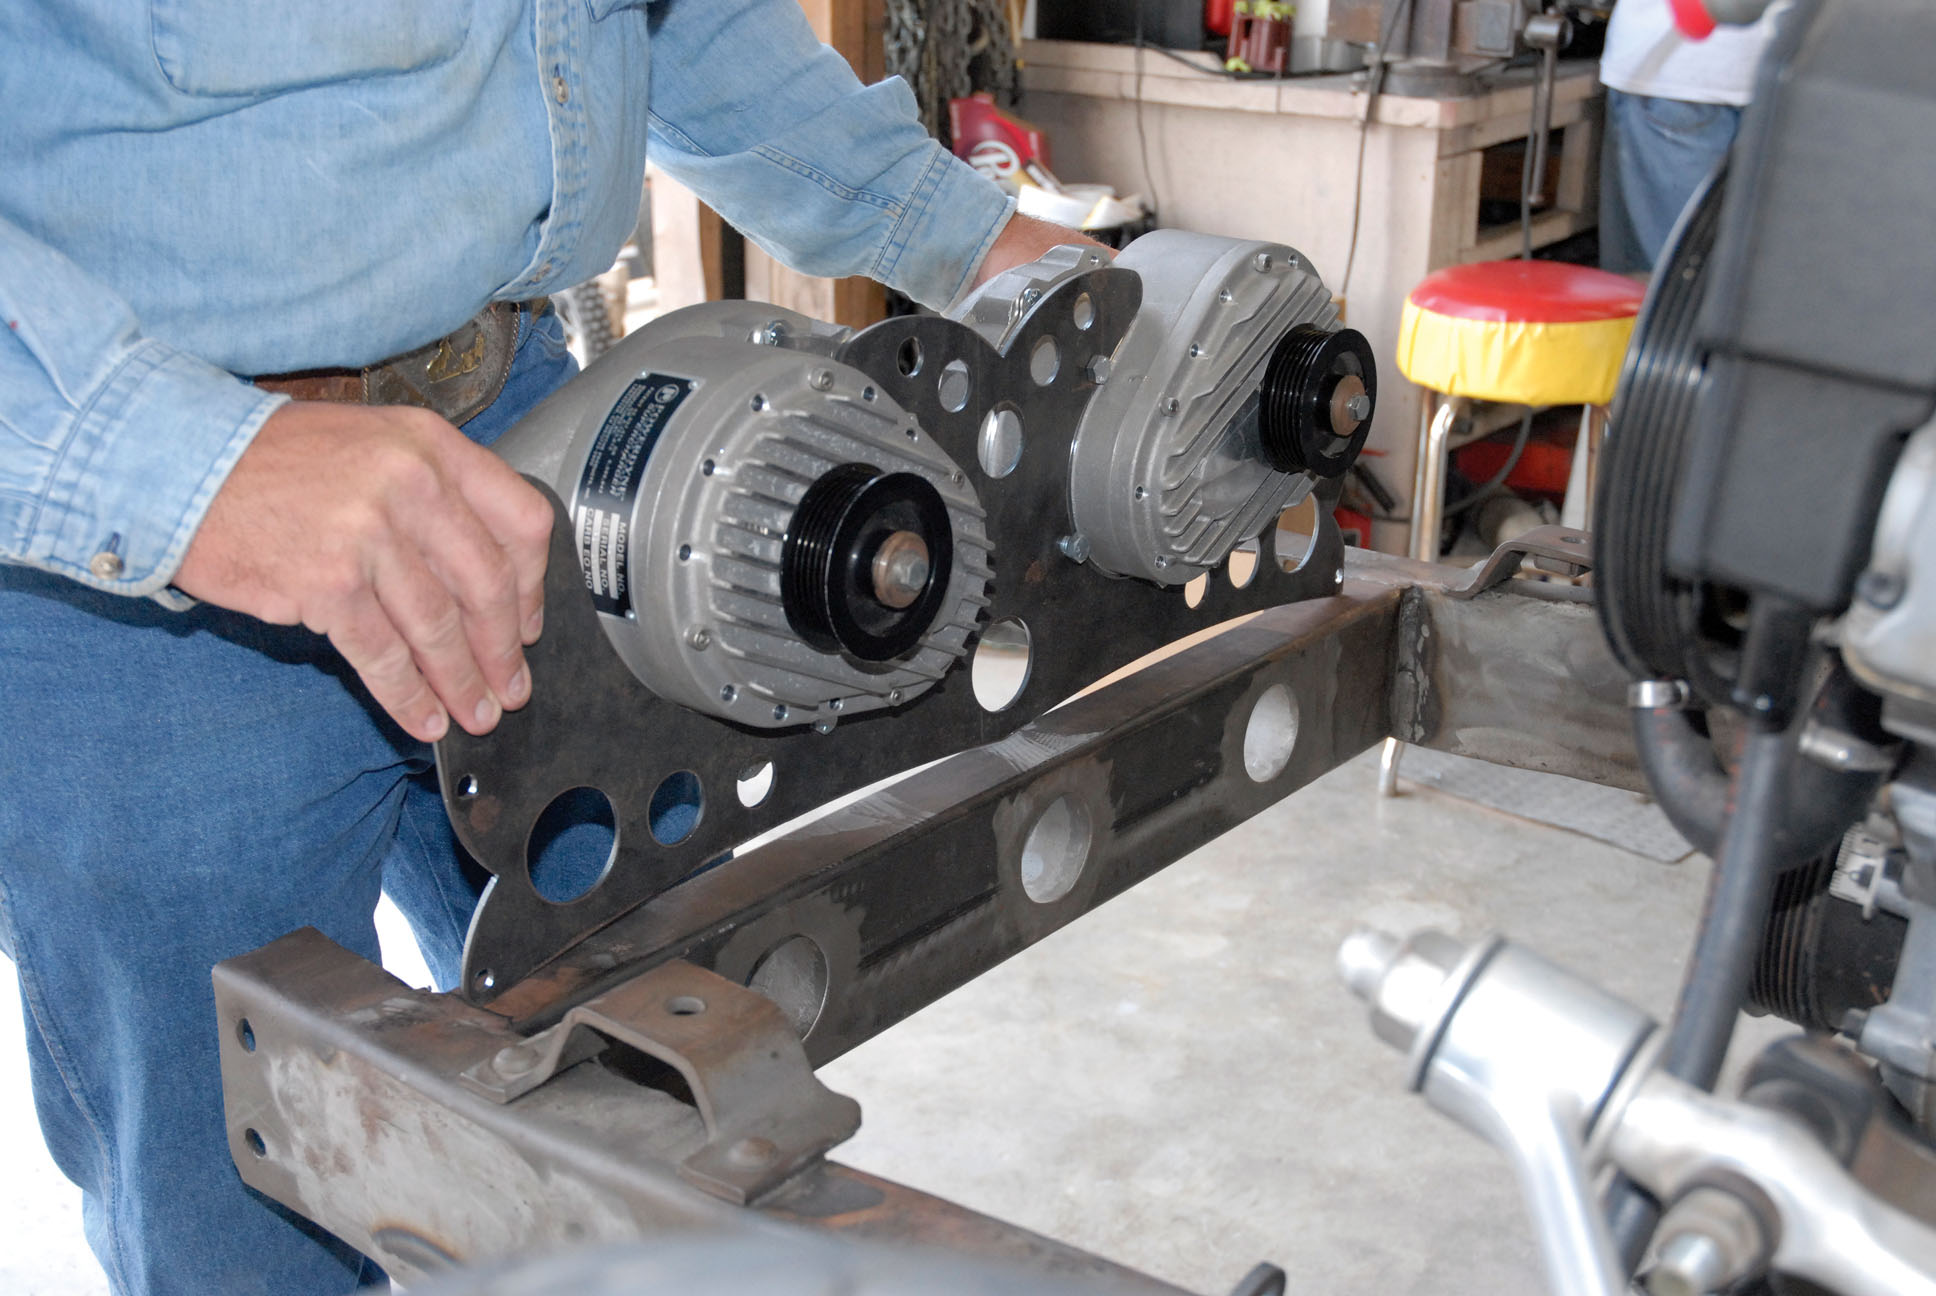
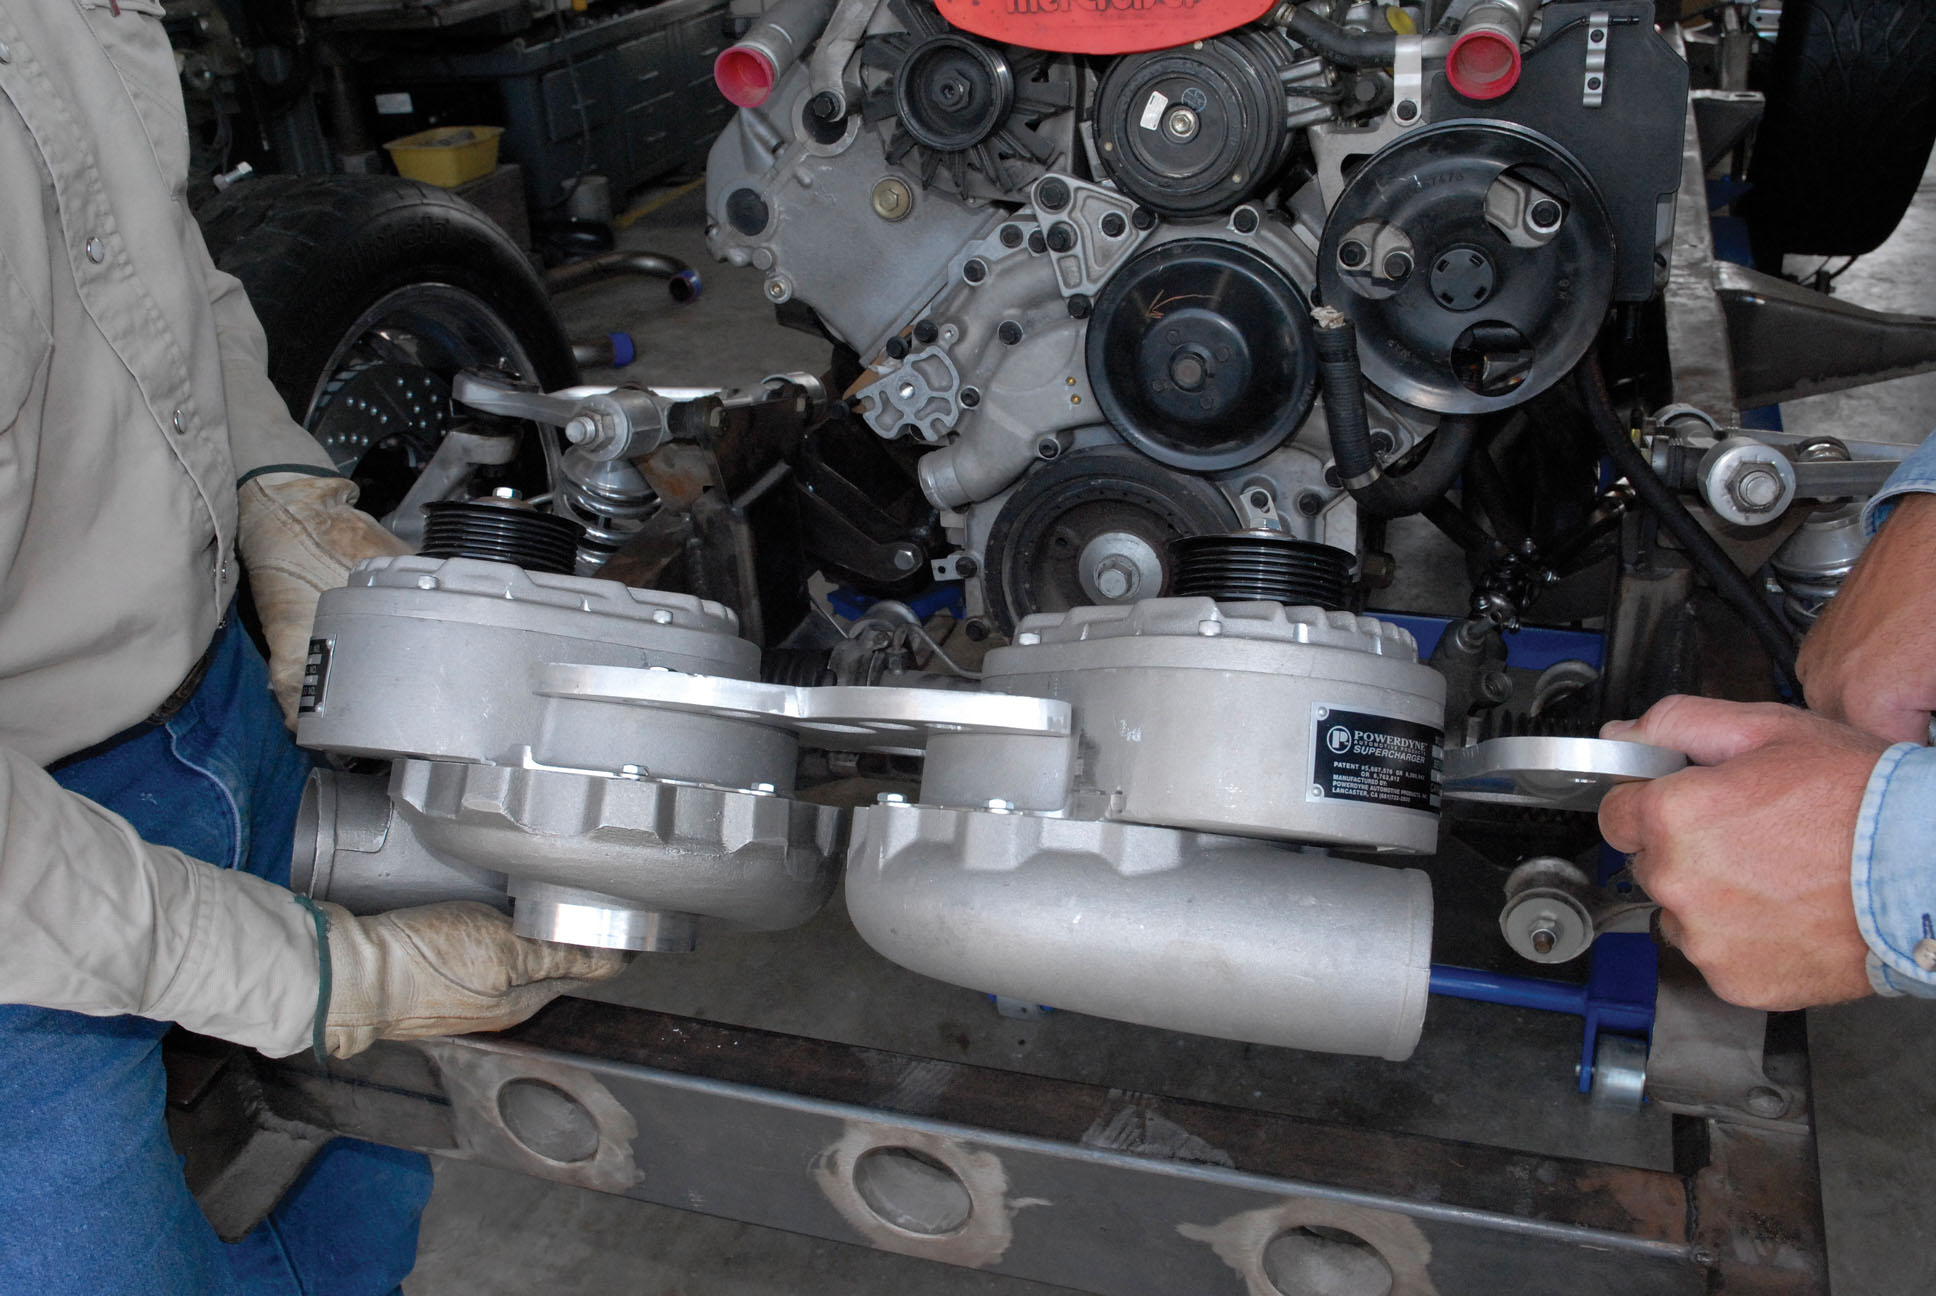
2. Shown are the Powerdyne BD-11A reverse-rotation SilentDrive superchargers selected for this application. Not wanting to tap into the pricey Corvette ZR1 crankcase, the Powerdyne BD-11A-RR units are ideally suited, as they are 100-percent self-lubricating.
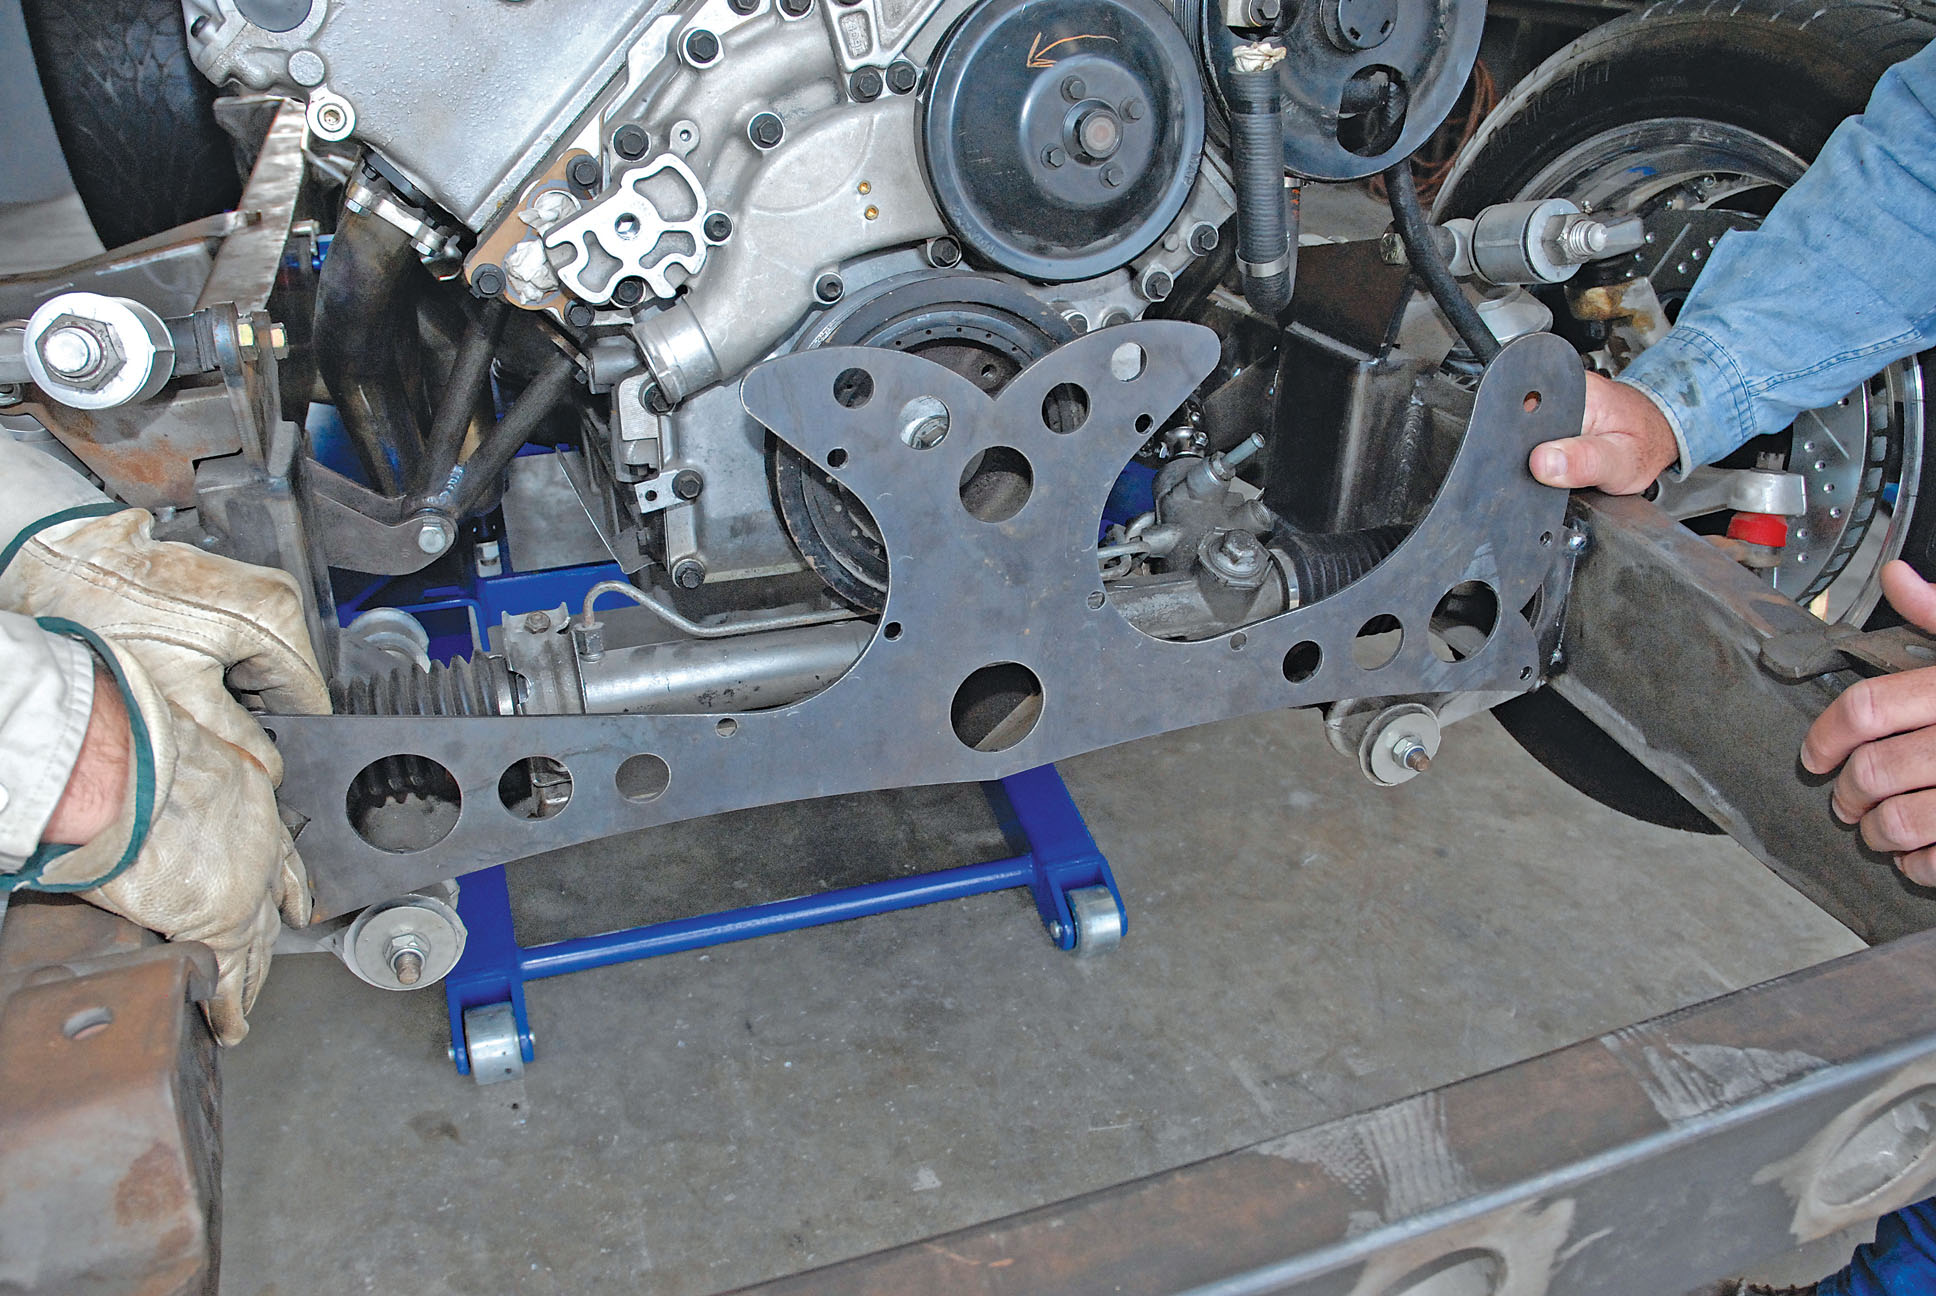
3. After finding a suitable mounting location, Cimtex craftsmen fabricated a 1/4x30x10-inch laser-cut steel template to serve as the pattern for the supercharger mounting bracket.
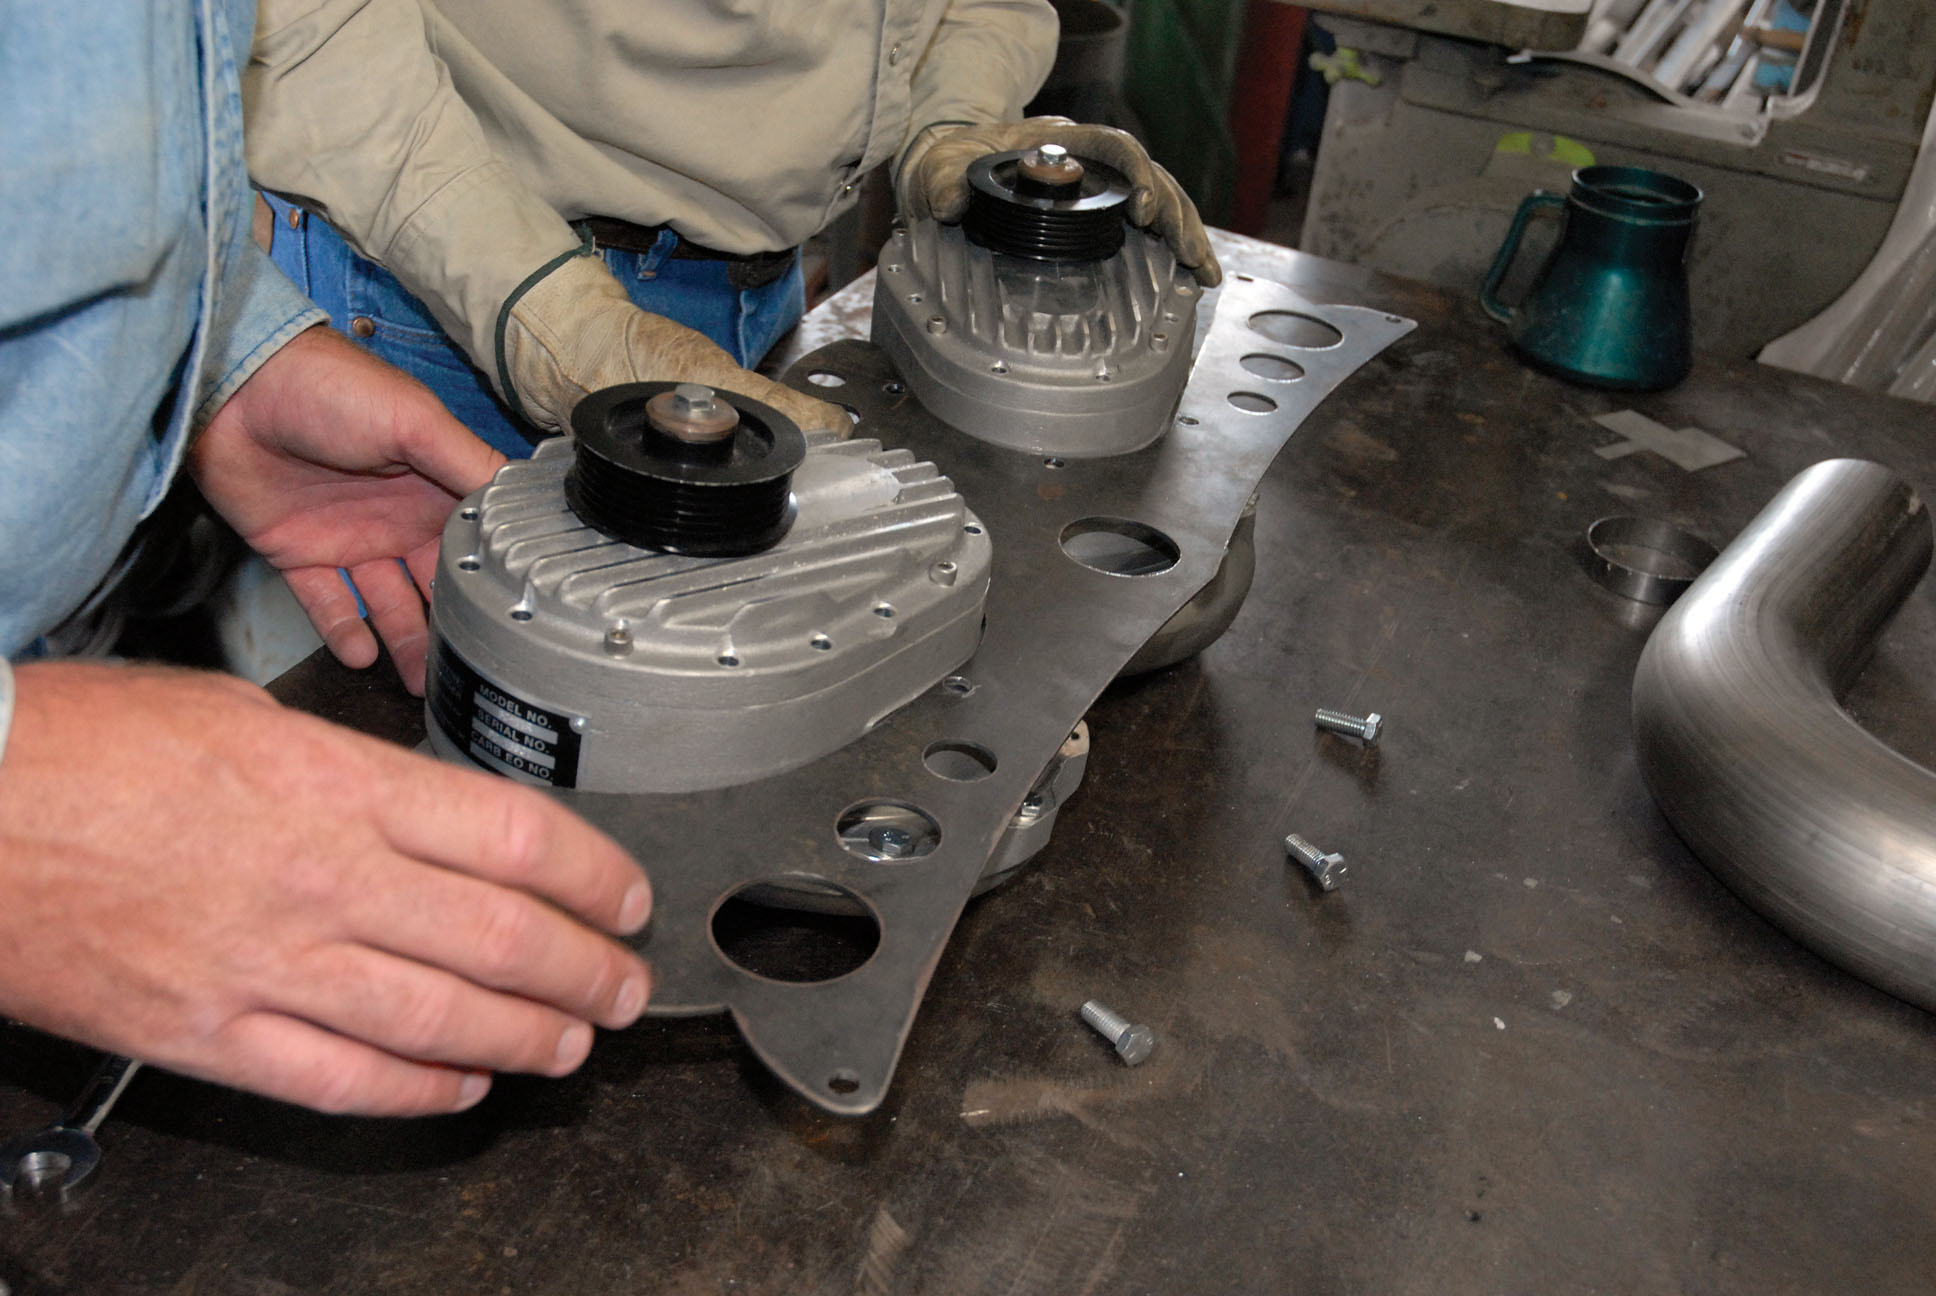
4. Here we see our reverse-rotation Powerdyne BD-11A superchargers being bolted in place using a series of 3/8-inch bolts.
5. Our craftsman continues with the fitting of the complete assembly to the chassis, all the while checking for optimum supercharger-to-crank pulley alignment.
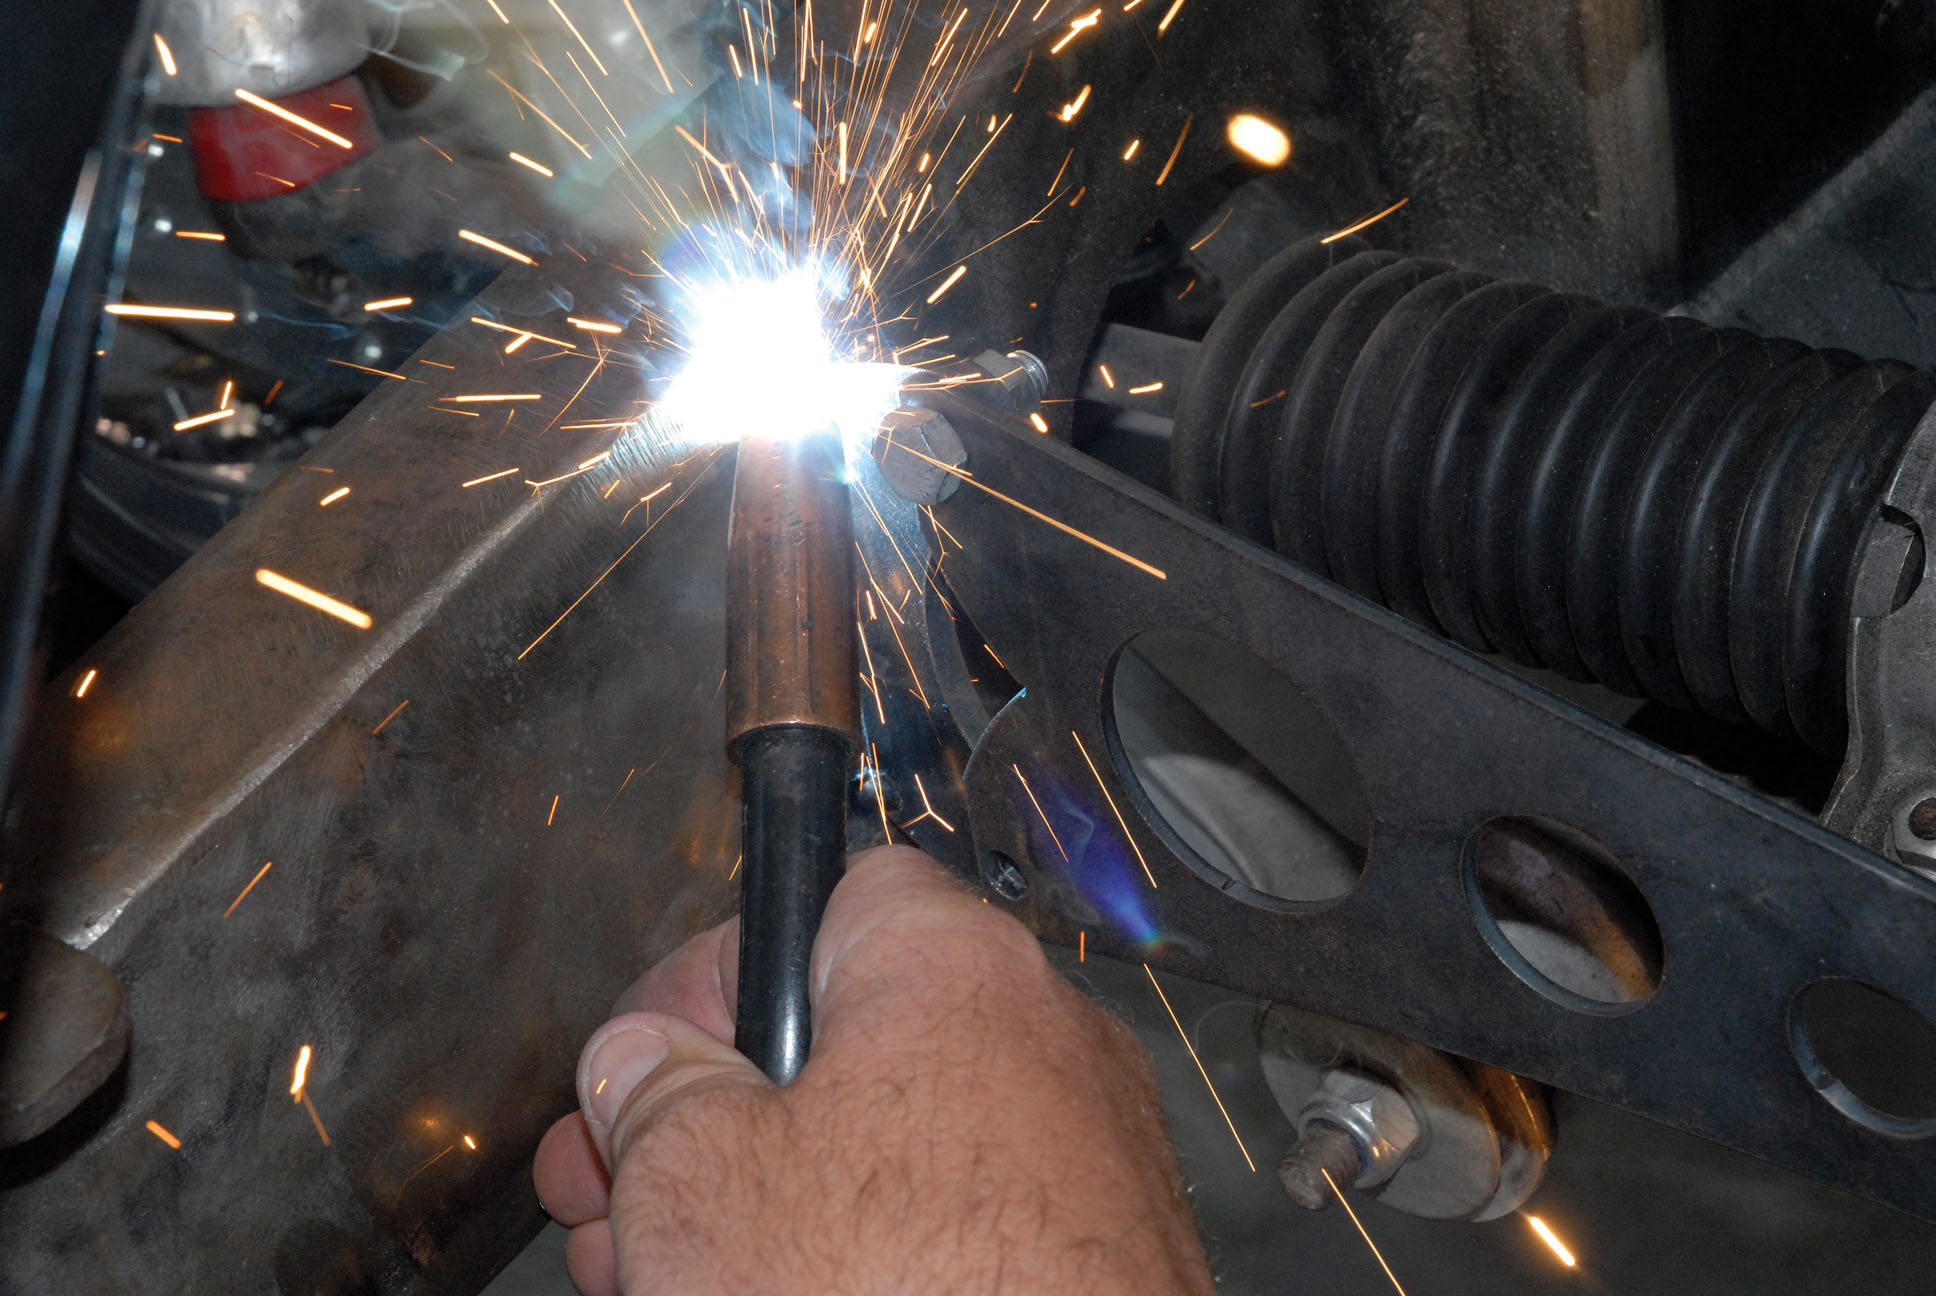
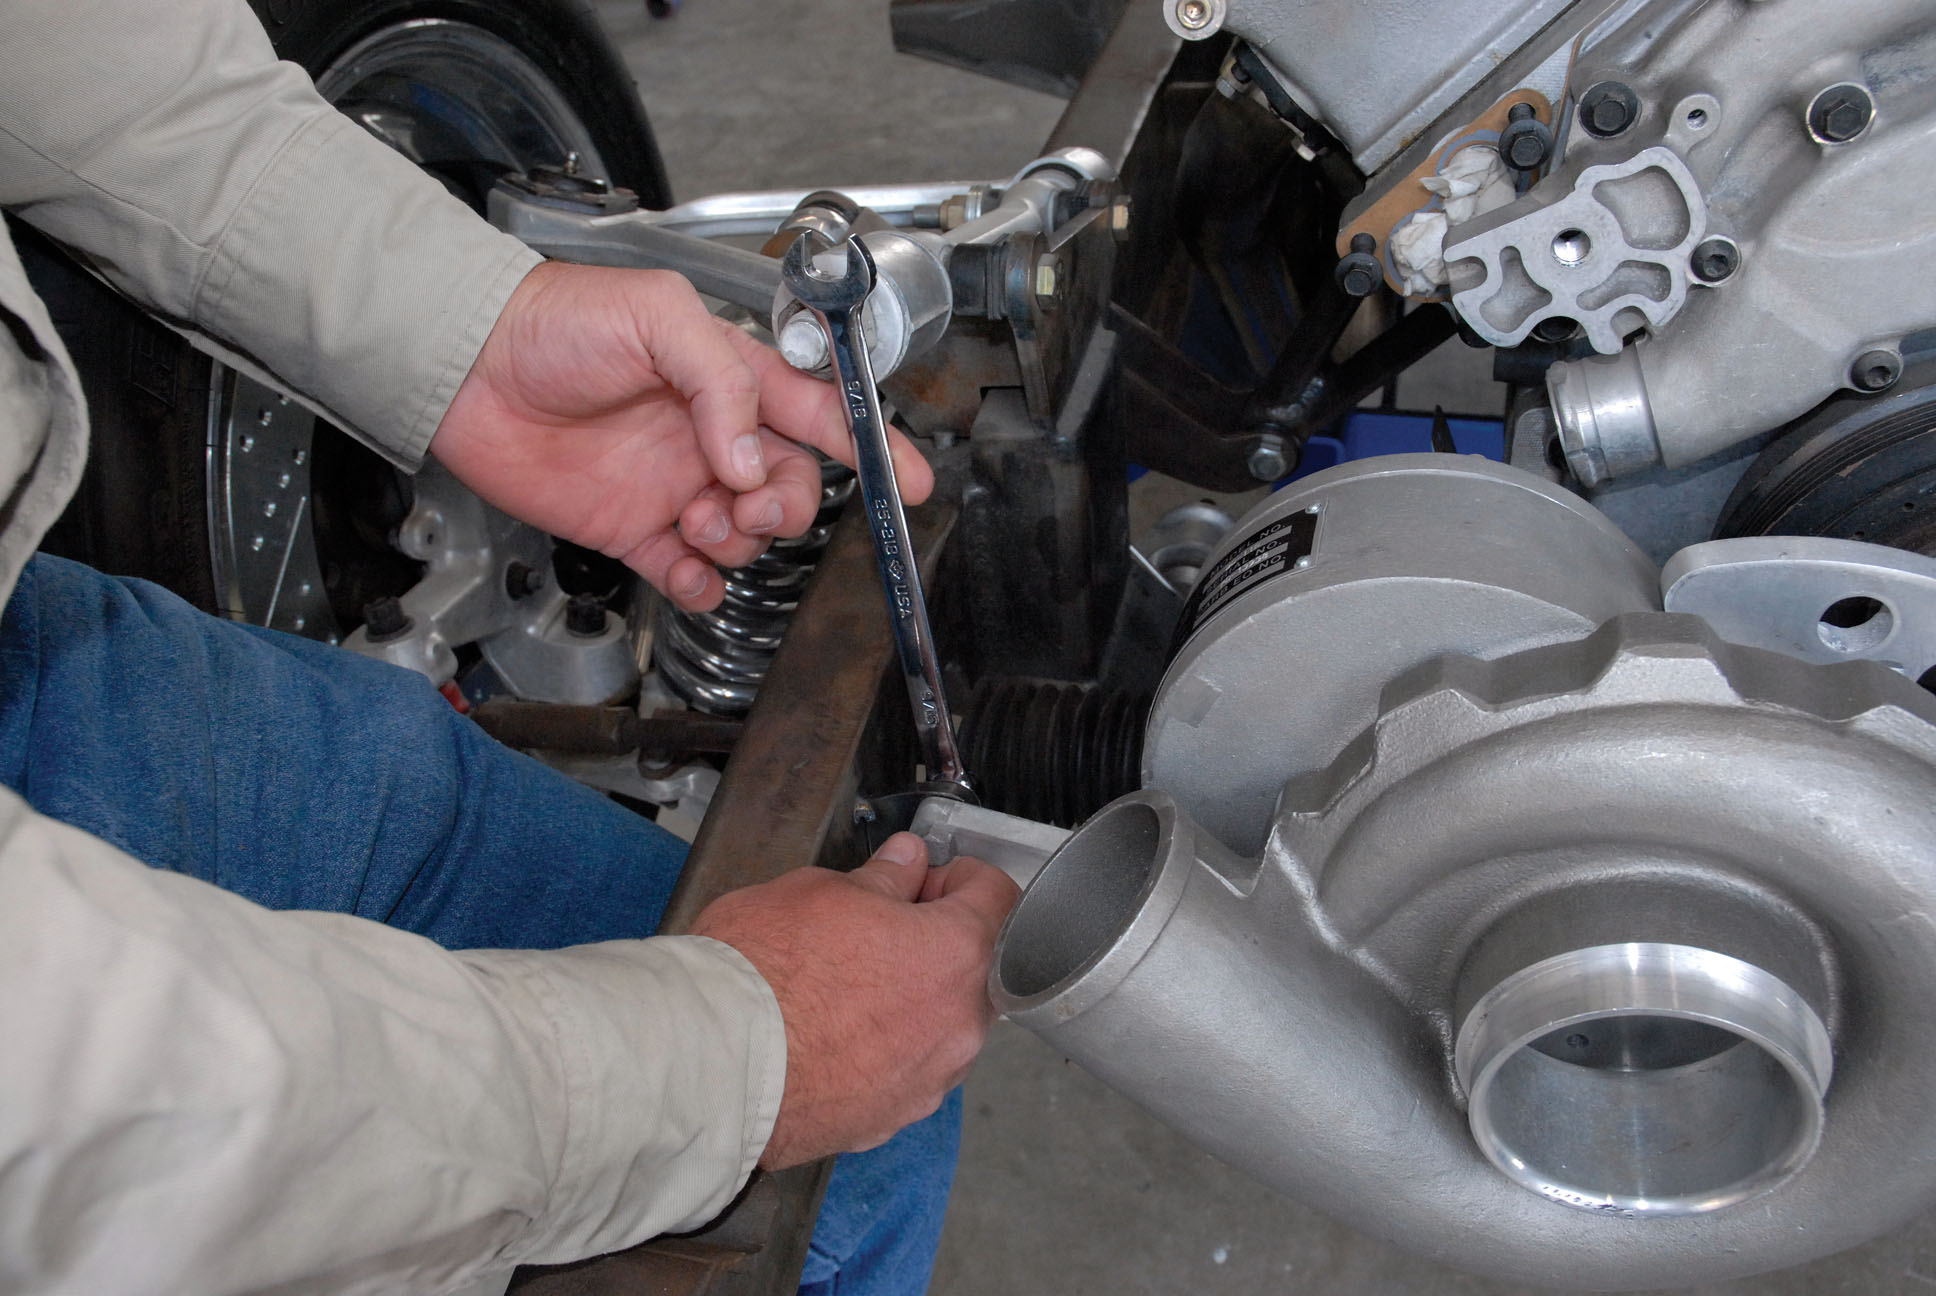
6-7. With the new bracket fully aligned, our installers weld on a set of 3x2x3/8-inch mounting tabs fashioned out of flat steel.
6-7. With the new bracket fully aligned, our installers weld on a set of 3x2x3/8-inch mounting tabs fashioned out of flat steel.
8. Satisfied with the results, our installers head back to the laser cutter and fashion the actual production bracket out of 5/8-inch aluminum flat stock with a series of 2-, 1-1/2- and 3/4-inch holes.
9-10. With Powerdyne BD-11A RR SilentDrive superchargers fully installed, it’s time to bolt up the finished supercharger bracket to the supercharger mounting tabs.
9-10. With Powerdyne BD-11A RR SilentDrive superchargers fully installed, it’s time to bolt up the finished supercharger bracket to the supercharger mounting tabs.
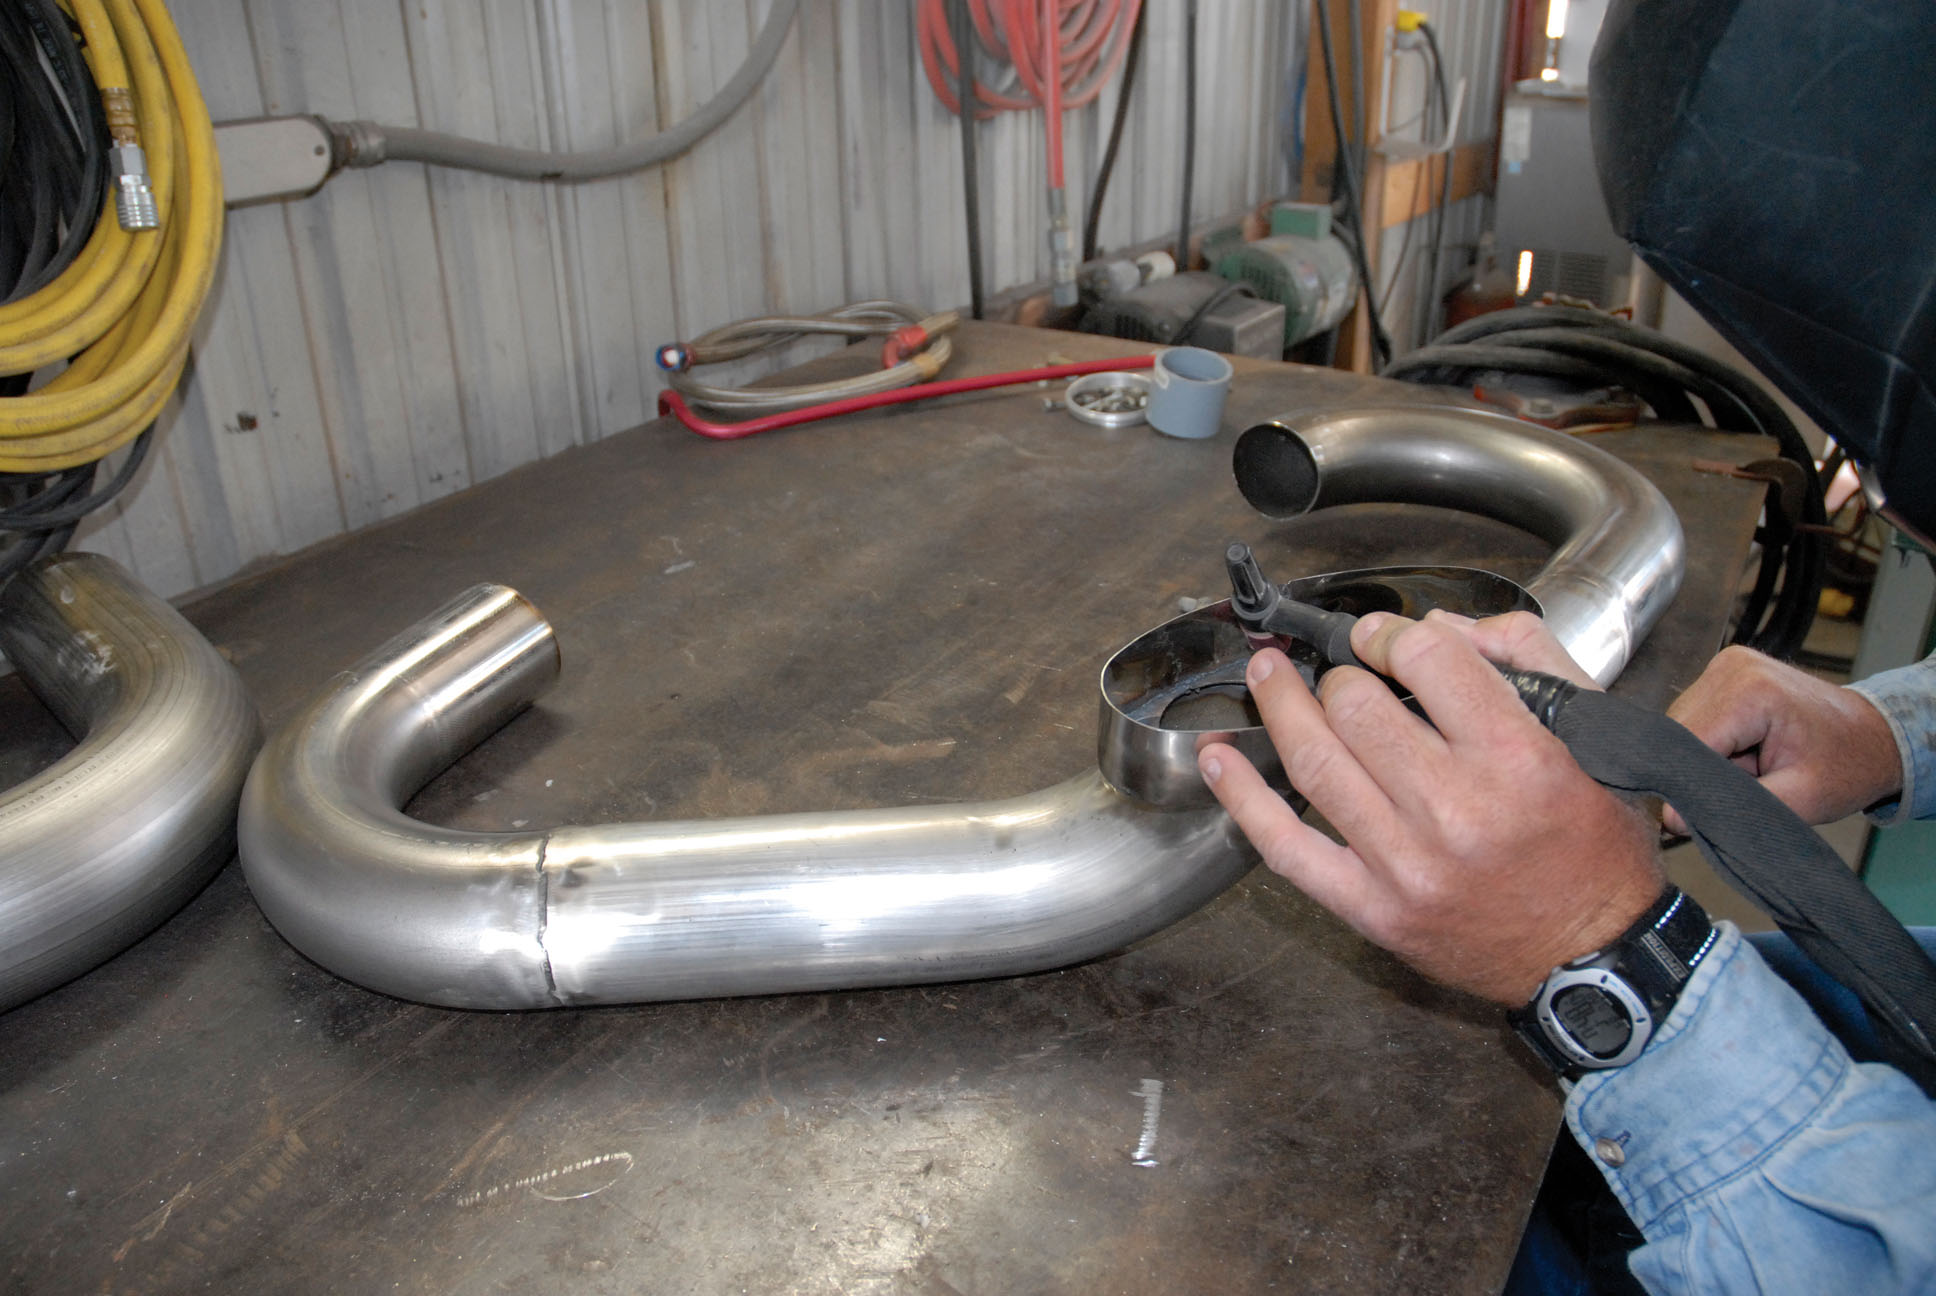
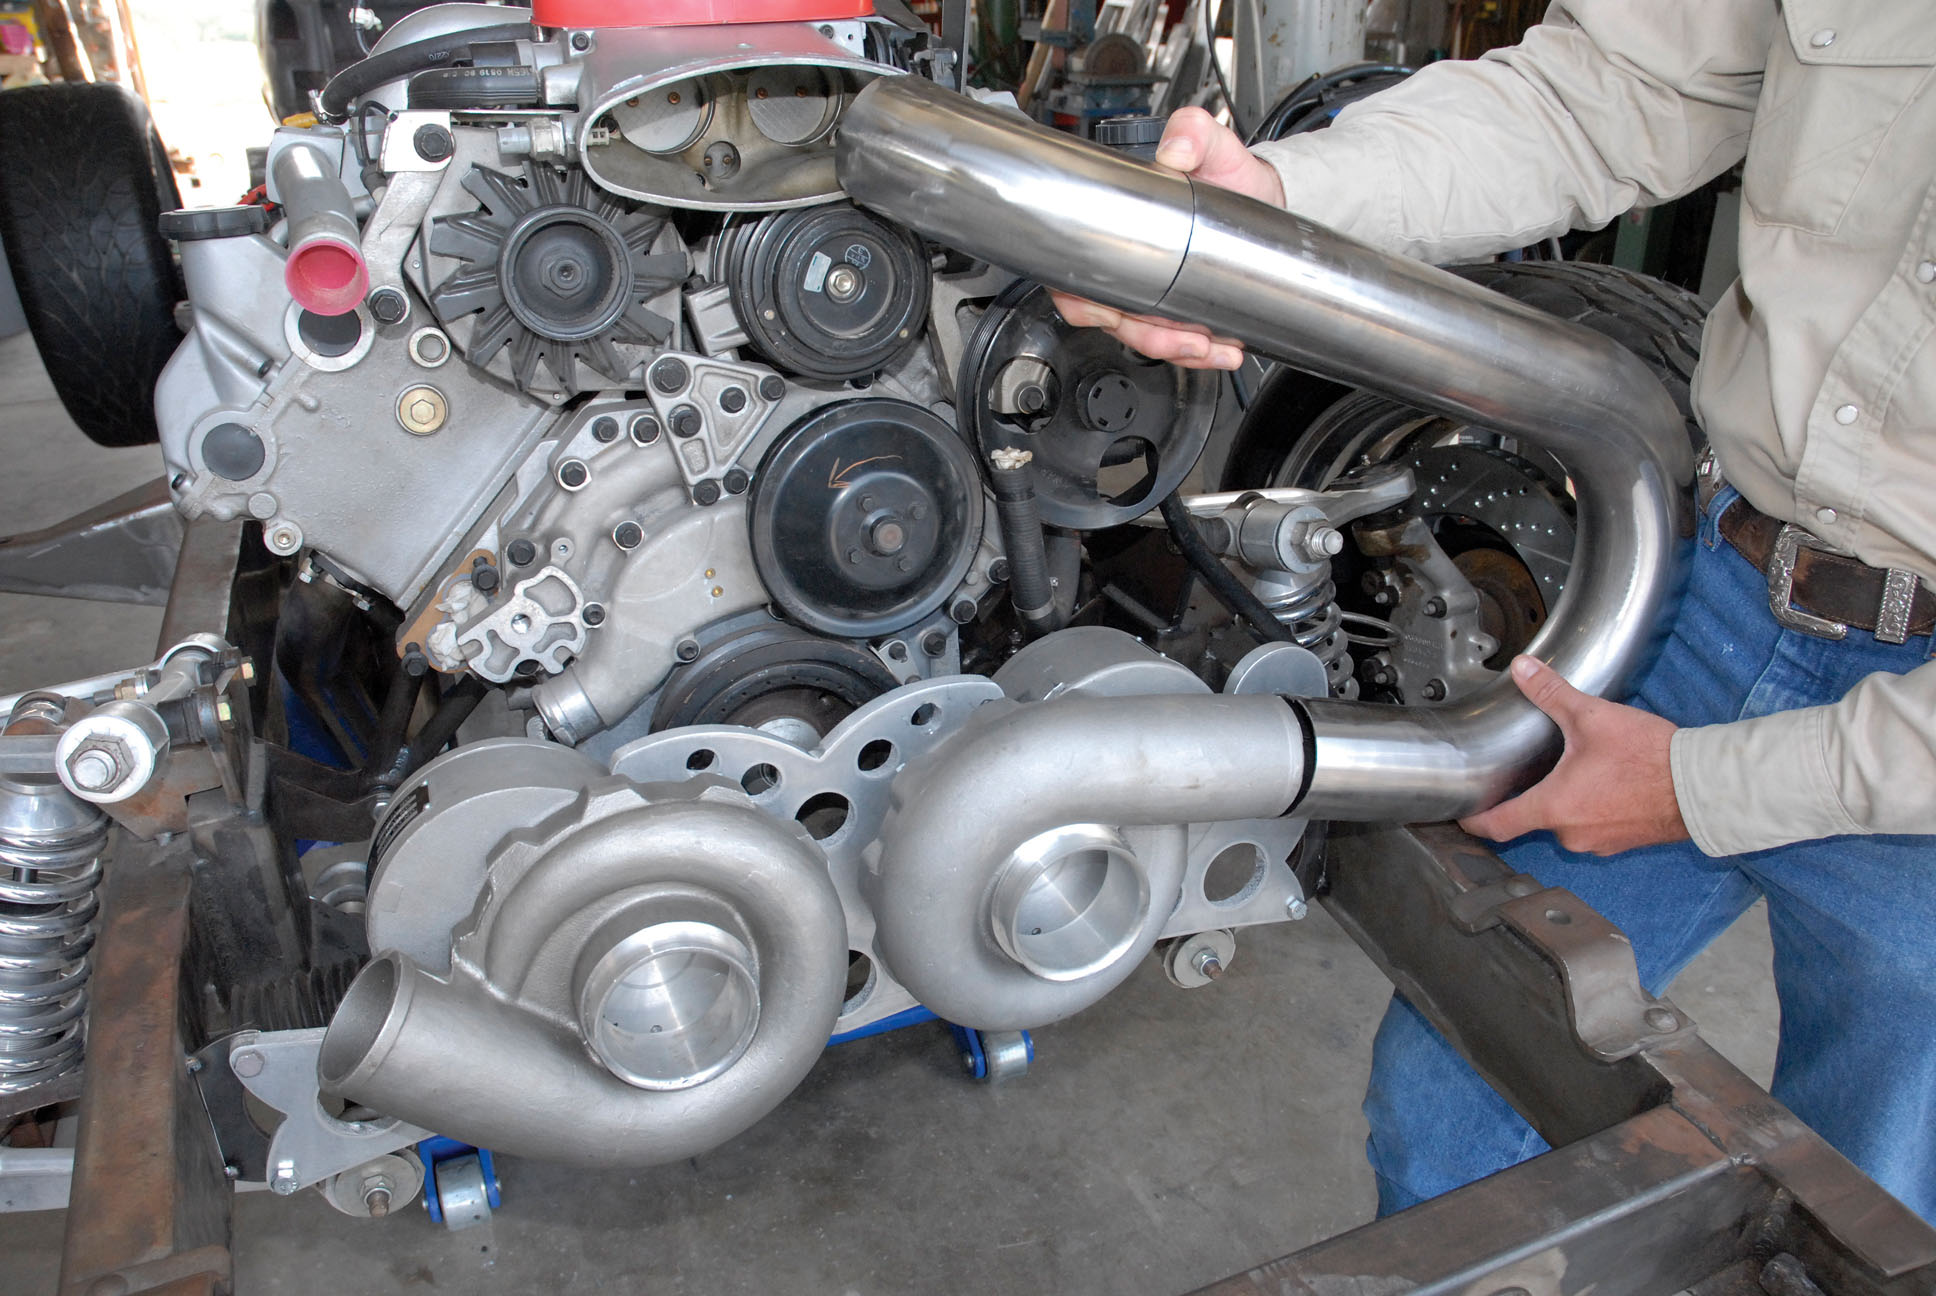
11-12. Prototyping the air discharge system comes next. Team Cimbanin used one of MagnaFlow’s universal (stainless steel) exhaust elbow kits containing a series of 45-, 60- and 90-degree elbows and U-bends.
11-12. Prototyping the air discharge system comes next. Team Cimbanin used one of MagnaFlow’s universal (stainless steel) exhaust elbow kits containing a series of 45-, 60- and 90-degree elbows and U-bends.
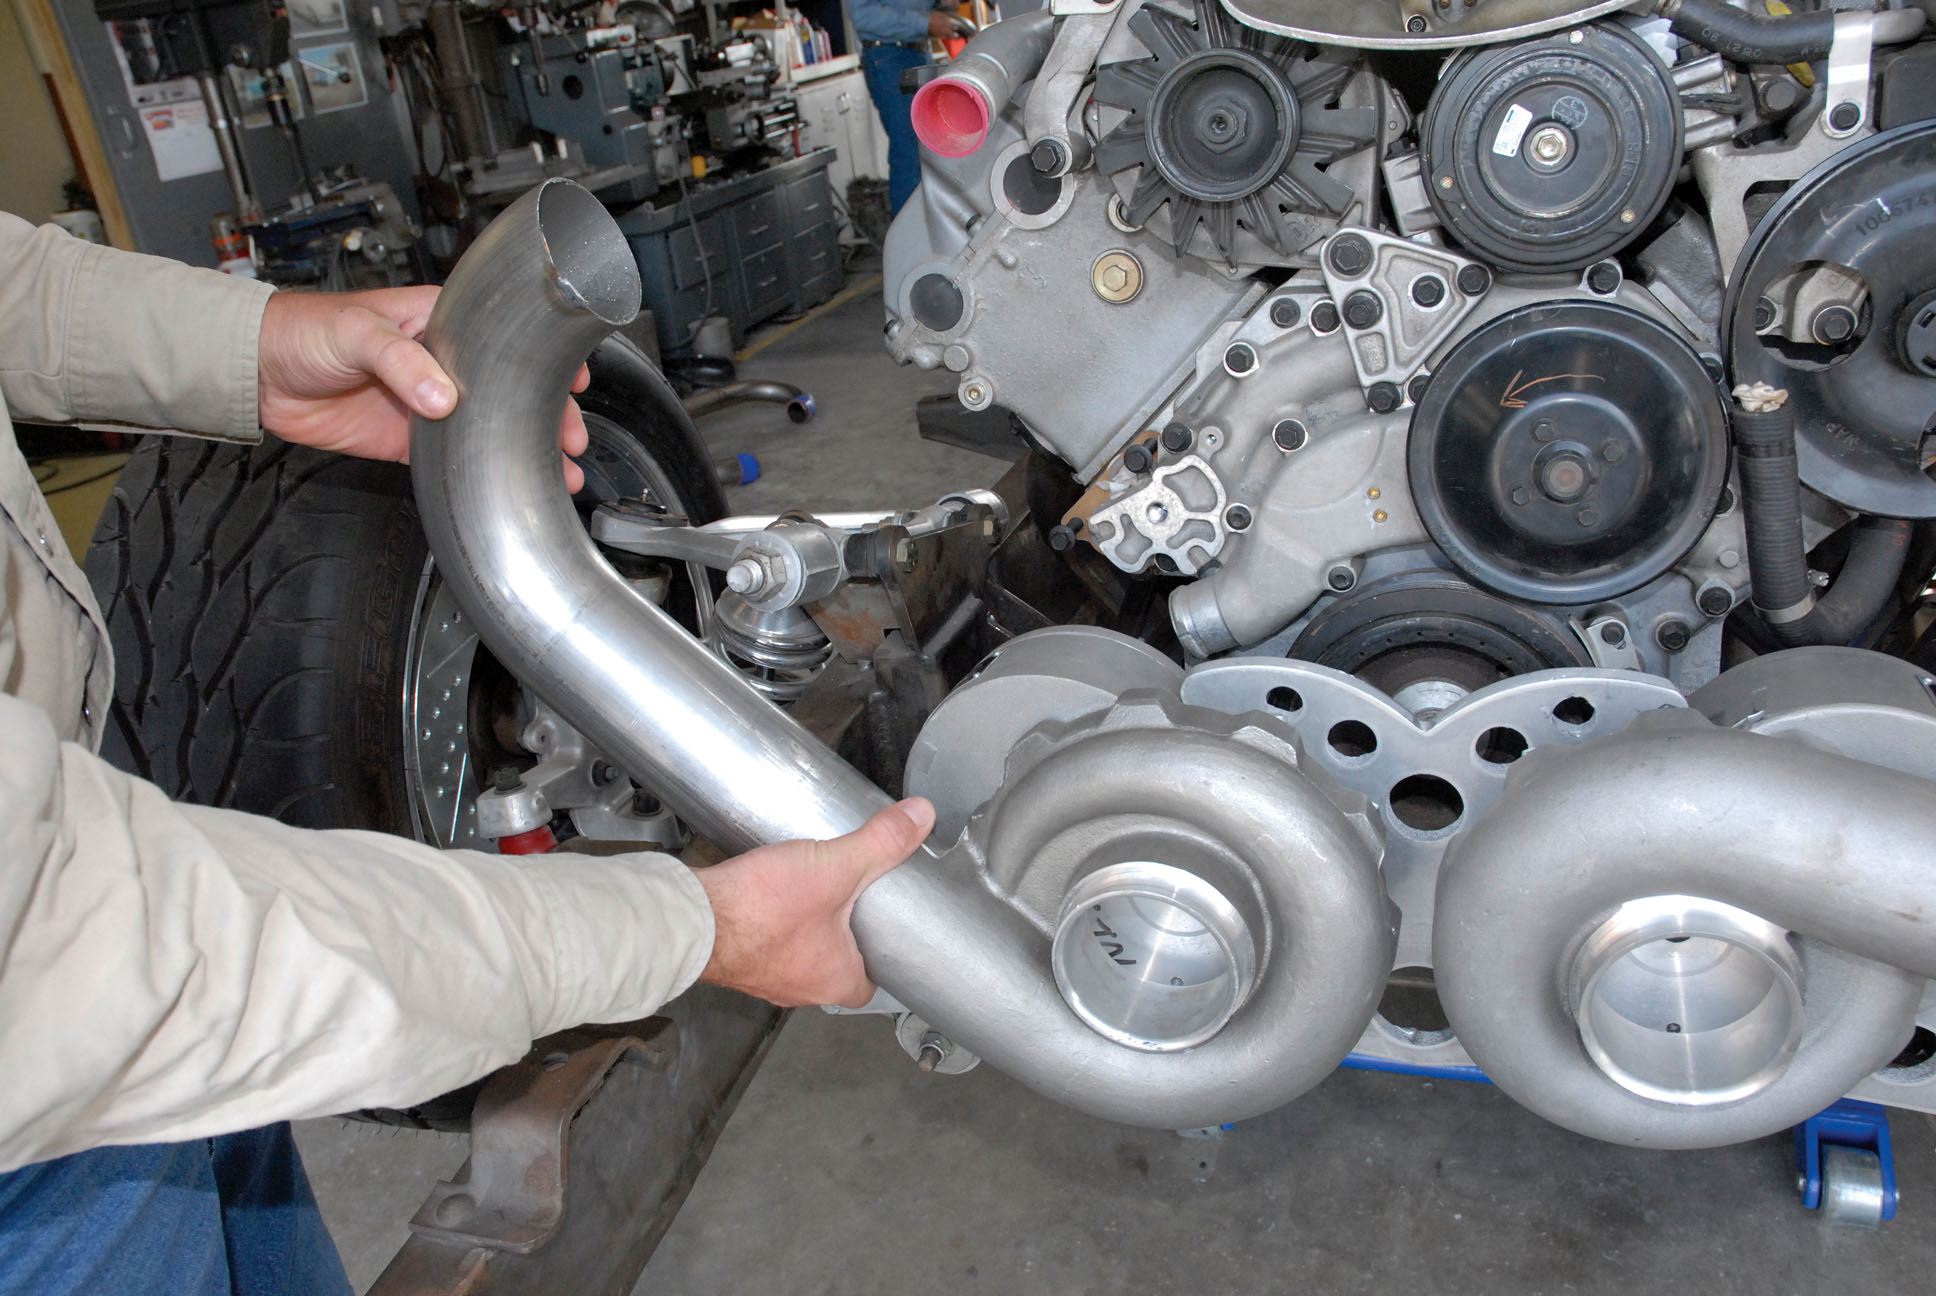
13-14. These air discharge tubes join up to a stainless steel oval or junction box at the throttle body, which was made from a piece of 1-1/2-inch stainless steel flat stock and MIG welded together.
13-14. These air discharge tubes join up to a stainless steel oval or junction box at the throttle body, which was made from a piece of 1-1/2-inch stainless steel flat stock and MIG welded together.
15-16. Both sides of the air discharge tubes are held in place using a pair of 2x3-inch neoprene hoses with corresponding stainless steel hose clamps.
15-16. Both sides of the air discharge tubes are held in place using a pair of 2x3-inch neoprene hoses with corresponding stainless steel hose clamps.
17-18. In order to achieve the requisite belt tension setting, it was necessary to relocate the serpentine belt tensioner form the driver’s side of the ZR1 engine to the driver’s side of the supercharger mounting bracket. This was accomplished by machining a 3x3x2-inch billet aluminum spacer.
17-18. In order to achieve the requisite belt tension setting, it was necessary to relocate the serpentine belt tensioner form the driver’s side of the ZR1 engine to the driver’s side of the supercharger mounting bracket. This was accomplished by machining a 3x3x2-inch billet aluminum spacer.
19-20. Both spacer and belt tensioner were mounted to the supercharger mounting bracket using a 1/2x3-inch fine-thread bolt.
19-20. Both spacer and belt tensioner were mounted to the supercharger mounting bracket using a 1/2x3-inch fine-thread bolt.
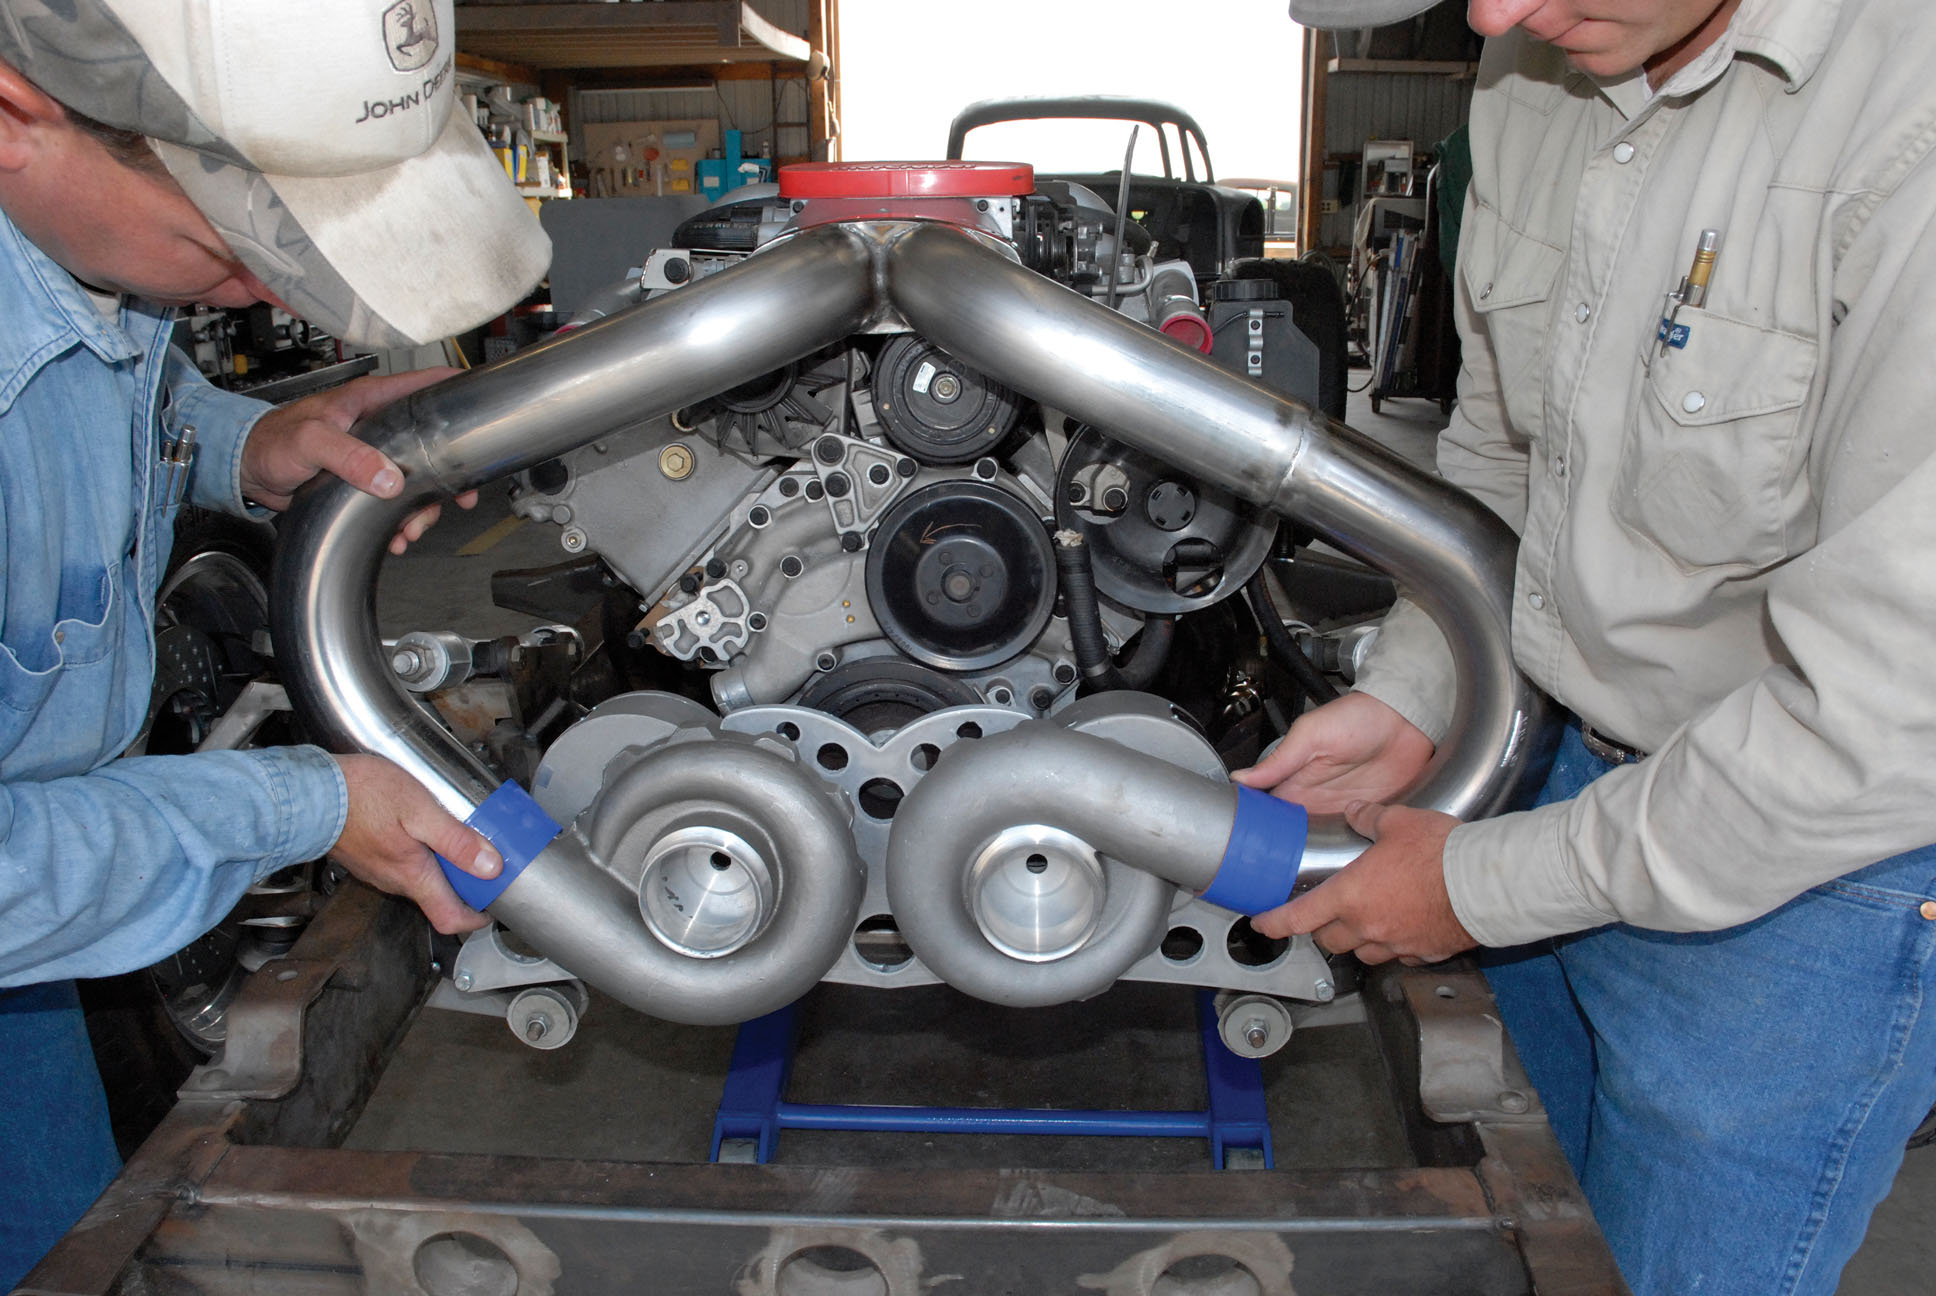
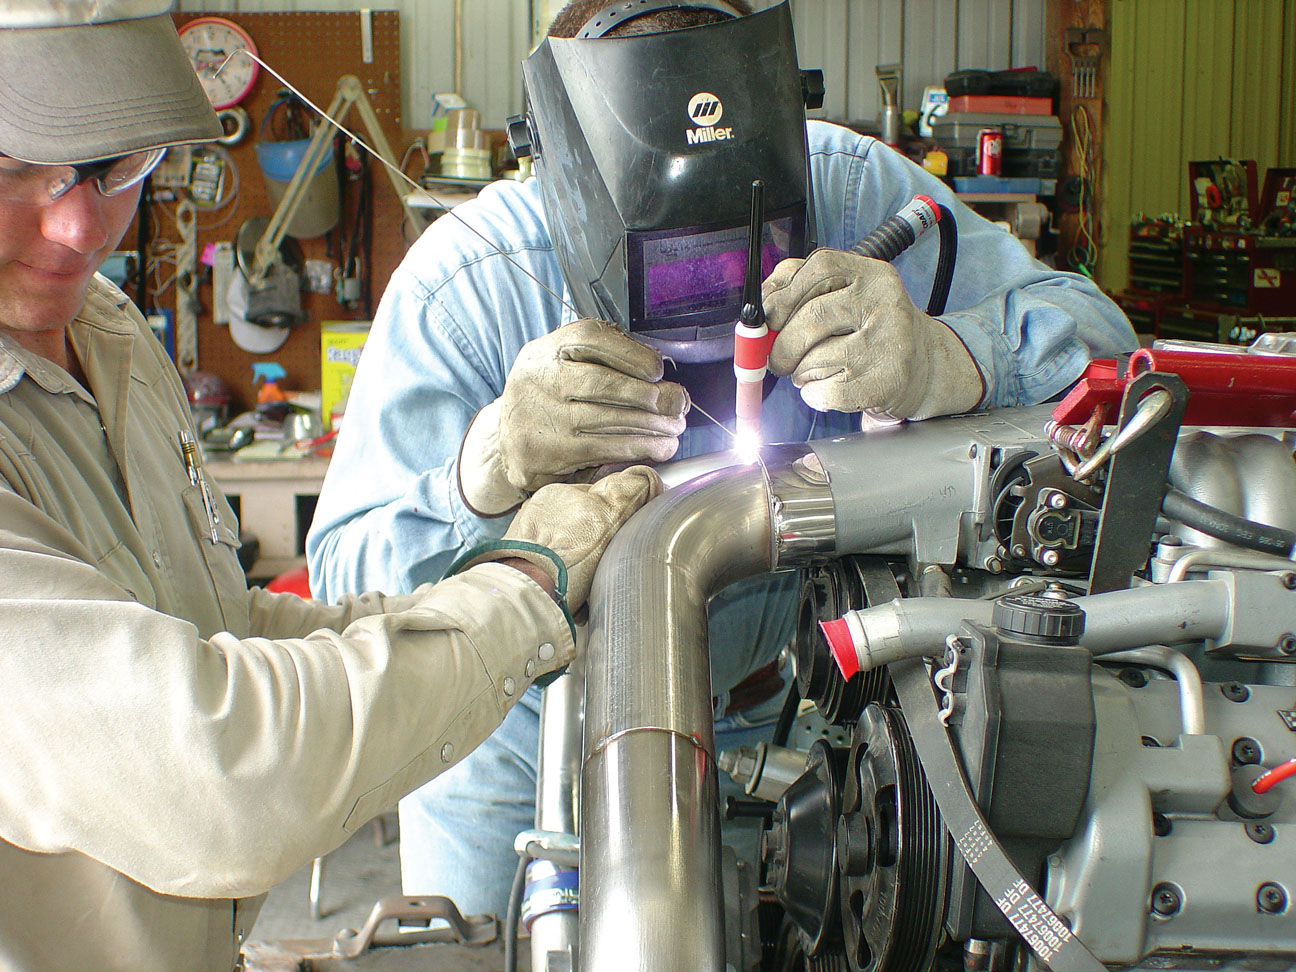
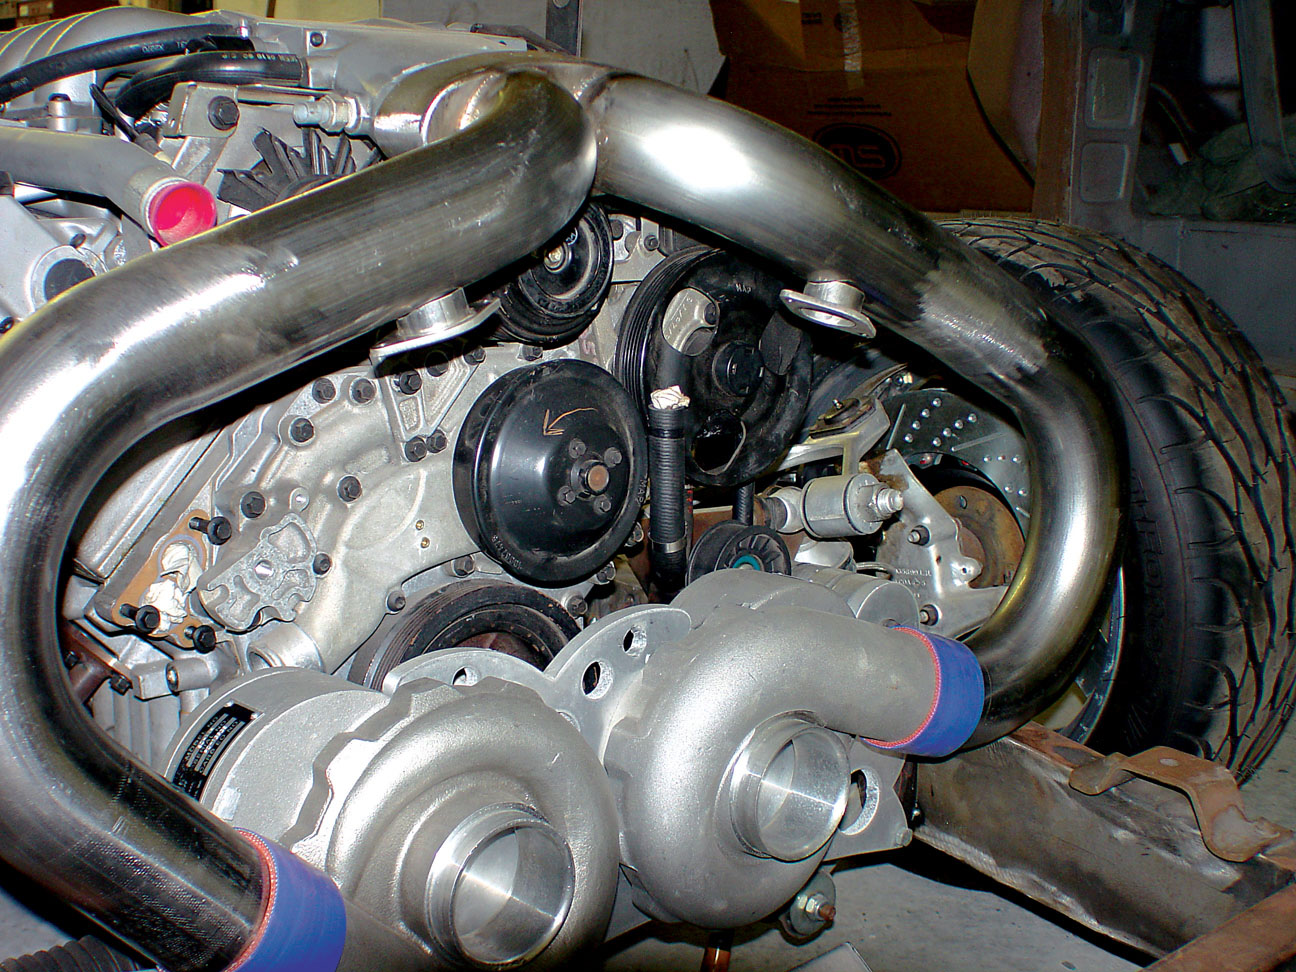
21-22. With MagnaFlow stainless air discharge tubes firmly in place our installers final weld the system together, and this is how it looks.
21-22. With MagnaFlow stainless air discharge tubes firmly in place our installers final weld the system together, and this is how it looks.
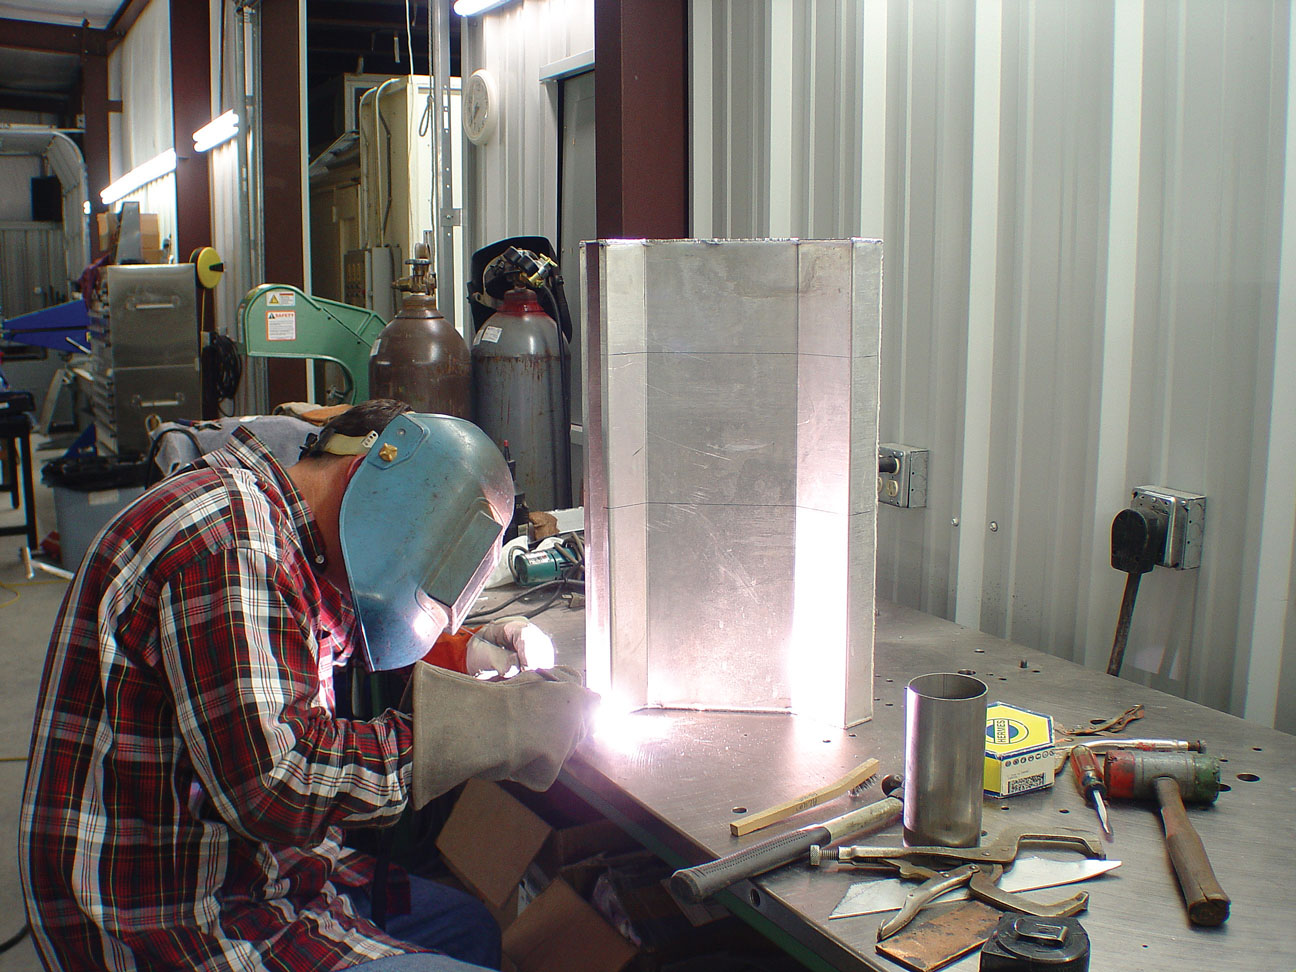
23. Next came the fabrication of the actual cold air intake. Cimtex Rods fabricator Darren Barker came up with a vacuum-cleaner-shaped cold air box, which measures 23 inches wide, 11-1/2 inches tall, 8-1/2 inches deep and 2 inches at the cold air intake.
24. This box was MIG welded together and features an opening door for servicing.
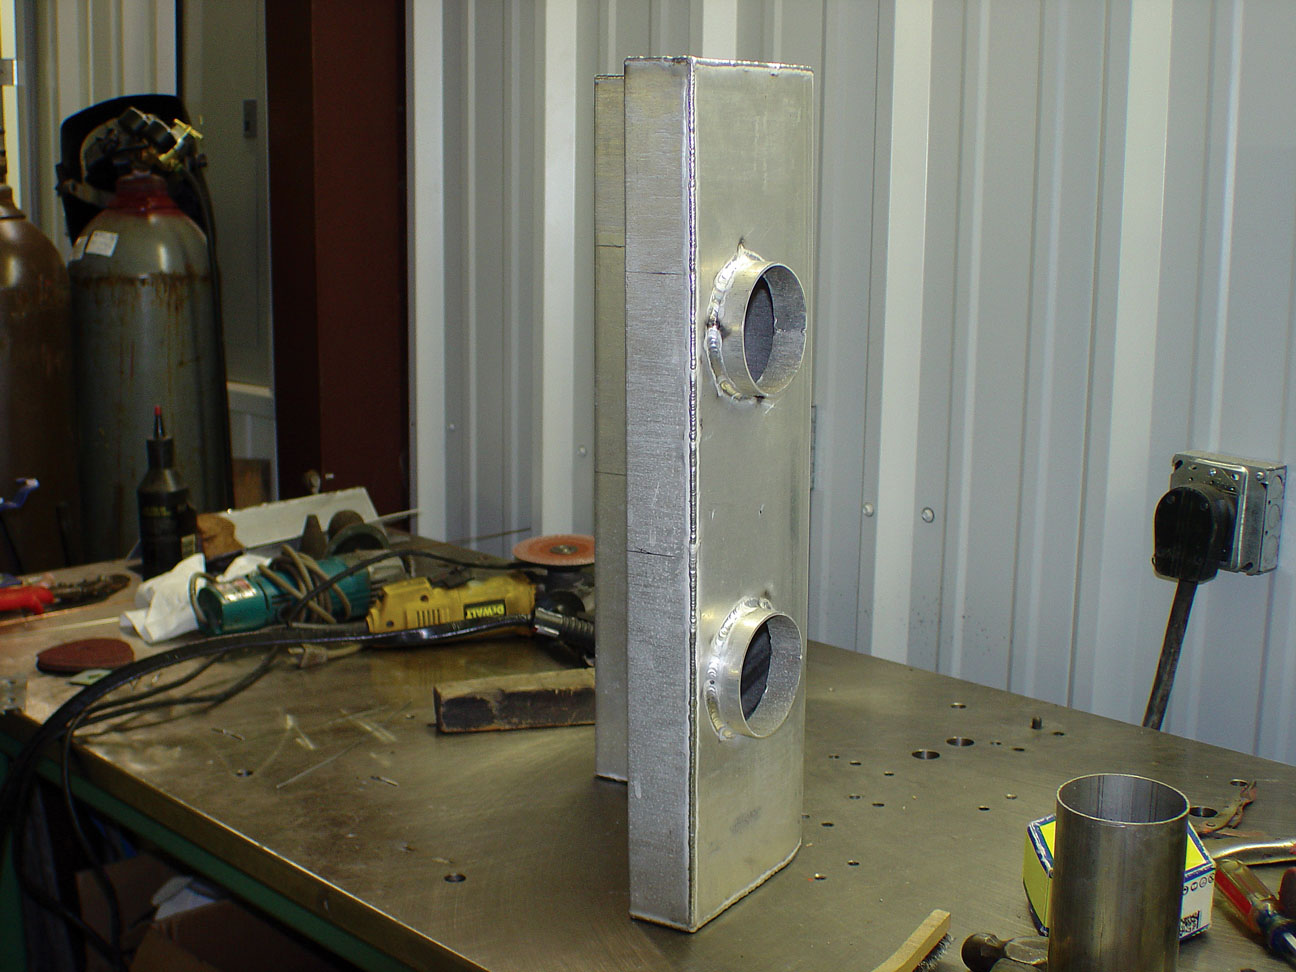
25. Shown are the 3-inch openings at the backside of the cold air intake, which will be attached to the Powerdyne BD-11A supercharger inlets by a pair of neoprene hose couplers.
26. This is how the finished box looks. Eventually it will be polished.
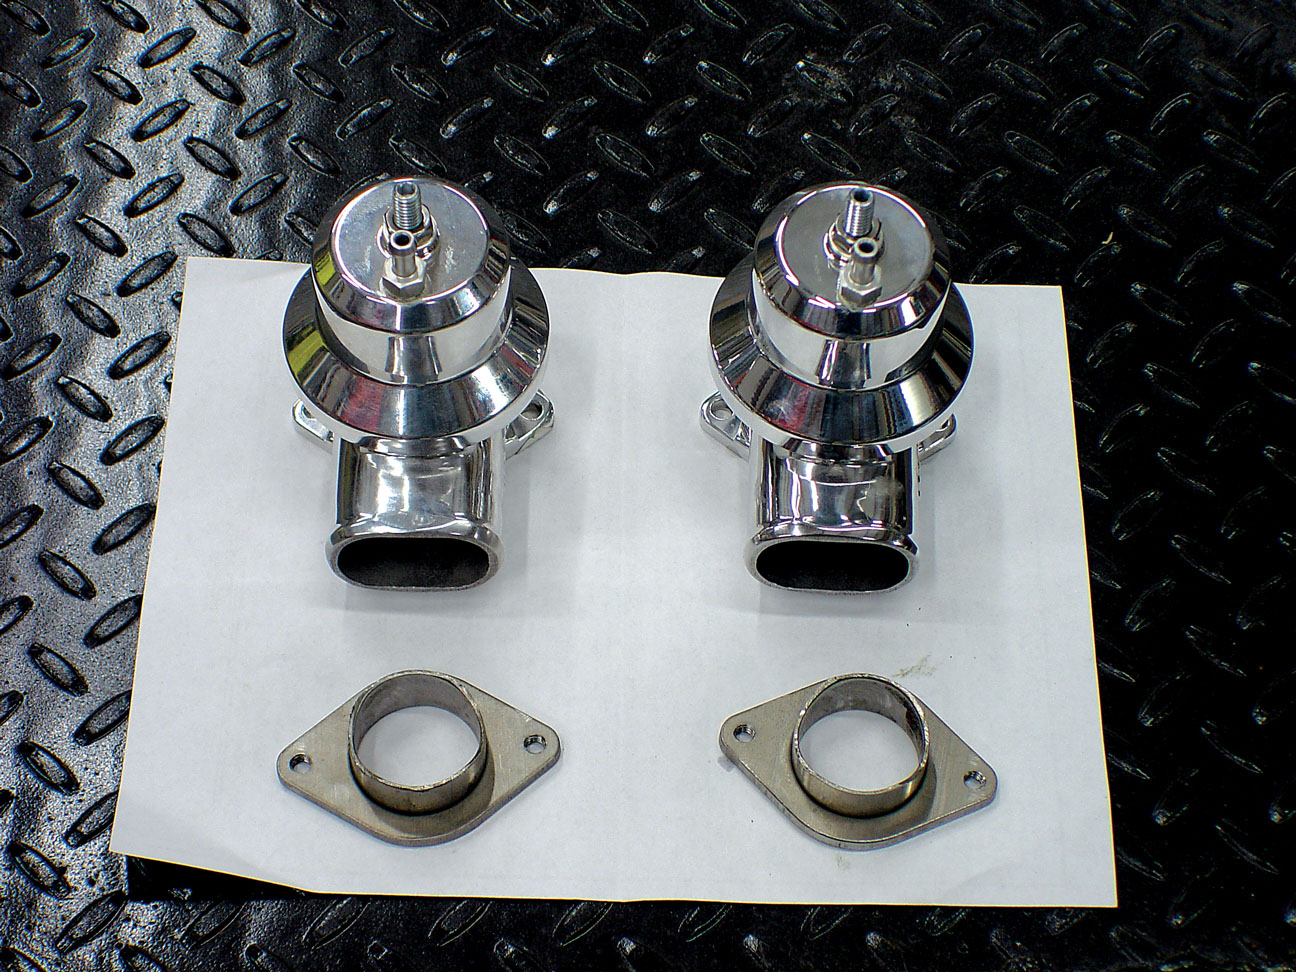
27. Shown are the twin Vortech polished aluminum bypass valves that will be installed into the system. These valves are set to operate at 10-11 inches of vacuum.
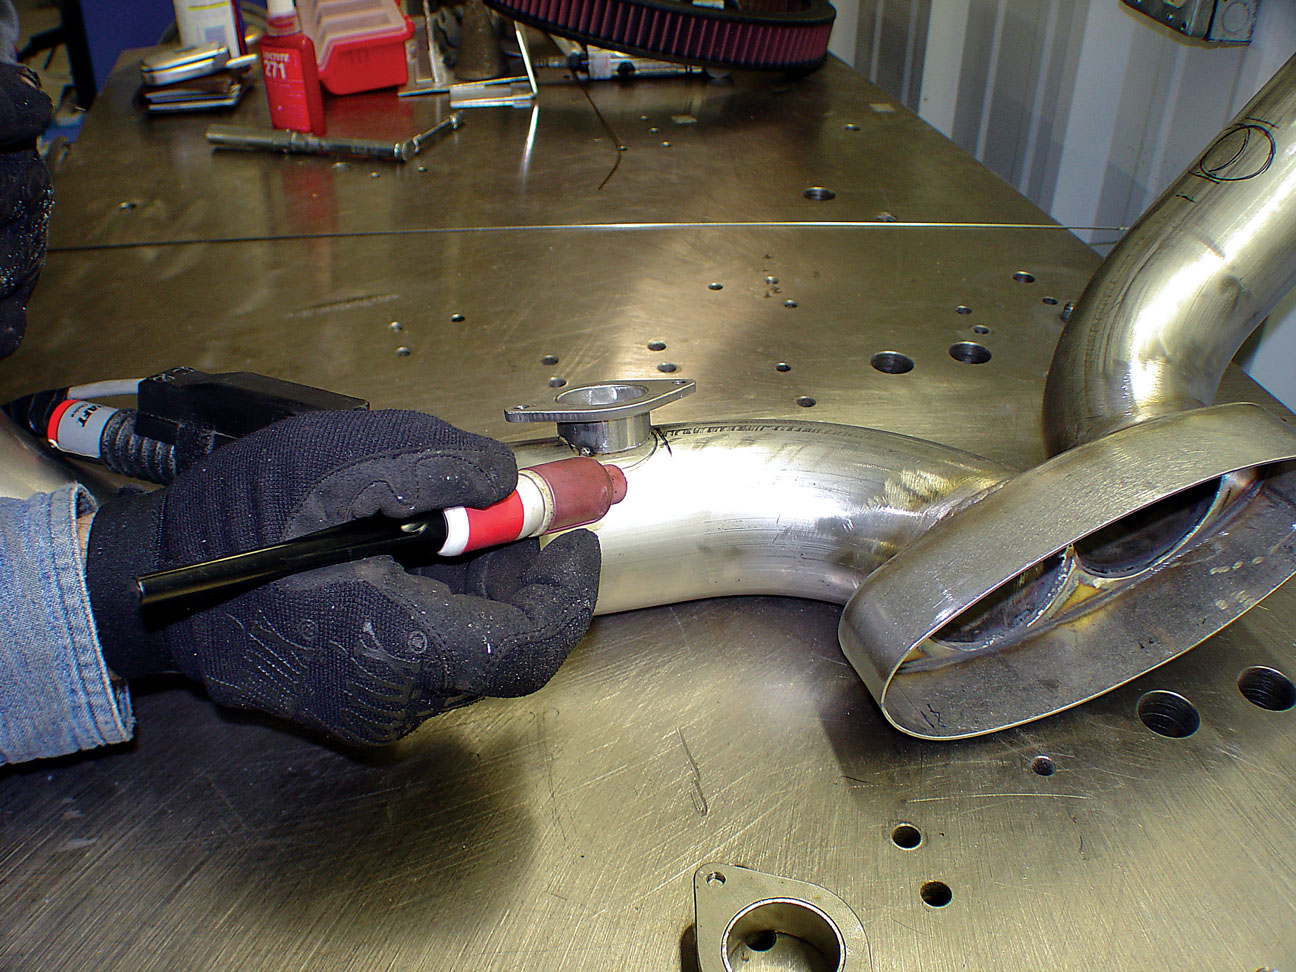
28-29. Barker welds up the bypass valve stainless steel mounting flanges to each side of the supercharger air discharge tubes at a 45-degree angle.
28-29. Barker welds up the bypass valve stainless steel mounting flanges to each side of the supercharger air discharge tubes at a 45-degree angle.
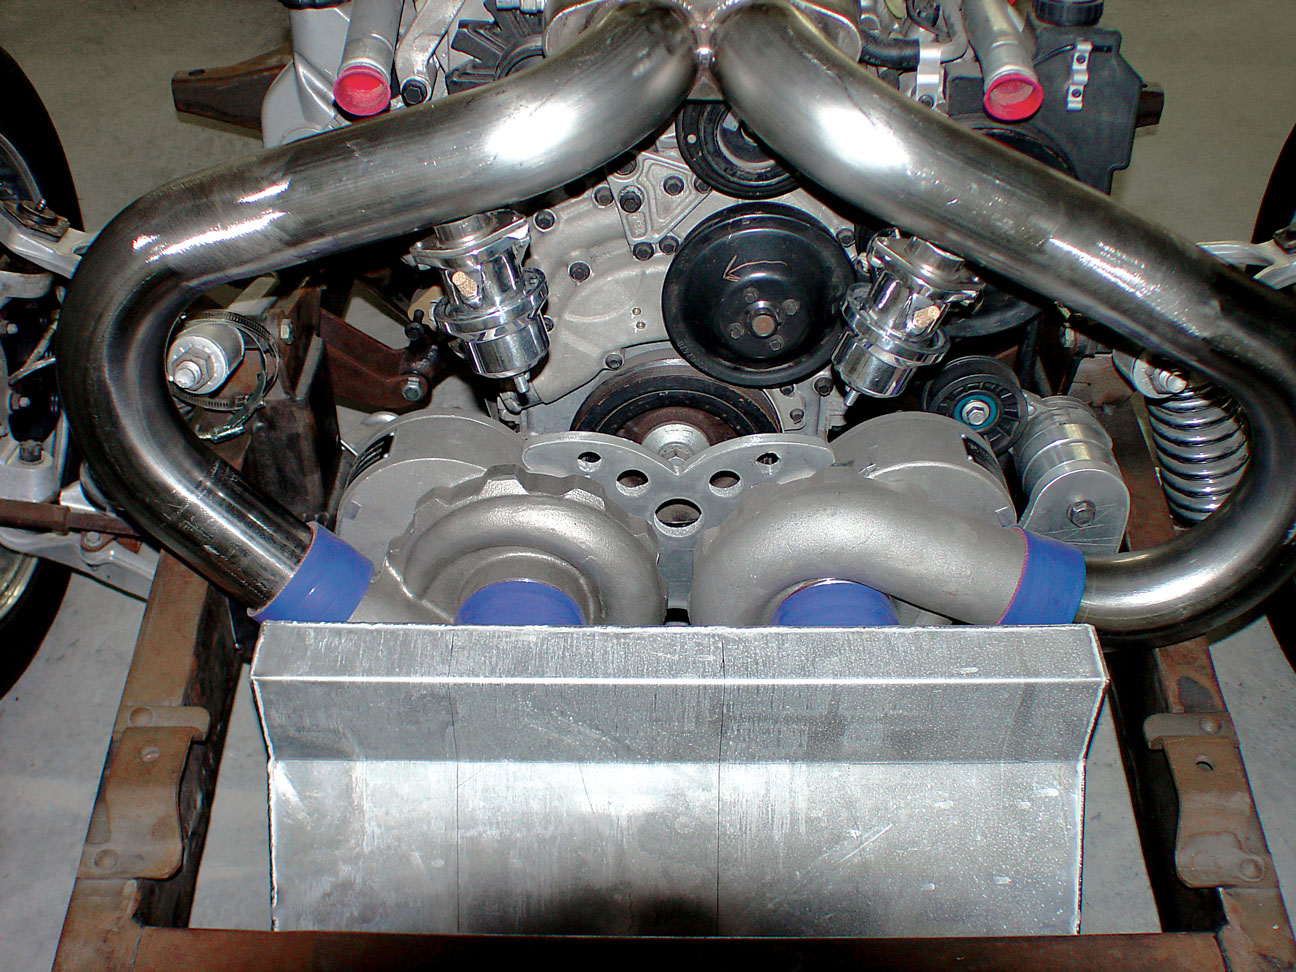
30. This is what the completed system looks like!
ARTICLE SOURCES
Cimtex Rods
P.O. Box 205
Jarrell, TX 76537
512/746-2707

MagnaFlow
22961 Arroyo Vista
Rancho Santa Marguerite, CA 92688
800/824-8664
Powerdyne Inc.
9145 Deering Ave.
Chatsworth, CA 97355
818/773-9735
