
THE AUTO BUILDER
Featured

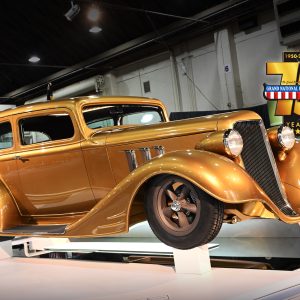
Masterclass in Metal: The Battle for the Al Slonaker Memorial Award
The 75th annual O’Reilly Auto Parts Grand National Roadster Show, presented by Meguiar’s, went full throttle this year, bringing out some of the most insane custom cars the hot rod world has ever seen. Sure, the AMBR award gets all the press, but the real hardcore builders know that the Al Slonaker Memorial Award is where true engineering battles happen. This isn’t just about looking pretty—this is about pushing the limits of fabrication, design, and flat-out mechanical genius.

Our SEMA 2025 Hot List
SEMA always delivers sensory overload — the unveilings, the crowds, the horsepower echoing off every hall. But this year, the real thrill came from the unexpected. Tucked between the headline builds and mega displays were the parts that made us slow down, lean in, and say, “Okay… now that’s something special.”

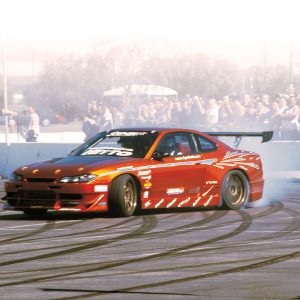
FALKEN TIRE DRIFT SHOWOFF
THE FALKEN Tire Drift Showoff was a hit, to say the least. The event was held at Irwindale Motor Speedway on a beautiful, sunny afternoon. Thousands of people attended, which goes to show the outstanding marketing job that Falken Tire is doing to help make a difference in the tuner car movement. The company took it upon itself to give us a taste of what the Japanese market has been enjoying for so many years. Among the thousands of spectators, a healthy number of show cars showed up as well—and why wouldn’t they? This was an Import Showoff event, but this car show was a bit different from the norm. It was a JDM versus DTM show. In other words, Japanese against Euro. The cars that came out were very hot, with enough JDM and DTM on hand to kill you. All the heavy hitters and the big crews such as Team Hybrid, Flux, Tuningwerks Competition and Art-N-Motion came out to show their stuff. While this was a huge attraction, it was far from the main one.
Spotlighter
POPULAR READS
-
Product Spotlight: Bill Mitchell Products Aluminum LS Engine Block
-
PRODUCT SPOTLIGHT: 60-66 Chevy C10 Fresh Air Vent Block Off Plate
-
Product Spotlight: Pyramid Optimized Design Sequential Aurora Taillight for 1964½–1966 Mustang
-
PRODUCT SPOTLIGHT: Cam Covers for GEN/3 Coyote from Pyramid Optimized Design
Right Rod
Installing a Chevy Engine and a Four-Speed Transmission in a Rat Rod Chassis
Author
Jeff Tann
Words & Photography
Building a Safe and Reliable ’28 Sedan Rat Rod
When Amadeus Ramirez-Reynolds started building this ’28 sedan rat rod, he wanted it to look cool, but he also wanted it to be safe and dependable. Amadeus has seen other rat rods broken down on the side of the road, and that’s certainly not the kind he wanted. Amadeus decided to use old parts where he could get away with them, such as on the front suspension. All of the parts he used were in good condition and rebuilt so that they would be reliable. The rear suspension was also done in an old style, but he upgraded the differential to a Ford 9-inch that would be reliable and able to handle plenty of horsepower. Before the rearend was installed it was totally rebuilt, and that also adds reliability to his rod.
Choosing a Chassis and Engine for Reliability
Amadeus decided that it would be cost effective to purchase a new chassis for the rod, because by the time he started with a stock Model A chassis and fixed all of the problems it would cost more money than buying a nice unit from Last Refuge Hot Rods. Amadeus could have used any number of old V-8 engines, but again, for reliability he selected a 350 Chevy engine and totally rebuilt it with a 0.030-inch overbore and a 400 crank, giving the engine 383 cubic inches. The engine also has fuel injection heads and a high-performance cam, and it made more than 400 horsepower on the dyno. The engine is going to be hooked to a Muncie four-speed transmission, and that gives you a good idea of why he selected a strong 9-inch Ford rearend. The Last Refuge Hot Rods chassis didn’t come with engine mounts, so it was up to Amadeus to install them himself. Amadeus contacted Chassis Engineering and ordered a set of engine mounts. The transmission mount will be engineered after the front mounts are installed.
Installing a High-Performance Chevy Engine
The engine installation wasn’t difficult to accomplish, but it did require some special tools such as a MIG welder, a plasma cutter, a 3-inch angle sander, an engine hoist and a 3-inch cutoff wheel. A variety of regular hand tools was also required. When this engine was installed, it was done so that the standard fan could be used, so we will show you how Amadeus installed this powerful Chevy engine.


